Copyright G5Theme 2016

Mowasalat - logisitics & transportation

Wordpress Version

Thank you for purchasing our theme. If you have any questions that are beyond the scope of this documentation, please feel free to contact us via email. Thanks so much!

Files Included

  • The theme zip file mowasalat.zip (included Visual Composer and Revolution Slider plugins)
  • Child theme for easier customize in mowasalat-child.zip
  • Document for using Mowasalat in Documentation.zip
  • Link download psd Mowasalat in psd-include.txt

Structure look like:

dashboard

Code navigation

Mowasalat includes 8 other folders. Please see explanation below for more details:

  • assets: Store less, js, resource default and another plugin for theme. Besides include file for demo data.
  • core: This folder store core file to add action for header, footer, woocommerce, function breadcrumb, filter for search.
  • inc: Store all functions.
  • languages: Store .pot for translate to another language.
  • templates:Store templates for header, footer, archive, comments, breadcrumb.
  • theme-plugins: Store plugins that use on theme.
  • vc-templates: Store template that override visual composer plugin.
  • woocommerce: Store template that override for woocommerce plugin.

System Requires

To use Mowasalat, you must be running WordPress 3.9 or higher, PHP5.4 or higher, and MySQL 5 or higher. We have tested it with Mac, Windows and Linux. Below is a list of items you should ensure your host can comply with.

Recommended PHP Configuration Limits

Many issues that you may run into such as: white screen, demo content fails when importing, empty page content and other similar issues are all related to low PHP configuration limits. The solution is to increase the PHP limits. You can do this on your own, or contact your web host and ask them to increase those limits to a minimum as follows:

  • max_input_vars = 3000
  • memory_limit = 128M
  • max_execution_time = 300
  • max_input_time = 300
  • upload_max_filesize = 64M
  • post_max_size = 64M

Download Mowasalat Theme

Get the Mowasalat Theme installation package from your account(after login on Themeforest.net) at downloads page and save it to your computer.

dashboard

Install Mowasalat Theme

Installation via Wordpress

Video guide on How to install Mowasalat via WordPress

Step 1 - Login to your Wordpress Dashboard

Step 2 - Go to Appearance -> Themes. Click the Add New button or Add new theme link. (check screenshot below)

Step 3 - Click on the Upload Theme button. Locate "mowasalat.zip" and click Install Now.

Step 4 - Click on the Activate button to activate Mowasalat. Congratulations, you have now activated Mowasalat! You can now proceed with Mowasalat's Plugin Installation.

dashboard

install

install

install

Installation via FTP

Step 1 - Log into your Hosting server using an FTP client (like FileZilla or WinSCP).

Step 2 - Locate "mowasalat.zip" that you found in your ThemeForest Package and unzip it somewhere on your hard drive. Once it is unzipped it will look like a folder named Mowasalat with all theme files in it.

Step 3 - Locate your Wordpress installation and upload the theme directory Mowasalat (you unzipped in the previous step) into ../wp-content/themes/ in your Wordpress installation.

Step 4 - Click on the Activate button to activate Mowasalat. Congratulations! You activated Mowasalat completely! Now you can proceed Mowasalat's Plugin Installation.

Install Mowasalat Required Plugins

All plugins required have been zipped already into your download package, so you only need to click on the Begin installing plugins.

You should be navigated to the Install Required Plugin page, which shows a plugin list similar to this:

install plugins

Next, Click on the checkbox beside "Plugin" label to select all plugins in the list.

install check list

Then choose "Install" from the drop-down list at the top and then click "Apply".

install action

The installing process status will be shown in your browser. It may takes a few minutes, so please be patient. After sucessfull, your screen could be as below

install plugins

When the notice "All installations have been completed" appears, click on the "Return to Required Plugins Installer" link to turn back to the plugin list.

install plugins

Next, click on the box beside the Plugin label again to select all plugins and choose Activate this time as image below.

active all required plugins

One Click Install Demo

With Mowasalat, you can build a fully functional website just by clicking a button to install our Settings Demo/Demo Data or click 5.2.1 Create A New Page to step by step. Your Mowasalat installation will be set up with what we have on our demo website, and you can use it as a template to develop your own website.

Video guide on How to install demo data on Mowasalat

Go to Appearance >> Install Demo

Import Demo Content in One Click

Then choose option button to install demo as you want:

Import Demo Content in One Click02

Import Demo Content in One Click02

The progressing would be displayed on import status bars so you will know when it is finished and your data is ready.

Import Status Bars

DONE. Now, you can visit your website to view demo.

Creat a new page

You can create countless pages with content. Our theme includes several page templates to choose from, and all you need to do is to choose the page template that suits your needs. All of them have been done in the pages section of your WordPress admin.

If you DID NOT One Click Install Demo, you will need to MANUALLY CREATE your Home and other pages. Here’s how to build it:

Video guide on How to create page using Visual Composer

Step 1 – Navigate to Pages in your admin sidebar and click Add New option.

Step 2 – Input a new name for your page, and click "BACKEND EDITOR"(make sure that you have already installed Visual Composer plugins).

Step 2.1 – In case that you don't click "BACKEND EDITOR": only input content to area 3 then go to Step 3

Step 2.2 – Click "BACKEND EDITOR": your screen could be like this

Step 3 – Input new content for your page.

Step 4 – Set your Parent page. It’s usually set to No Parent.

Step 5 – Choose settings for this page.

Step 6 – Customize Page Title

Step 7 – Customize Page Title Backgroud

Next, you can publish this page and set it as your frontpage (8.1. Settings a static page as Home) in the Wordpress Settings panel.

Building Hompage

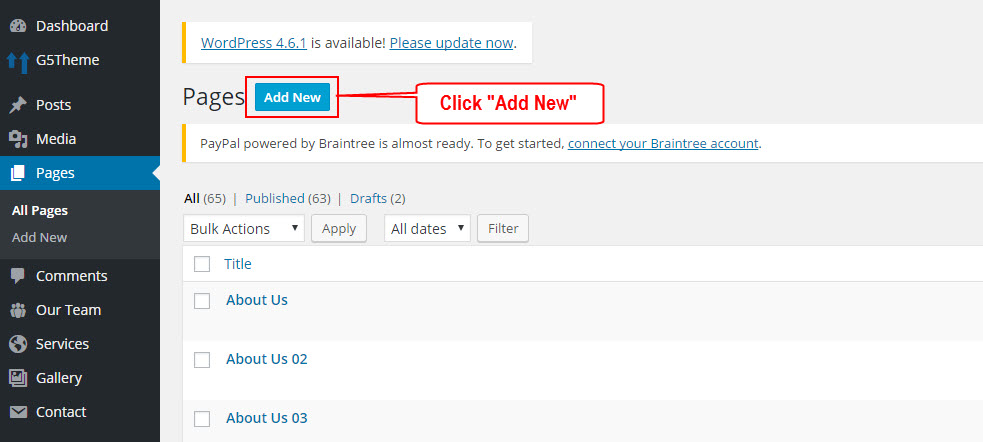
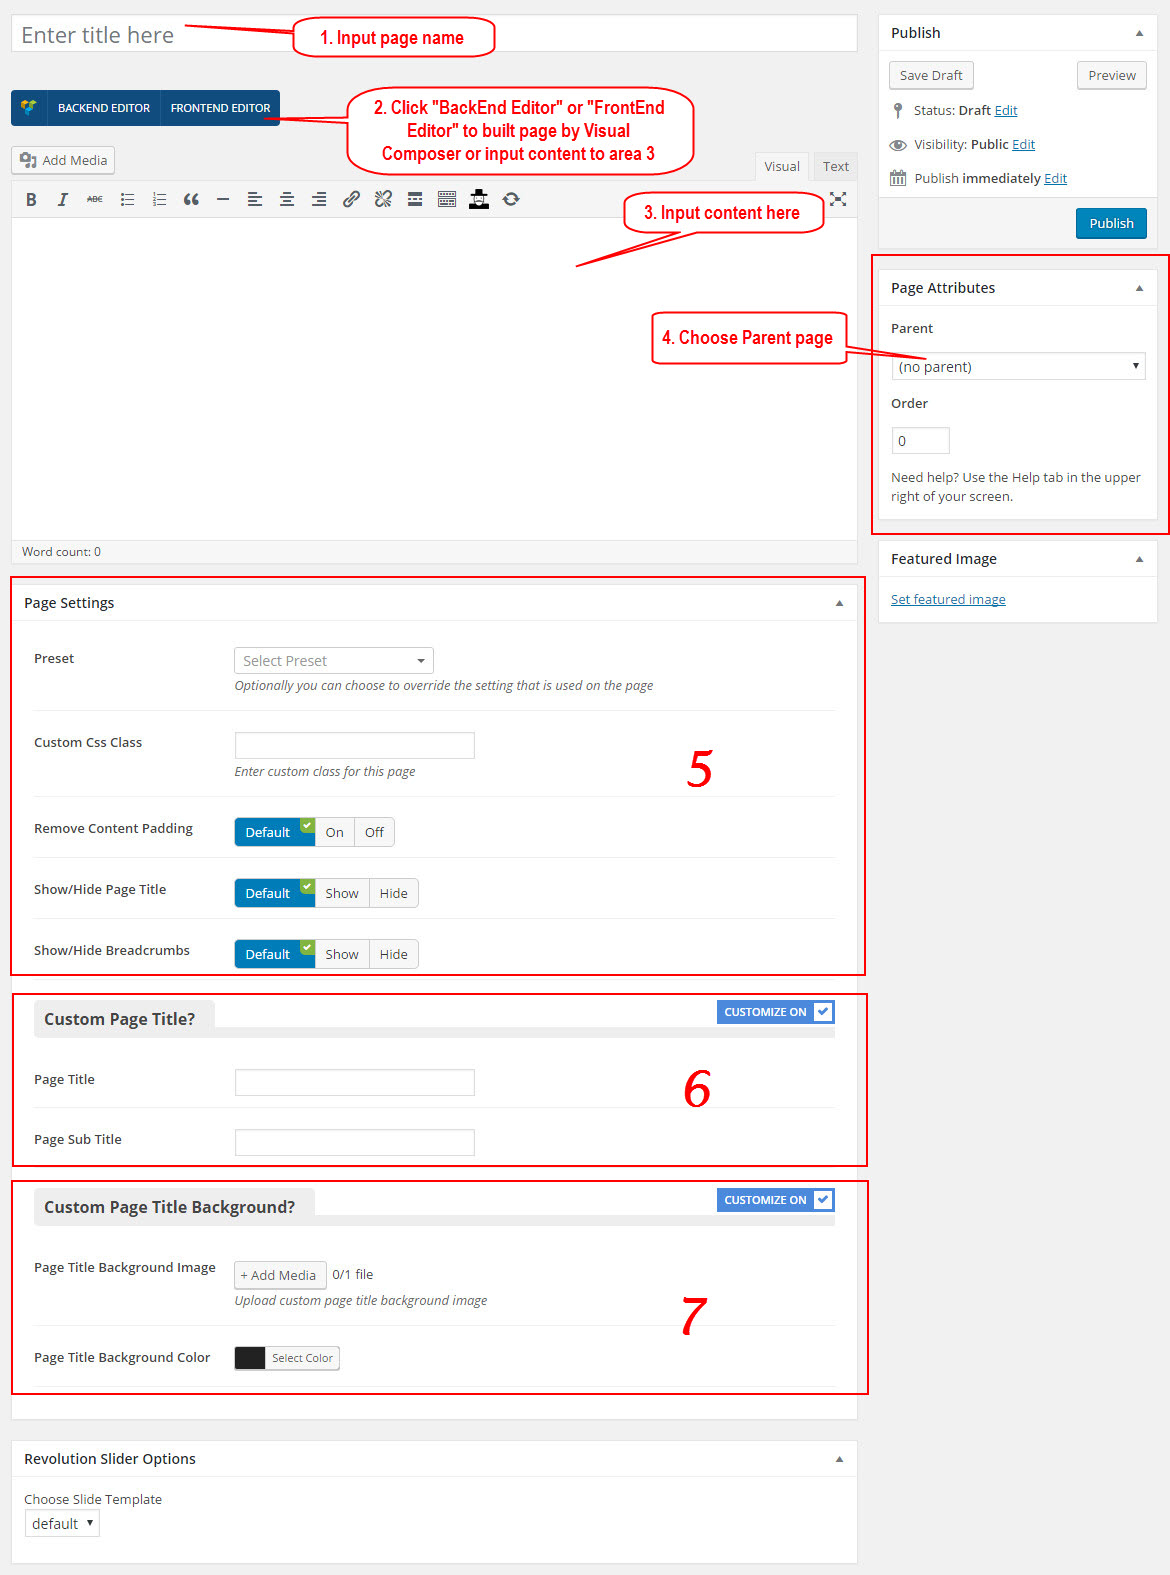
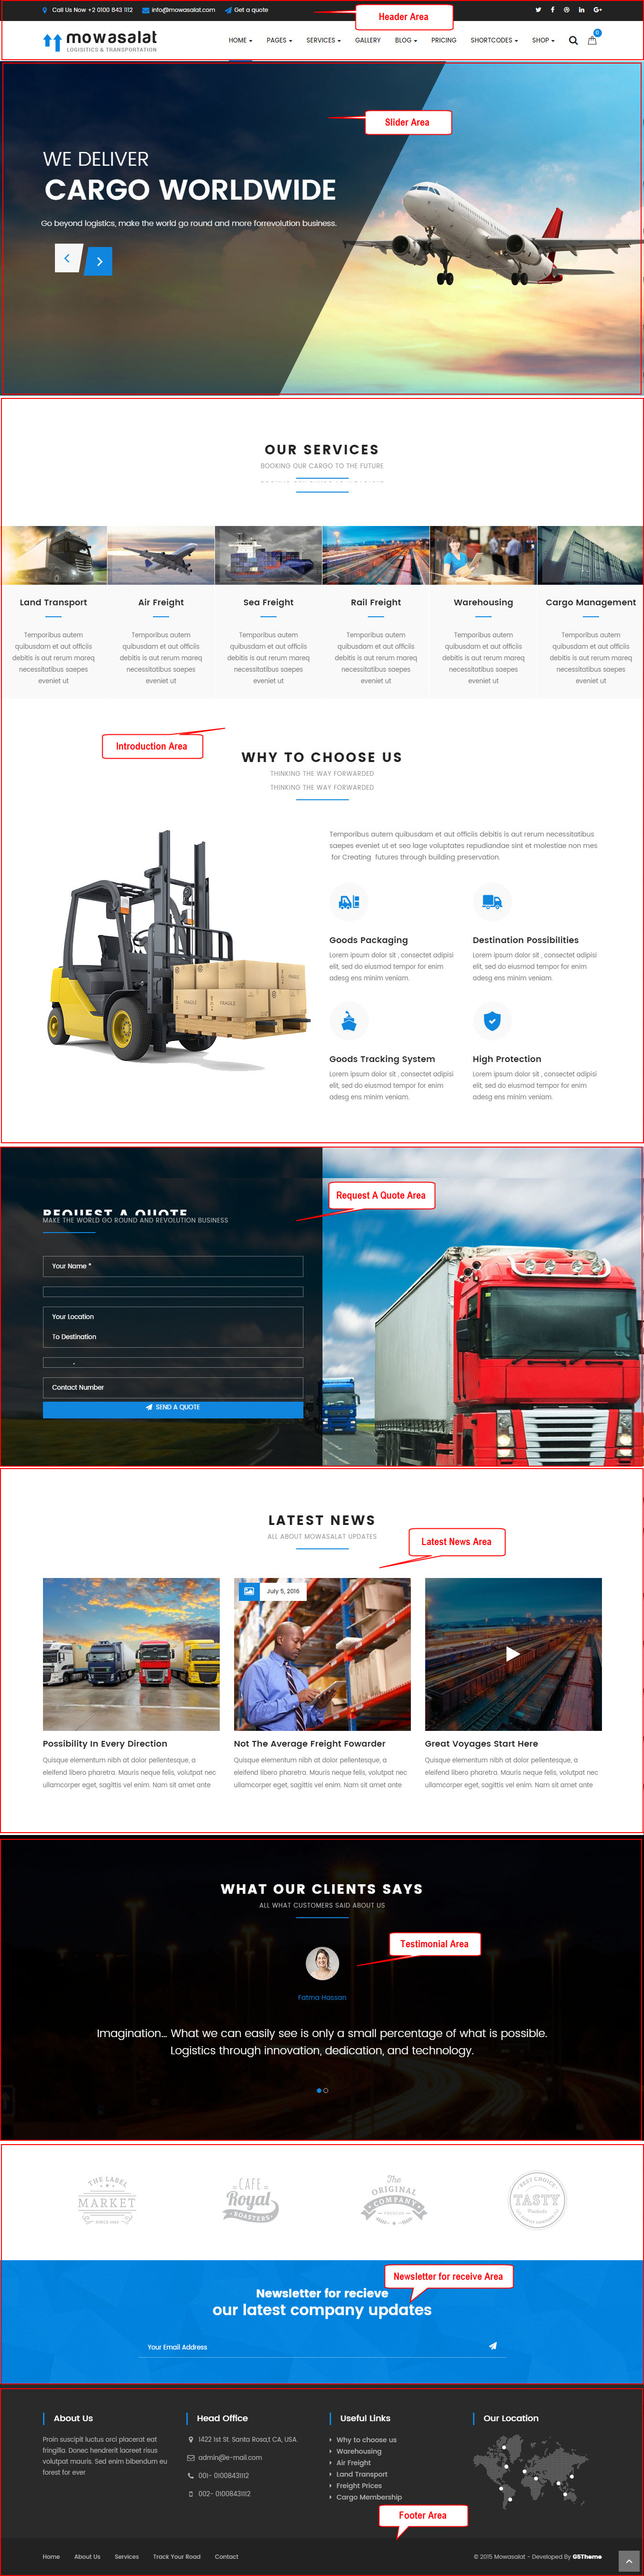
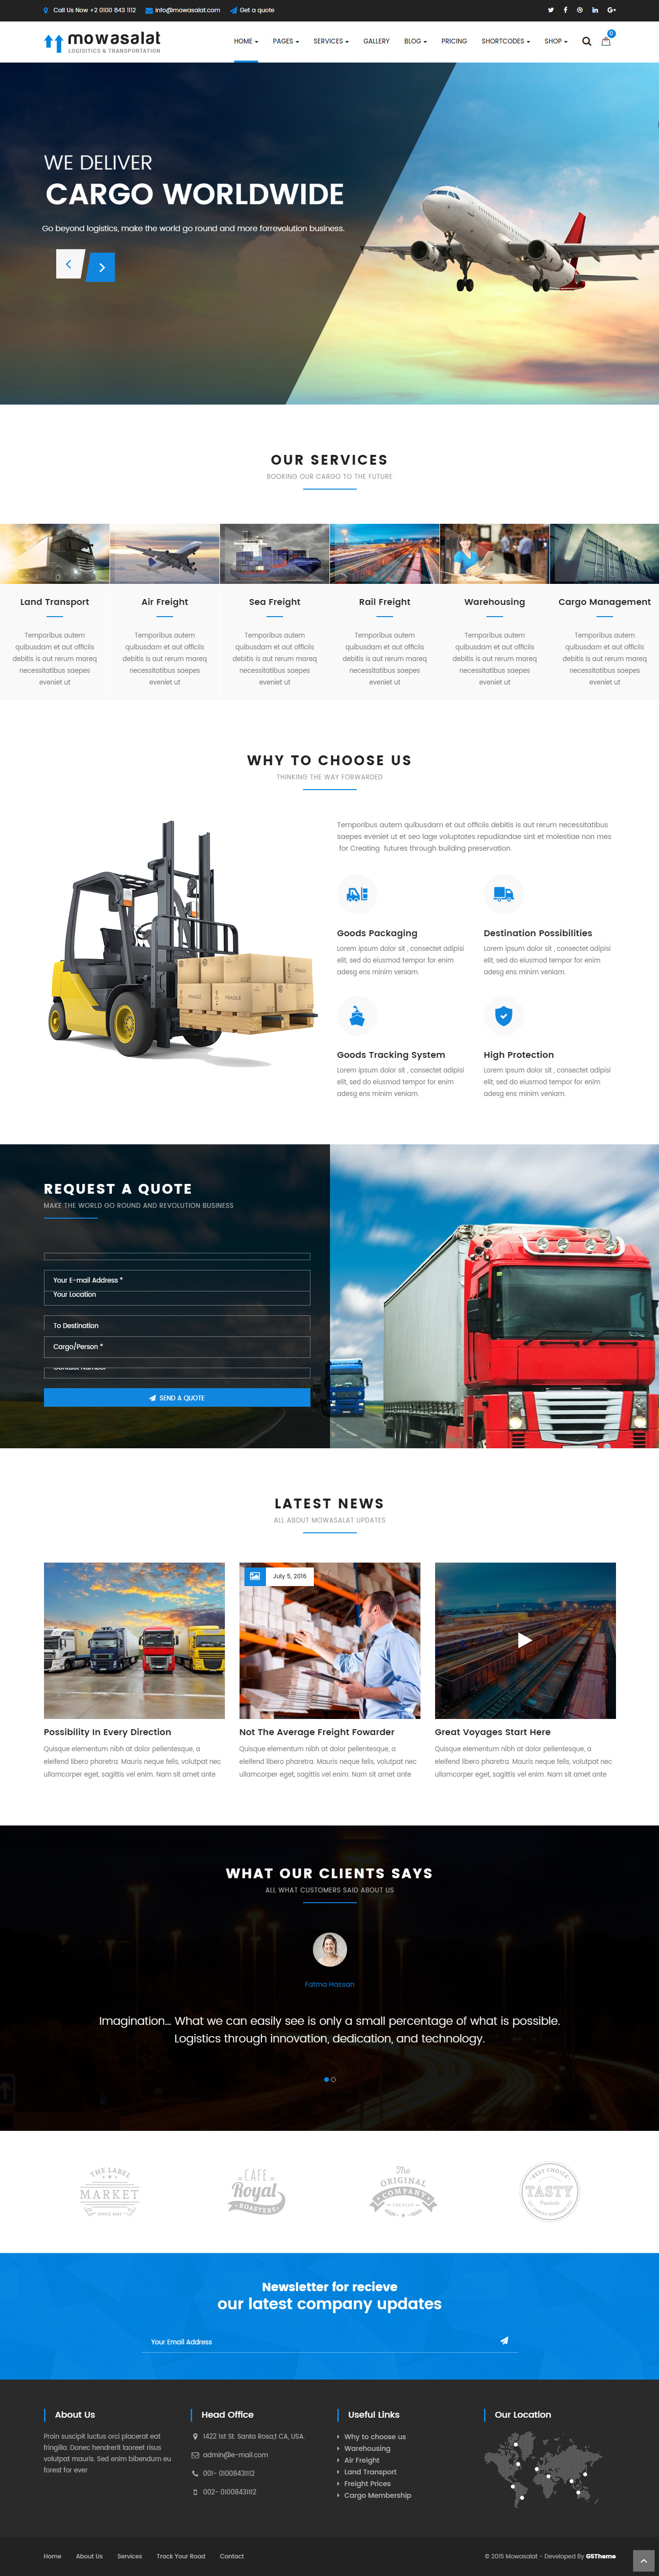
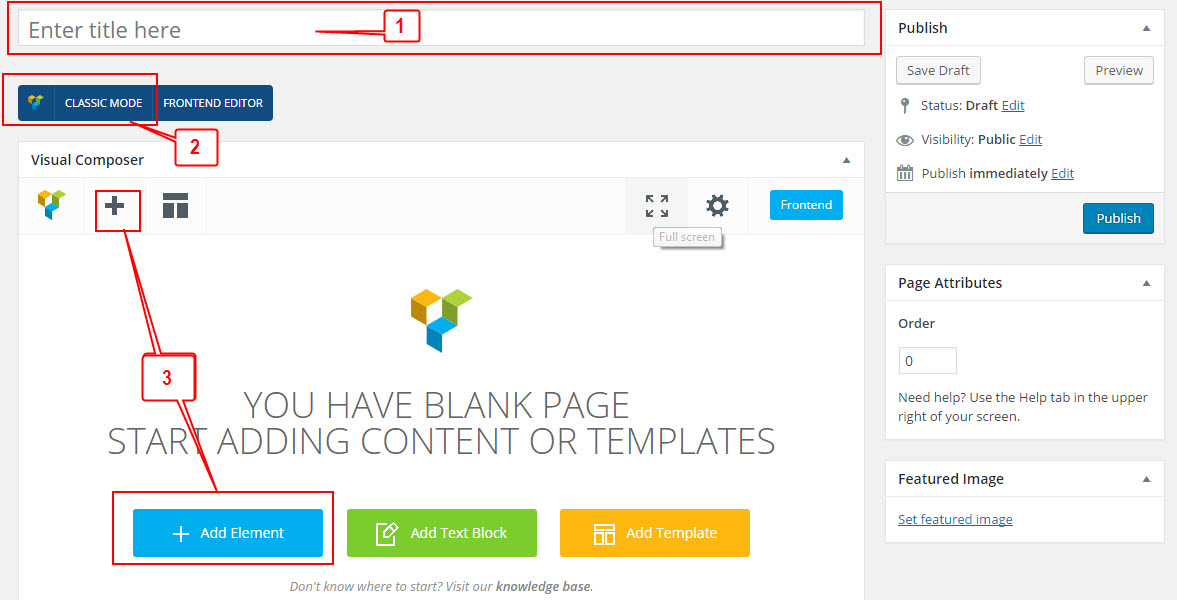
Building your Home page:

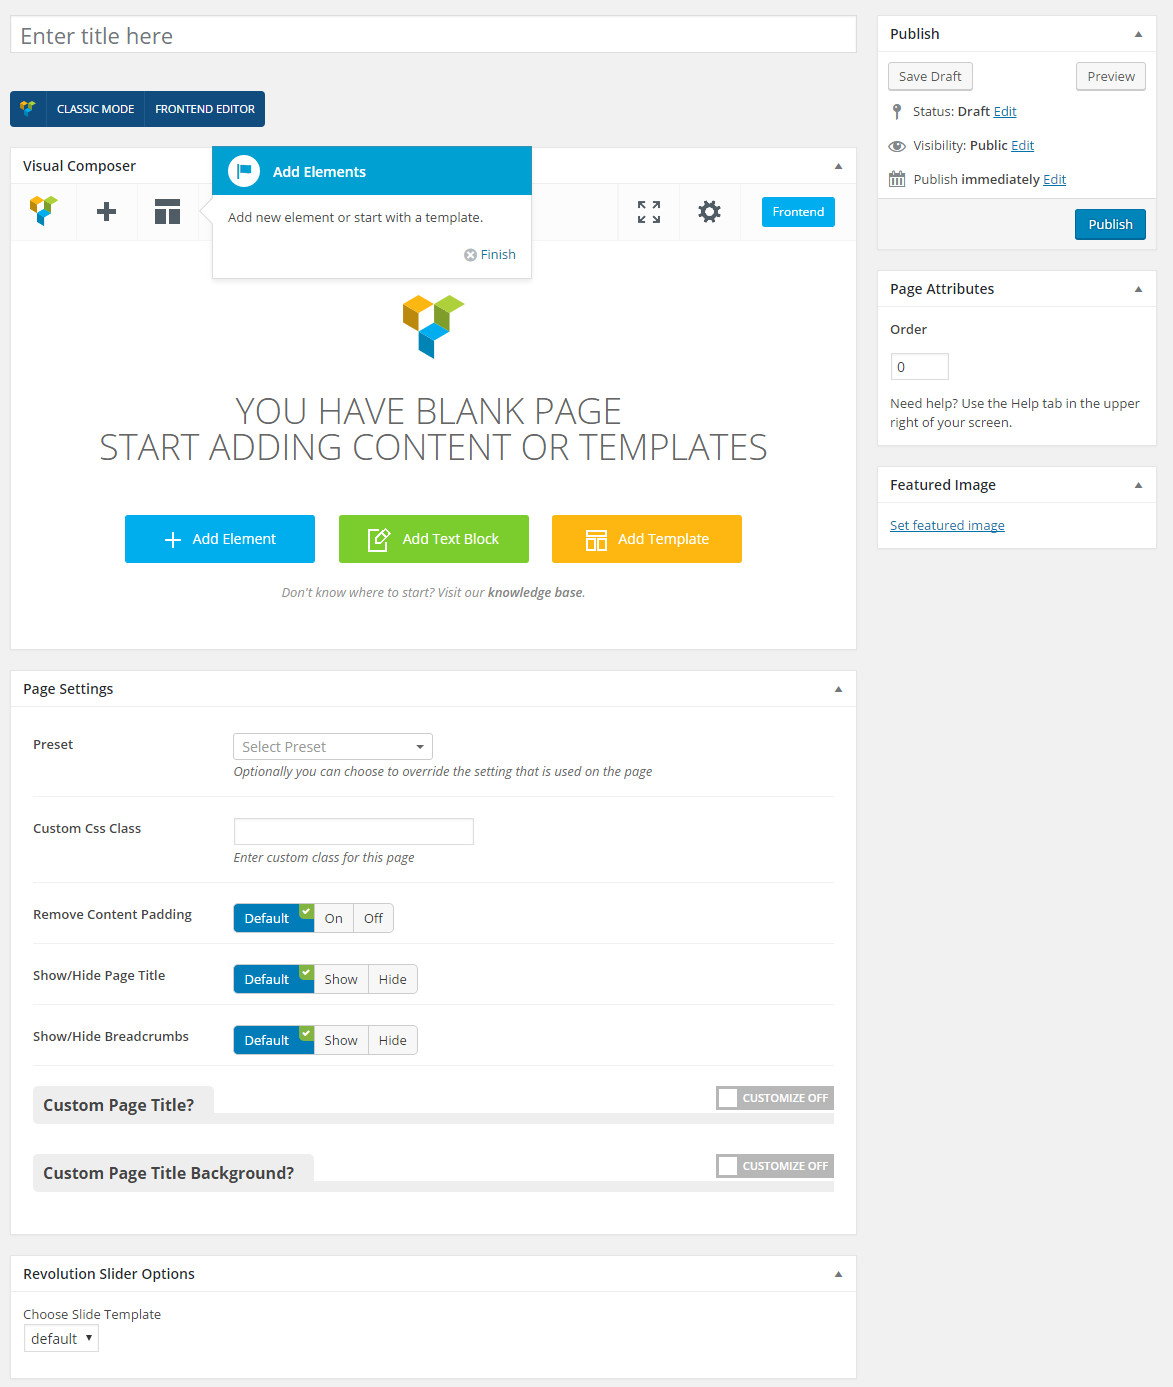
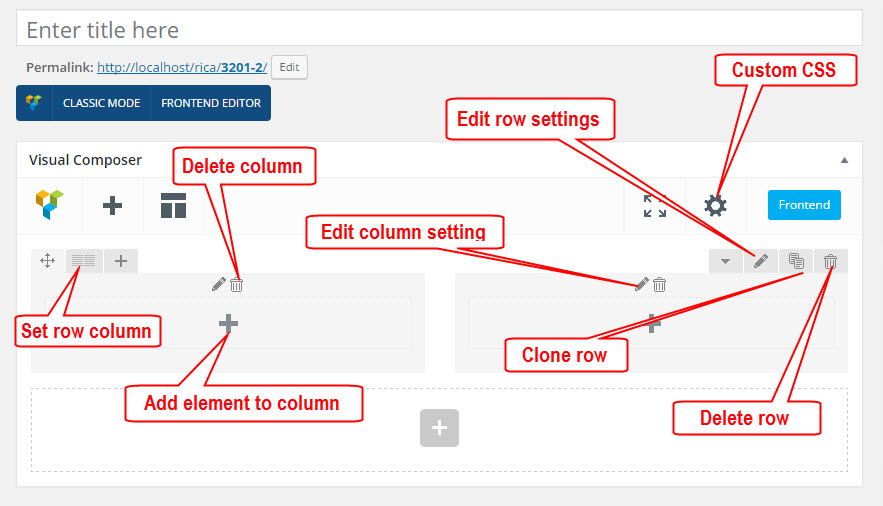
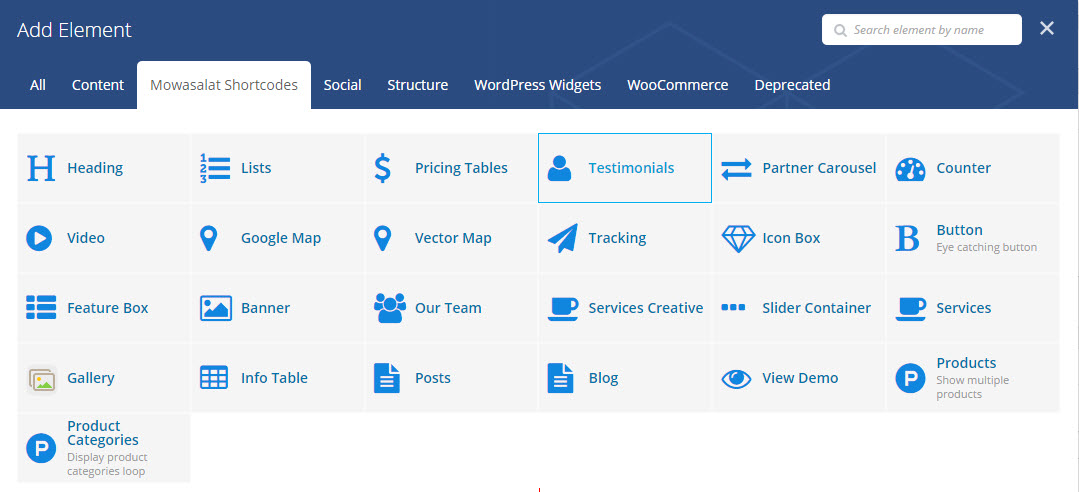
Now you can start to use Visual Composer to build your home page with any design as your liking.

In case you don't have time for experience with it, you can switch to "Classic Mode" and use one of the shortcode sets provided below to build your frontshop based on one of the pre-made home page we offer.

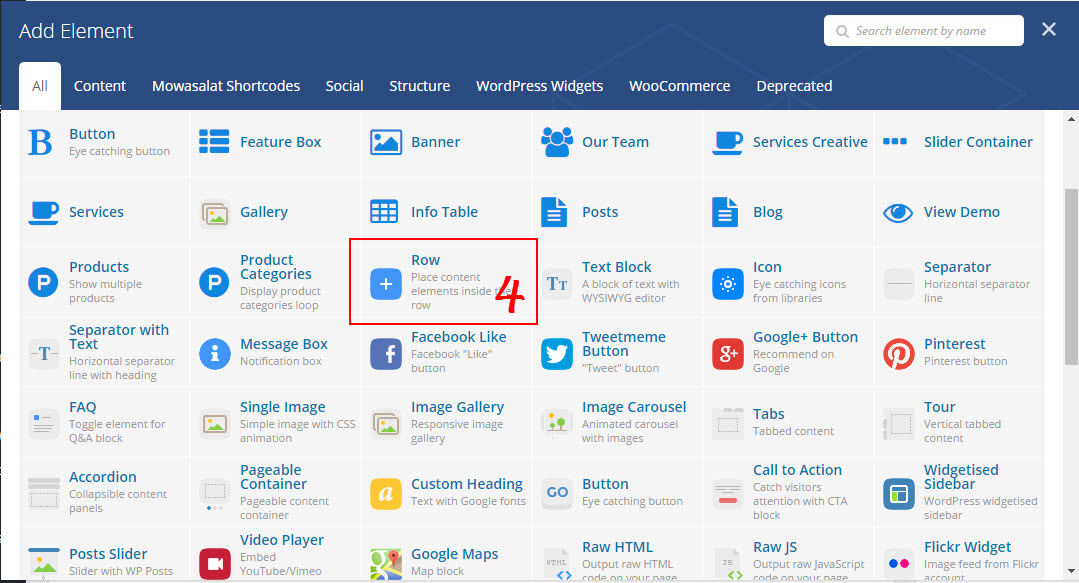
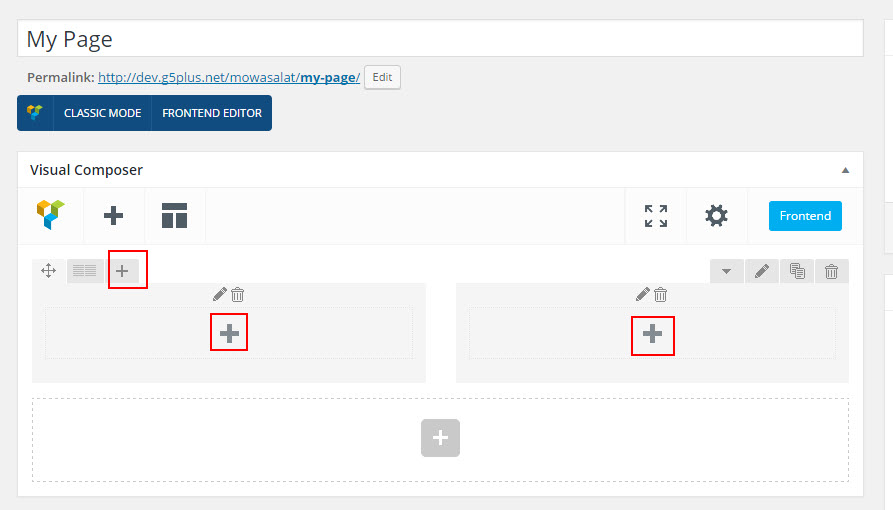
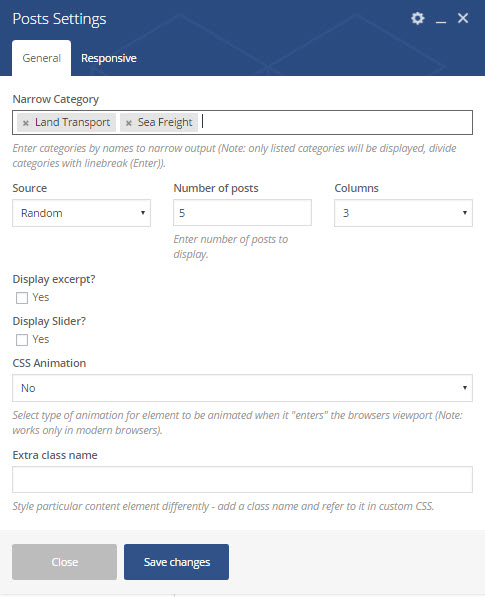
To create a page similar to Homepage in our the demo, choose the Classic Mode and switch to the Text tab, then paste this code into the content of your page:

Shortcode set for Home 1

Shortcode set for Home 2

Shortcode set for Home 3

Shortcode set for Home 4

Shortcode set for Home 5

Shortcode set for Home 6

Shortcode set for Home 7

Shortcode set for Home 8

Shortcode set for Home 9

Shortcode set for Home 10

Shortcode set for Home Onepage

And updating, view more demo at:
Mowasalat Demo

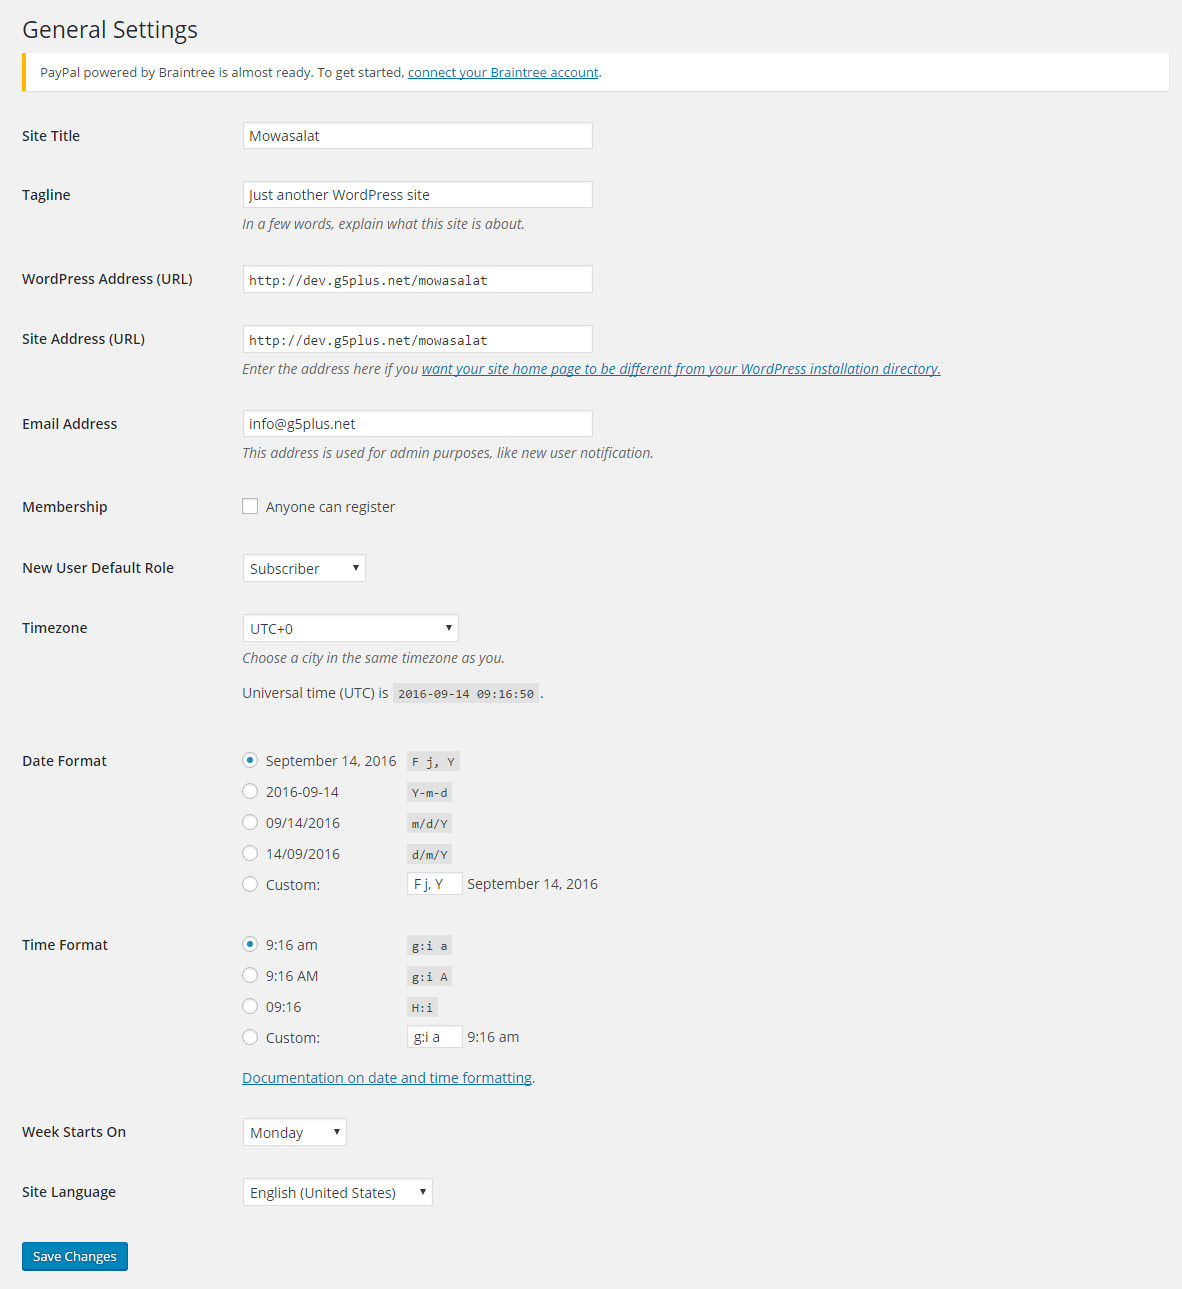
Paste one of these content into your Homepage, choose Template "Home 
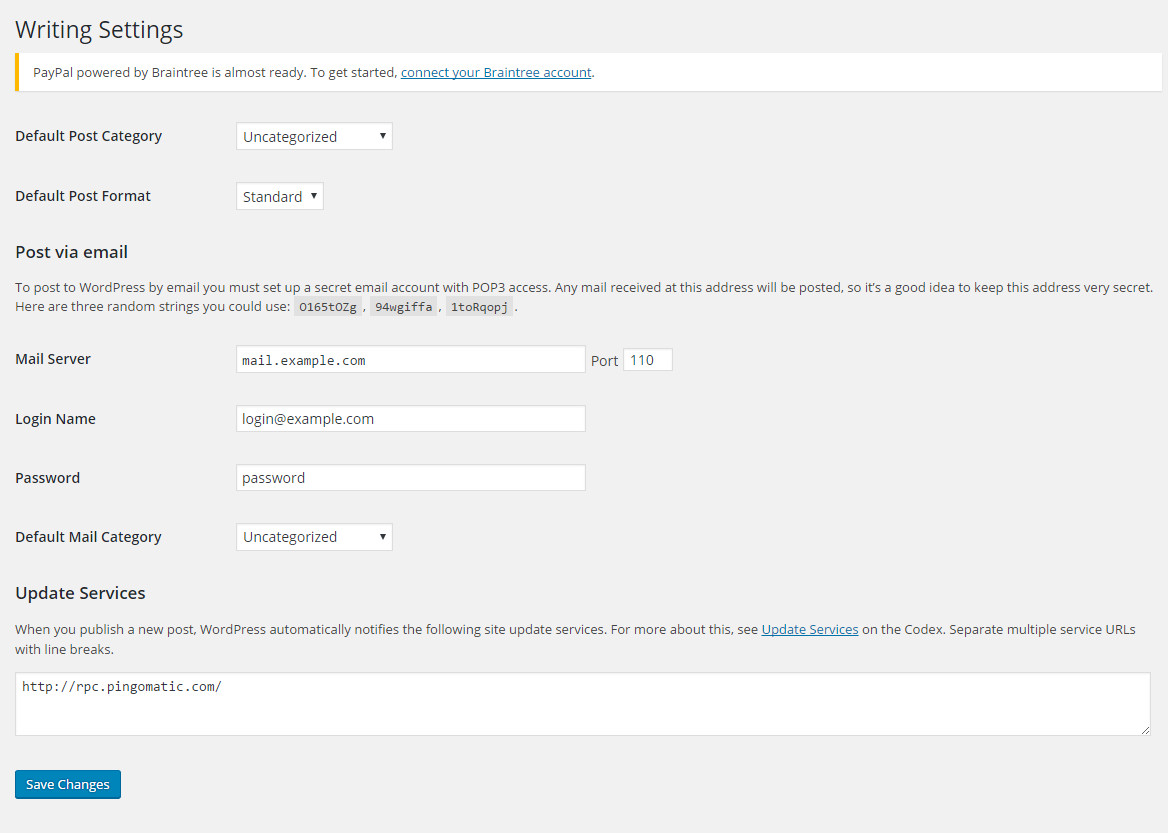
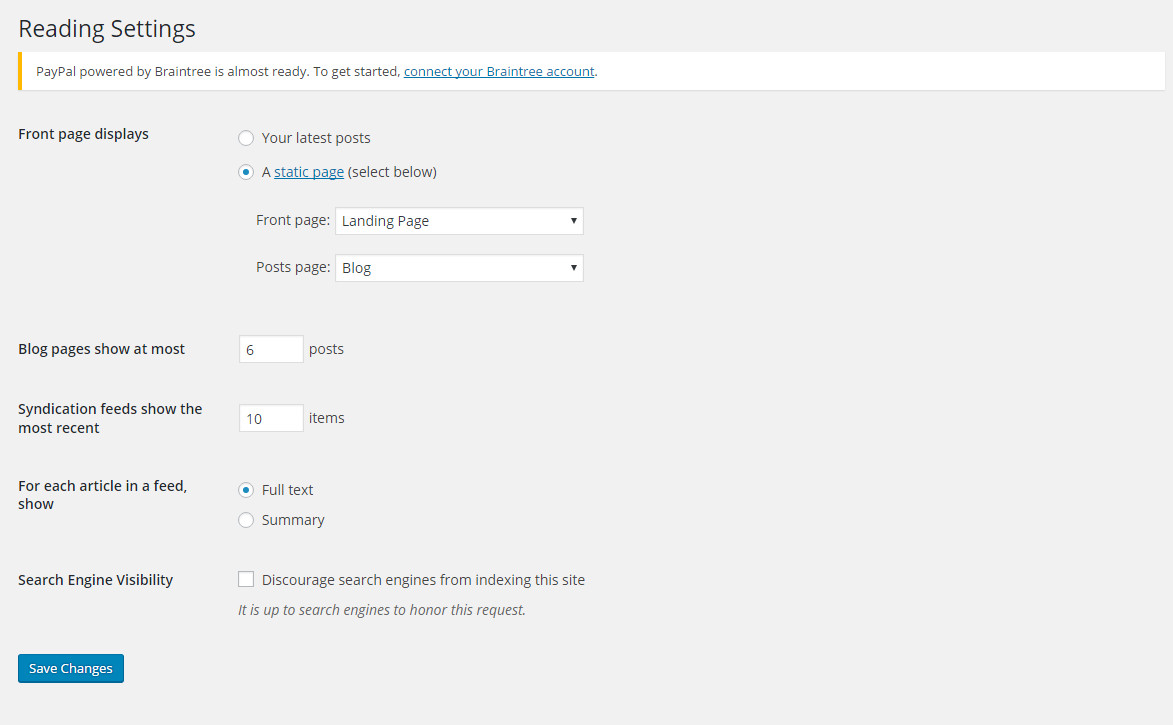
Pages", then publish this page and set it as your frontpage(8.1. Settings a static page as Home) in the Wordpress Settings panel.

For a further understanding on these shortcodes and what they do, please visit Mowasalat Demo page.
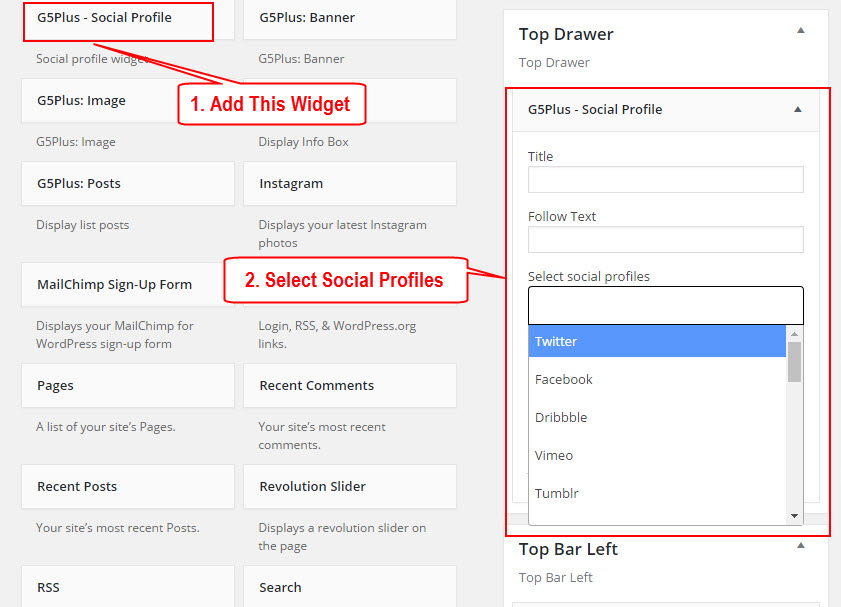
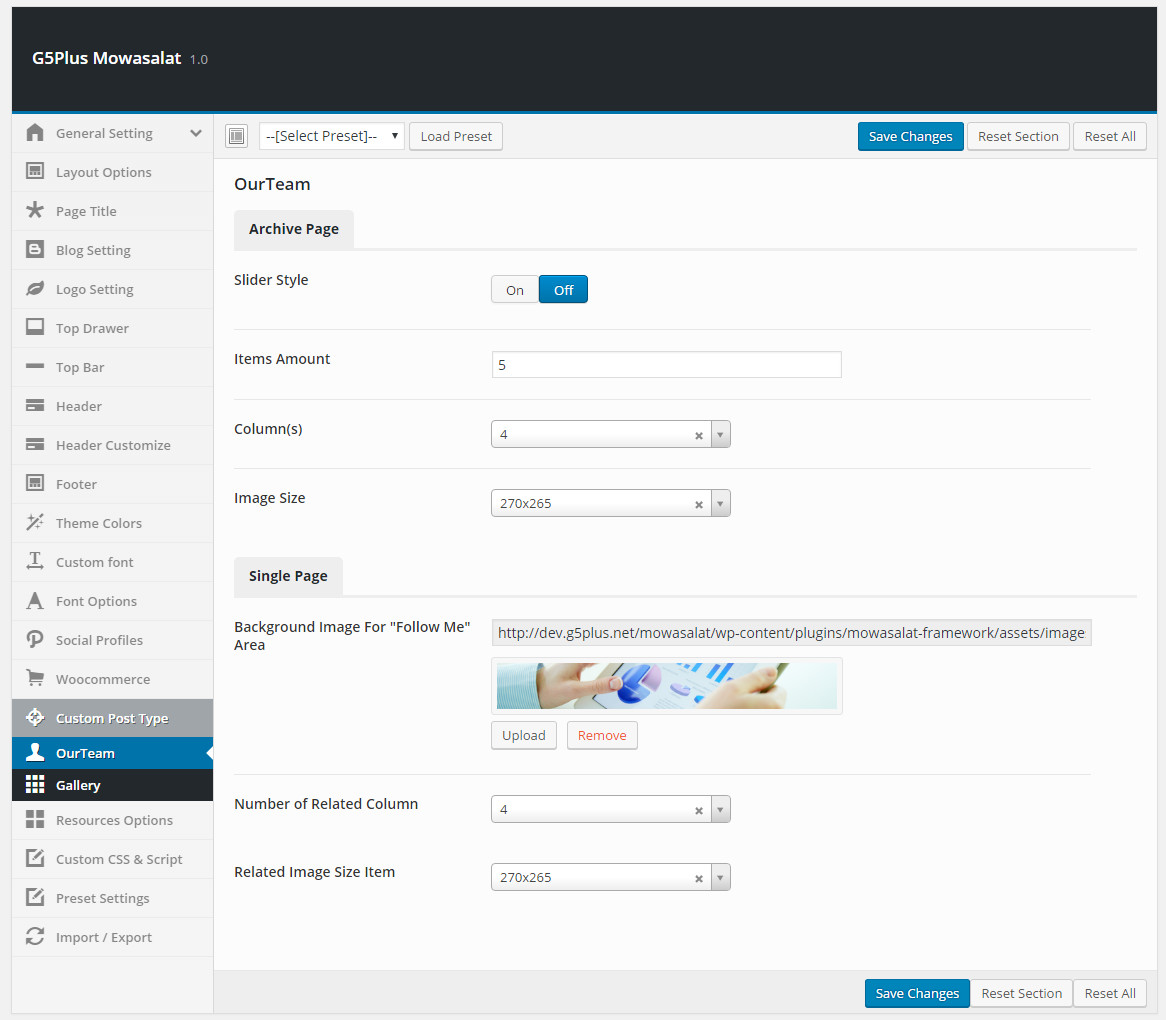
Building OnePage

Recently OnePage sites has become a trend, and Mowasalat can help you do it easily. You just have to create a Menu with Links as items.

Video guide on How to build OnePage.

After that, any where want menu link to section, please edit row by Visual Composer and type id on field: Row ID

BUILD AN EXAMPLE

THIS IS STEP BY STEP GUIDE ON HOW TO BUILD HOME PAGE MANUALLY FOR MOWASALAT HOME 1

Need Wordpress, Mowasalat & plugins are already

I. Overview elements area on page

II. BUILDING

1. Build & Setting header area

You can consult this video guide on How to build Header Area (on ORSON - Homepage 15)

1.1 Upload logo

Go to ThemeOptions >> Logo Setting tab, do follow:

1.2 Create menu

Go to Apperance >> Menus, do follow:

1.3 Settings

Go to ThemeOptions >> Header tab, then setting below

1.4 Add widgets "G5Plus-Info Box" to "Top Bar Left" area

Add content to "G5Plus-Info Box":

1.5 Add widgets "G5Plus - Social Profile" to "Top Bar Right" area

Add content to "G5Plus - Social Profile":

2. Import slider & create home page

2.1 Import slider simple

You can consult how to import slider at IMPORT SLIDER HOME PAGE
And locate zip file slider to import on path: Mowasalat\theme-plugins\Mowasalat-framework\install-demo\data\main\revslider

2.2 Create A New Page

Click classic mode, add code below:

3. Setting Footer & Create content footer

3.1 Settings Footer

Go to ThemeOptions >> Footer tab, then setting below

3.2 Add widgets "Text" to "Footer 1" area

Go to Widget Manager

Add content "Text":

3.3 Add widgets "G5Plus-Info Box" to "Footer 2" area

Add content to "G5Plus-Info Box":

3.4 Add Widget "Custom Menu" to "Footer 3" area

Add content to "Custom Menu":

3.5 Add Widget "Text" to "Footer 4" area

Add content to "G5Plus-Image":

3.6 Add Widget "Custom Menu" to "Bottom Bar Left" area

Add content to "Custom Menu":

3.7 Add Widget "Text" to "Bottom Bar Right" area

Add content to "Text":

Import Demo Content

If you are new to WordPress and have problems with setting up the theme you might want to import the demo content file that comes with the theme. The following actions will import some dummy posts and pages from the live preview:

  • Go to menu Tools > Import
  • Select WordPress from the list
  • If you haven't installed the WordPress import plugin, a popup window will appears and ask you to install it. Just click Install Now. When the installation progress is completed, click Activate Plugin & Run Importer. If you have installed this plugin, skip to next step.
  • Click Browse and select demo-data.xml file from the download package
    (Example: simple demo on path: Mowasalat\assets\data-demo\simple, so the same for others)
  • Click Upload file and import
  • When you are asked to import author, you can create new author or import to existing author. You also should check the Download checkbox and import file attachments.

demo

Select WordPress from the list

demo

Continue with steps in image

demo

You would be asked to assign author, please selected and continue

demo

After completing all above steps, open frontend link(Home 1) to see the pages imported to make, look like below is ok

demo

If you don't want to use the demo content pack, you can read the instructions on how to work with our theme built-in Page Builder below to make your own pages.

Import Slider Home Page

After setting up the homepage, you need to setup the slider for homepage to make it display the same as in live preview.

The download package contains the exported slider (Revolution Slider) that can be used as your slider template. Please follow the steps below to import it to your shop:

  • Go to "Revolution Slider"
  • Click "Import Slider" button
  • When a popup appear, click "Browse" and select one of zip sliders(these files include in main file downloaded) file.
  • Click "Import Slider" button to start import the selected slider
  • Repeat the steps to import all
Video guide on How to Import Slider using Revolution Slider

Please note that these steps are to set up slider for homepage the same as in live demo. If you want to make your own slider, please follow the official Slider Revolution document.

Contact Form

You can do step by step as images below to build contact form

Add New Contact Form

You can visit Contact Form 7 Plugin to further details.

Or copy and paste content below to Form field(see image above)

Value Content "Contact form 1"

Value Content "Footer Quick Contact"

And a lot of our contact form created here

General Options

You can adjust WordPress settings as follows:

Step 1 – You can set Site Title, Tagline in Settings > General


Step 2 – You can set Blog pages show at most in Settings > Writing


Step 3 – You can select Front Page displays in Settings > Reading


Step 4 – You can set Discussion settings in Settings > Discussion


Step 5 – You can change Image sizes in Settings > Media

We used the following sizes on our demo sites:
Thumbnail size: 150 x 150
Medium size: 300 x 300
Large size: 1024 x 1024

Step 6 – You should ensure that a non-default permalink setting is selected, e.g. Month and name in Settings > Permalinks

Step 7 – You can set Duplicate Post settings in Settings > Duplicate Post


Step 8 – You can set Advanced Email settings in Settings > Advanced Email


Theme Options/Mowasalat Options

By clicking on the Theme Options menu, you'll be able to change all template specific settings.

You can refer How to use Theme Options and How G5Theme Options work for more detail about the relationship between Theme Options, Preset and Page Options and How to use them to create your website.

General Settings

General Settings tab is divided into a few sections. Asides from the Install Demo Data section mentioned above, there are a few important sections for you to customize your layout.

You can upload this Logo on your server, or just paste an URL into the Logo box

Maintenance Mode

Maintenance Mode use for update/maintenance website. Can choose custom page or default(basic)

Performance

Performance use on/off js & css for faster loading page

Page Transition

Page Transition use to enable/disable and effects transition of page

Custom Favicon

Custom Favicon have many options for each devices/screen, view on image to further more details.

404 Setting

You can input information, background for 404 page with out install plugins.

Frontend display

Layout Options

Layout Options have all options for setting layout

Page Title

Page Title contains all options for setting of page title

Blog Setting

Blog Setting contains all options for Blog setting

Top Drawer

This option isn't used on Mowasalat Demo Data

Top Bar

Top Bar contains all options for setting of Top Bar area

Header Customize

Header Customize contains all options for customizing Header Area

Theme Color

Theme Color allows user to custom and change many options color on website.

Custom Font

Custom Font allows user to custom and upload many options font for website.

Font Options

Font Options allows user to choose font properties to use for each tag.

Social Profiles

Social Profiles contains all options that allows user to share post/product on various social networks which automatically shows up under the content post, an important function that helps promoting your site. You can also check the options to decide which network are allowed to share the content of your website on. You can also turn off all options if you don't want your content to be shared at all.
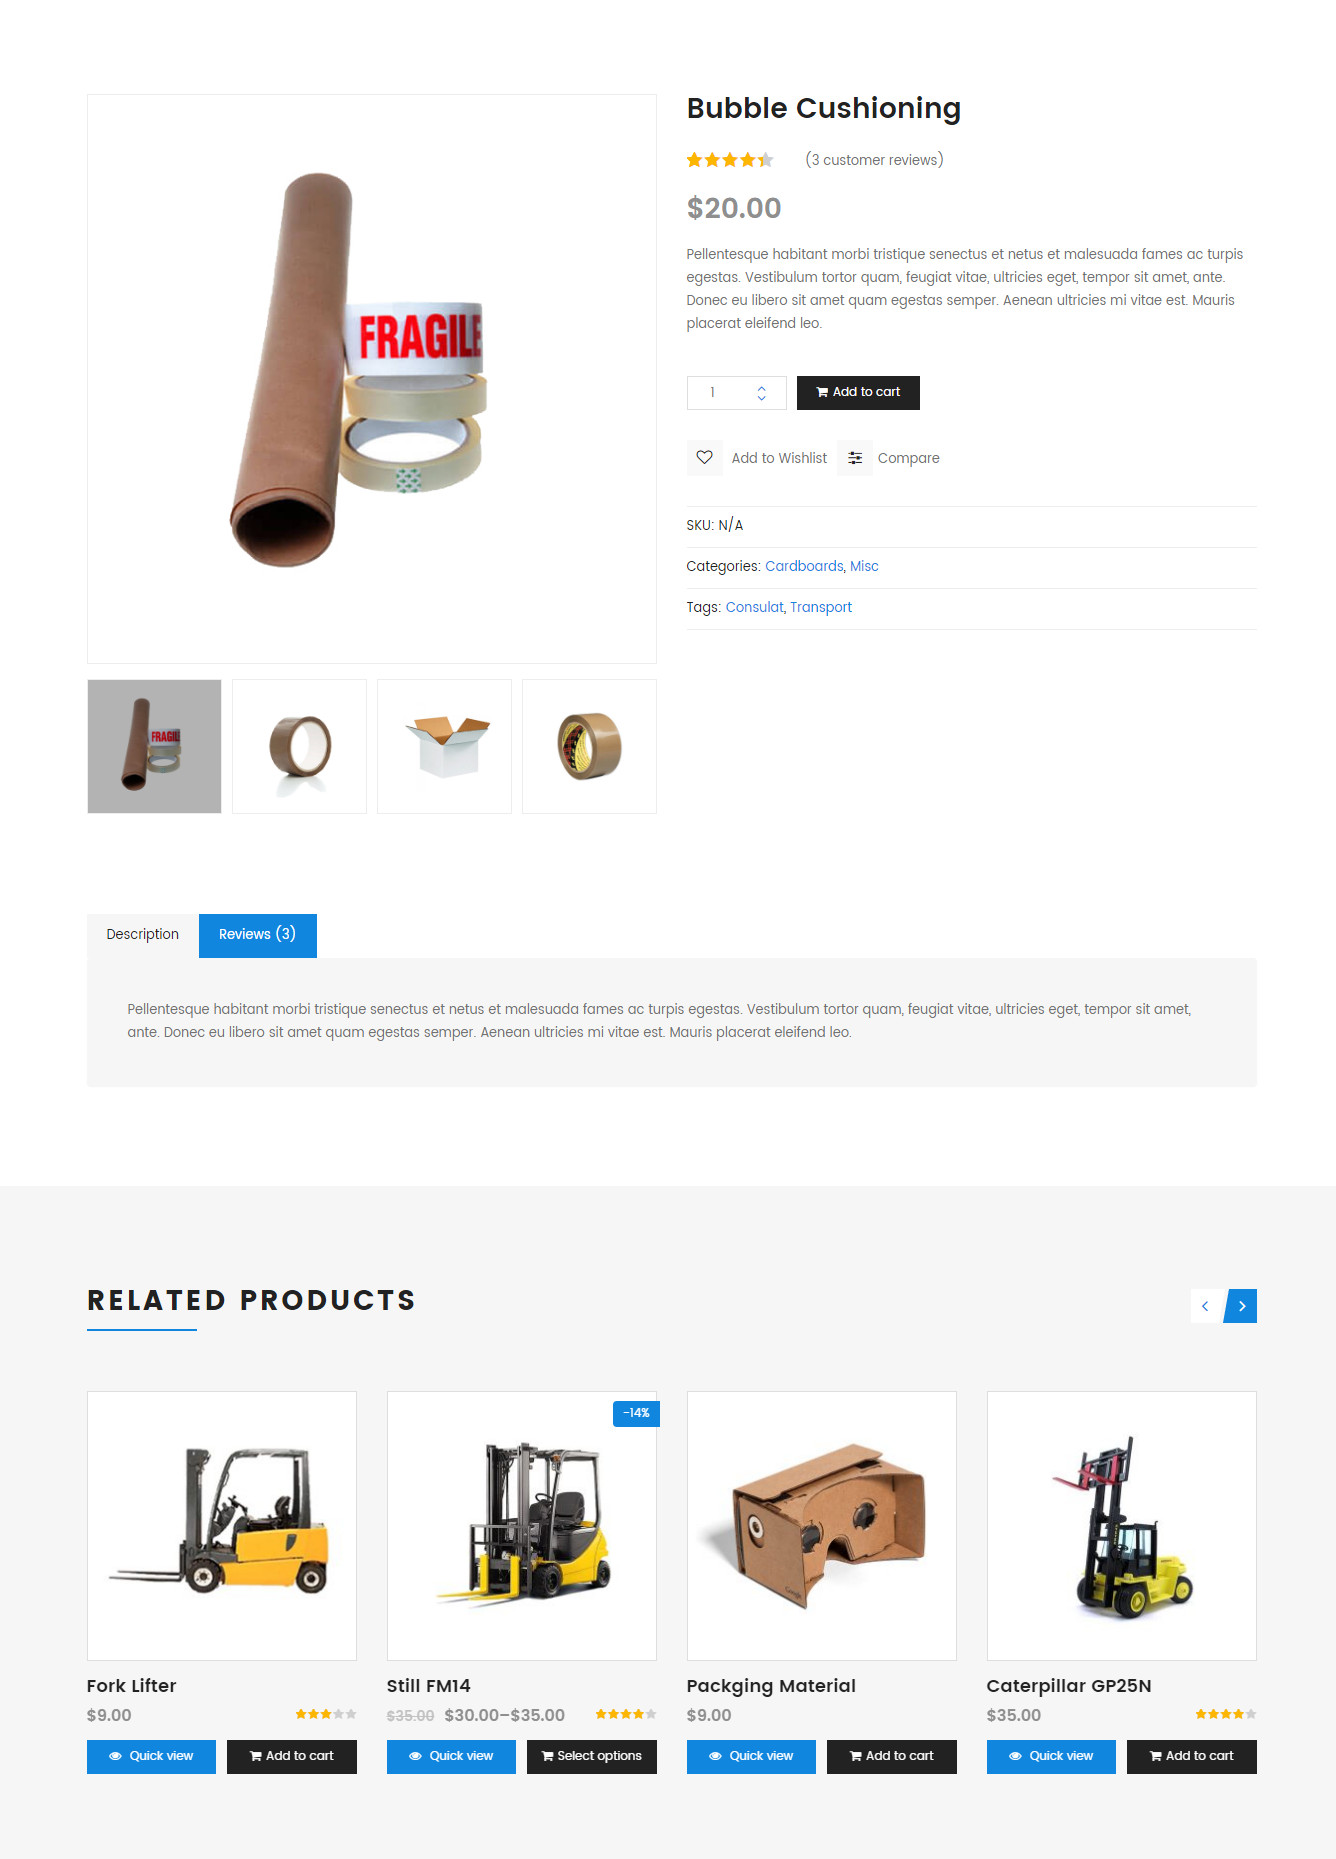
Frontend display

Woocommerce

Woocommerce contains all options to using woocomerce on webstie such as shop/category/cart page, single product...

Frontend display

Ourteam

Ourteam contains all options to custom Ourteam on Archive Page as well as Single Page

Gallery

Gallery contains all options for user to display Gallery

Resources Options

Resources options let you utilize boostrap elements to style your store quick and easily.

Custom CSS & Script

In case you want to add new CSS class or JS to your website, add it in this text box. This will add/overwrite the theme CSS,JS, so please be careful!

Preset Settings

Preset Settings allows user to choose Preset Settings apply for each page type

Import/Export

You can back up the options that you chose here and restore them later, in case you want to fiddle with it. You can even swap data between different installations by pasting the text in the box under Transfer Theme Options Data and click Import Options button.

import option

Preset

Preset are Page Options that were set beforehand to facilitate use, it will override settings in Theme Options on all pages applyed it..

You can consult How to use Preset article to understand How Preset work and how to use them properly on your website.

Add a new Preset by accessing to Preset panel in G5Theme options, click on Add New button and follow these steps as below:

add new preset

You can also apply a Preset to Page Options with any page you want

add new page

1. Page Layout

This option is used for setting Page Layout in Preset. It will overwrite Page Layout in Theme Options. Any option is set to "default" which means they will take on the global options set in Mowasalat Theme Options

Meta Options Page Layout

You can set the following Page Layout Options for the Preset you are currently editing:

Attribute Description
Layout Style Overwrite the Default Layout Style (set in Theme Options) for page used this preset.
Layout Overwrite the Default Layout of pages settings section in Theme Options for page used this preset.
Sidebar Layout Set position for the page sidebar: none, left, right, both of left and right
Content Padding Set content top/bottom padding. Do not include units (empty to set default)
Content Padding Mobile Set content top/bottom padding mobile. Do not include units (empty to set default)
Remove Content Padding If turn on this function. It will Remove Content Padding top/bottom padding, include value default

2. Page Title

This option is used for setting Page Title in Preset. It will overwrite Page Title in Theme Options. Any option is set to "default" which means they will take on the global options set in Mowasalat Theme Options

Meta Options Page Title

You can set the following Page Title Options for the Preset you are currently editing:

Attribute Description
Show/Hide Page Title? Set visible of header, if selected default will take value in Theme Options
Page Title Layout Set Layout for Page Title: 'Default', 'Tile Left & Breadcrumb Right' , 'Center'
Custom Page Title Set content of page title. If leave empty will take value title of page
Custom Page Subtitle? Set custom for page subtitle, if selected Off will take value in Theme Options
Padding Set padding top/bottom for page title. If leave empty will take value in Theme Options
Custom Background Color? Set custom background color for page title. If selected Off will take value in Theme Options
Page Title Parallax Set parallax mode for page title. If selected Default will take value in Theme Options
Breadcrumbs Enable Set visible of breadcrumbs for page title. If selected Default will take value in Theme Options

4. Top Drawer

This option is used for setting Top Drawer in Preset. It will overwrite Top Drawer in Theme Options. Any option is set to "default" which means they will take on the global options set in Mowasalat Theme Options

Meta Options Top Drawer

You can set the following Top Drawer Options for the Page you are currently editing:

Top drawer padding top. Do not include units (empty to set default)
Attribute Description
Top Drawer Type Set type of top drawer: 'Disable', 'Always Show', 'Toggle'. If selected default will take value in Theme Options
Top Drawer Sidebar Set Sidebar for top drawer sidebar, if not selected will take value in Theme Options
Top Drawer Wrapper Layout Set layout wrapper for top drawer: 'Full Width', 'Container', 'Container Fluid'. If selected default will take value in Theme Options
Top Drawer hide on mobile Set visible for top drawer area on mobile. If selected default will take value in Theme Options
Top Drawer PaddingSet Padding top/bottom for Drawer area. If you not choose it will set value default

5. Top Bar

This option is used for setting Top Bar in Preset. It will overwrite Top Bar in Theme Options. Any option is set to "default" which means they will take on the global options set in Mowasalat Theme Options

Meta Options Top Bar

You can set the following Top Bar Options for the Page you are currently editing:

Attribute Description
Desktop Settings
Show/Hide Top Bar Set visible of top bar. If selected default will take value in Theme Options
Top Bar Layout Set layout for top bar: '1/2-1/2', '2/3-1/3', '1/3-2/3', 'full', if not selected will take value in Theme Options
Top Left Sidebar Set sidebar for left sidebar. If not selected will take value in Theme Options
Top Right Sidebar Set sidebar for right sidebar. If not selected will take value in Theme Options
Top Bar Border Set border for top bar area:'Default','None', 'Full Bordered', 'Container Border'. If selected default will take value in Theme Options
Mobile Settings
Show/Hide Top Bar Set visible of top bar. If selected default will take value in Theme Options
Top Bar Layout Set layout for top bar: '1/2-1/2', '2/3-1/3', '1/3-2/3', 'full', if not selected will take value in Theme Options
Top Left Sidebar Set sidebar for left sidebar. If not selected will take value in Theme Options
Top Right Sidebar Set sidebar for right sidebar. If not selected will take value in Theme Options
Top Bar Border Set border for top bar area:'Default','None', 'Full Bordered', 'Container Border'. If selected default will take value in Theme Options

6. Header

This option is used for setting Header in Preset. It will overwrite Header in Theme Options. Any option is set to "default" which means they will take on the global options set in Mowasalat Theme Options

Meta Options Header

You can set the following Header Options for the Page you are currently editing:

Attribute Description
Header On/Off? Set visible of header
Desktop Settings
Header Layout Set layout of header. If no selected will take value in Theme Options
Header Container Layout Set container layout for header: 'Container', 'Container Full'. If not selected will take value in Theme Options
Header Float Set float for header. If selected default will take value in Theme Options
Show/Hide Header Sticky Set sticky mode for header. If selected default will take value in Theme Options
Header padding Set Padding top/bottom for Header area. If selected default will take value in Theme Options
Navigation Height Set header navigation height (px). Do not include unit. If selected default will take value in Theme Options
Page Header Mobile
Header Mobile Layout Set layout fot header mobile. If no selected default will take value in Theme Options
Menu Drop Type Set drop type for menu mobile: 'Dropdown Menu', 'Fly Menu'. If not selected will take value in Theme Options
Header mobile sticky Set sticky mode for mobile header. If selected default will take value in Theme Options
Mobile Header Search Box Set visible for search box. If selected default will take value in Theme Options
Mobile Header Shopping Cart Set visible for shopping cart. If selected default will take value in Theme Options
Mobile header border bottom Set border bottom for mobile header: 'None', 'Bordered', 'Container Bordered'. If selected default will take value in Theme Options

7. Header Customize

This option is used for setting Header Customize in Preset. It will overwrite Header Customize in Theme Options. Any option is set to "default" which means they will take on the global options set in Mowasalat Theme Options

Meta Options Header Customize

You can set the following Header Customize Options for the Page you are currently editing:

Attribute Description
Header Customize Navigation
Header Customize Navigation Set visible and order item for Header Navigation: 'Sidebar','Custom text content left', 'Navigation Item Spacing ','Custom CSS Class'

8. Menu

This option is used for setting Menu in Preset. It will overwrite Menu in Theme Options. Any option is set to "default" which means they will take on the global options set in Mowasalat Theme Options

Meta Options Menu

You can set the following Menu Options for the Page you are currently editing:

Attribute Description
Page menu Optionally you can choose to override the menu that is used on the page.
Page menu mobile Optionally you can choose to override the menu mobile that is used on the page
Is One Page Set page style is One Page

10. Colors Setting

This option is used for setting Colors in Preset. It will overwrite Colors in Theme Options. Any option is switched to "Customize off" which means they will take on the global options set in Mowasalat Theme Options

Meta Options Colors Setting

You can set color for each area on page :

Attribute Description
General Settings
Accent Color Customize Customize color for Accent Area
Top Drawer Customize Customize color for Top Drawer Area
Header Customize Customize color for Header Area
Top Bar Customize Customize color for Top Bar
Navigation Customize Customize color for Navigation Area
Footer Customize Customize color for Footer Area
Bottom Bar Customize Customize color for Bottom Bar Area

WooCommerce Settings

How to config product image like demo

Step 1

Step 2

Mega Custom Menu

We use XMENU, please visit Document XMENU for further details.

Setting a static page as Home

If you installed the Demo Content, you don’t need to create a new Home Page, you just need to choose from the list Home Pages that were automatically created from the demo content, following these steps:

  • Go to Settings > Reading
  • For Front page displays, select A static page (select below)
  • Choose either Home 1, Home 2 from the dropdown for Front page
  • Click Save Changes

Save all your changes!

Config row / column

Content management is a breeze with Fortuna and it requires absolutely no coding skills. Using a highly customized version of the Visual Composer plugin the theme offers a user friendly Drag'n'Drop interface for easy page creation and editing. Follow these simple steps to create a Page with Mowasalat:

Step 1:Go to Pages > Add new in your Dashboard. Add a Title to your Page (top field).

Step 2:Switch to Backend Editor if you are currently under Classic Mode (button below Title field).

Step 3:Start adding page content by clicking on the Plus button or Add Element.

Step 4:The Add Element Popup appears, click on the first element in order to add a new Row to your page. A Row is a main building block of a page, you can split your Rows into Columns, place various elements into your rows, set Row Backgrounds, effects etc.

Step 5:Once you have the new Row added to your page you can split that Row into Columns in order to organize elements nicely in it. Once you split your Row into column you can start adding different Page Elements into your columns. If you want to edit your Row/Column Settings click on the small Pen icon (top right corner of the Row/Column). You can also Duplicate your Row with the Icon (duplicate icon) next to it or Remove the Row/Column with the icon to the right (trash bin icon).

Row Settings (General)

Click on the Edit Row button (Pen icon, top right of the Row). You will see the Row Settings Dialog popup.

Layout:

Default - Row will full width (option default)

Stretch row - Row will full width, visible content if overflow

Stretch row and content - Max width 1170px and center.

Stretch row and content (no paddings) - Full width, padding left and padding right 15px.

Default(no paddings) - Full width, padding left and padding right 0px.

Columns gap:

In order to control gaps between columns navigate to row parameter window and change column gap option - the gap will be introduced between all columns within this row. Default value of gap is set to 0.

Important: In case of mobile stacking gap will be introduced between stacked columns as well.

Full Height Row and Video Background:

Equal height:

In order to set columns within row to be equal height you must navigate to row parameter window and check Equal height option to be active. All columns within this row will have equal height and align to the longest column.

Content position:

In order to control vertical alignment of content within rows/columns navigate to row parameter window and select position of content - top, middle or bottom. By default value is set to "Default" meaning it will use Top or any other alternative if defined within your WP theme.

Parallax:

Show background overlay (Overlay Color)

Step 2: - Click button to select color of background overlay

Step 3: - Set opacity for overlay (0 → 100)

Show background overlay (Overlay Image)

Step 2: - Click button to select image or set background image from Design Options

Step 3: - Set opacity for overlay (0 → 100)

Row ID

Set ID of row (Note: make sure it is unique and valid according to w3c specification)

Row Settings (Design Options)

Managing Columns

Once you have the desired number of columns in a Row you can manage each Column's individual settings by clicking on the Toolbar icons of that specific Column. The Plus Icon adds an element to the top of the Column, the bottom Plus Icon adds an elemnt to the bottom of the Column. The Trash Bin icon removes the Column. Access the Column Settings by clicking on the Pen Icon.

Column Settings (General)

Access the Column Settings by clicking on the Pen Icon. The General tab provides with the option to add CSS classes to your Column if you wish to access it via CSS (can pass more than one divided by a space).

Column Settings (Design Options)

Column Settings (Responsive Options)

Add / Edit Page Elements

Adding Page Elements to your Page is pretty straightforward. First you need to have created a new page, added a Row to it and defined your Row Columns (read more in the previous section).

Step 1:Click on one of the Plus Icons within the column you want to add a new element to.

Step 2:The Page Elements dialog will appear, click on the element you want to add to your Column/Row.

Step 3:The Element Settings Dialog of the Element you are adding appears. Customize your element anyway you want, then click Save.

Step 4:Your element is now in the Column you added it to. Once you hover your newly added element you will see a small popup that let's you manage it. You can do the following with your elements:

Move - Drag your element via the Direction Icon to move it around within the Column,Row or Page.

Edit - Click on the Pen Icon to edit your Element's properties.

Clone - Click on the Copy Icon to duplicate your Element.

Delete - Click on the Trash Bin Icon to remove your Element.

Custom Posttype

Mowasalat includes 3 custom post types:

  • OurTeam: Our Team is the custom post type to introduce the staff in your organization to the customer.
  • Services: Services is the custom post type to manage the your services
  • Gallery: Gallery is the custom post type to manage the your images

Contact Forms Settings

Settings For Send Mail

You can visit WP Mail SMTP Plugin to further details.

MailChimp Settings

Step 1: Choose menu follow:

Step 2:

Step 3:

Step 4:

Step 5:

Step 6, the last:

Update theme to latest version

To update theme to latest version:

Please do follow here: http://support.g5plus.net/knowledge-base/how-to-update-to-latest-version/.

Update shortcode/framework plugins to latest version

To update shortcode/framework plugins to latest version:

Please do follow here: http://support.g5plus.net/knowledge-base/how-to-update-shortcodeframework-plugins-to-latest-version/.

Thank you for purchasing our theme

If you have any questions that are beyond the scope of this documentation

Please create topic here: http://support.g5plus.net. Thanks so much!