Creative Wordpress Sandbox Automatic Plugin
Do you selll plugins or Premium WordPress Themes?
If you say "Yes", you can not ignore this great plugin, it is a perfect plus point for your themes/ plugins.
The customers will be suprise with the unique experience that they are the admin of an instant website demo with just typing mail. The importance of being able to experience, use online to know all the features, see all of the options your products or detect many problems so you can solve in time.
This testing online help you to AVOPID REFUND REQUESTS because of the initial misunderstanding about the products.
Creative Wordpress Sandbox Automatic can automatically create a cloned instance of your live demo. It only requires the customer to enter their email then generate the customer ID to grant them access. After creating a cloned for the customer, the demo will be deleted even the files uploaded to the demo with a certain amount of time that you can set in option of plugin .
CREATIVE WORDPRESS SANDBOX AUTOMATIC
- Created: 01/04/2020
- Created By: G5Theme
- Email: g5plus@outlook.com
- HelpDesk: https://sp.g5plus.net/
Thank you for choosing our plugin. If you have any questions that are beyond the scope of this documentation, please feel free to contact us via Support Forum . Thanks so much!
Installation Instructions
You can watch this video to take a closer look at the installation for the Create WordPress Sandbox Automatic Plugin
- After downloading the plugin you should have create-wordpress-sandbox-automatic.zip file on your computer.
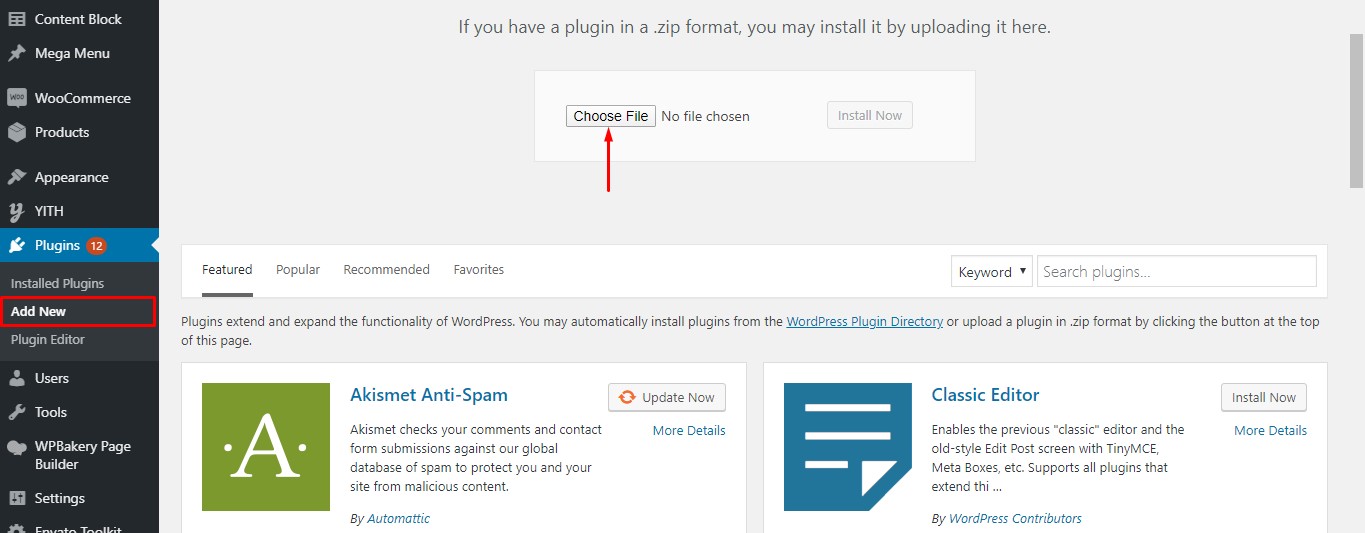
- Login your Wordpress dashboard then you go to Plugin >> Add new to add new the plugin
- Click Upload plugin button
- Click Choose file to upload the support-ticket-system.zip and select the downloaded zip file in your computer.
- Click Install Now to upload the zip file.
- Wordpress will ask you to active the plugin after you install plugin successfully.
- You click "Active" in the plugin to enable all features of the plugin.
- Download the create-wordpress-sandbox-automatic directory plugin files from your wordpress.org account.
- Extract/Unzip this file
- Login your FTP account and go to this path: ...wp-content/plugins, copy
- You copy & paste the upzip file in the above path to upload the plugin in FTP
- Once the upload is complete, login your Wordpress dashboard and active the plugin in Plugin
Install A Network
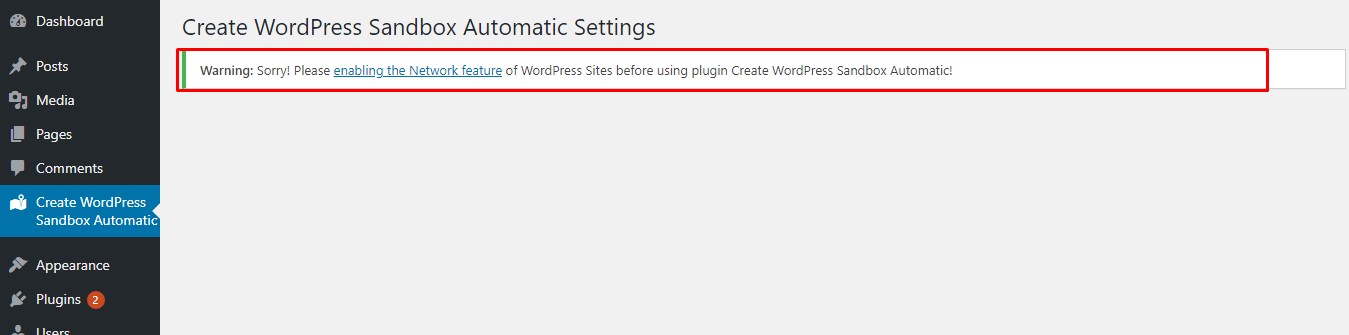
Creative Wordpress Sandbox Automatic Plugin must be necessarily used on a WordPress multisite installation. This is an essential requirement to create a new sandbox for each of your users.
After you install & active Creative Wordpress Sandbox Automatic Plugin successfully. In case, you click in the Plugin and see this: Warning: Sorry! Please enabling the Network feature of WordPress Sites before using plugin Create WordPress Sandbox Automatic!
You don't need worry about this because we are setting the plugin to work properly.
The guide to create a multiple network: Full guide
You login your FTP account or Cpanel acount, open the wp-config.php and add this code
define( 'WP_ALLOW_MULTISITE', true );
You can put this code in above the line /* That's all, stop editing! Happy blogging. */ .
After you add code and save the wp-config.php, you need to refesh your browser to continue.
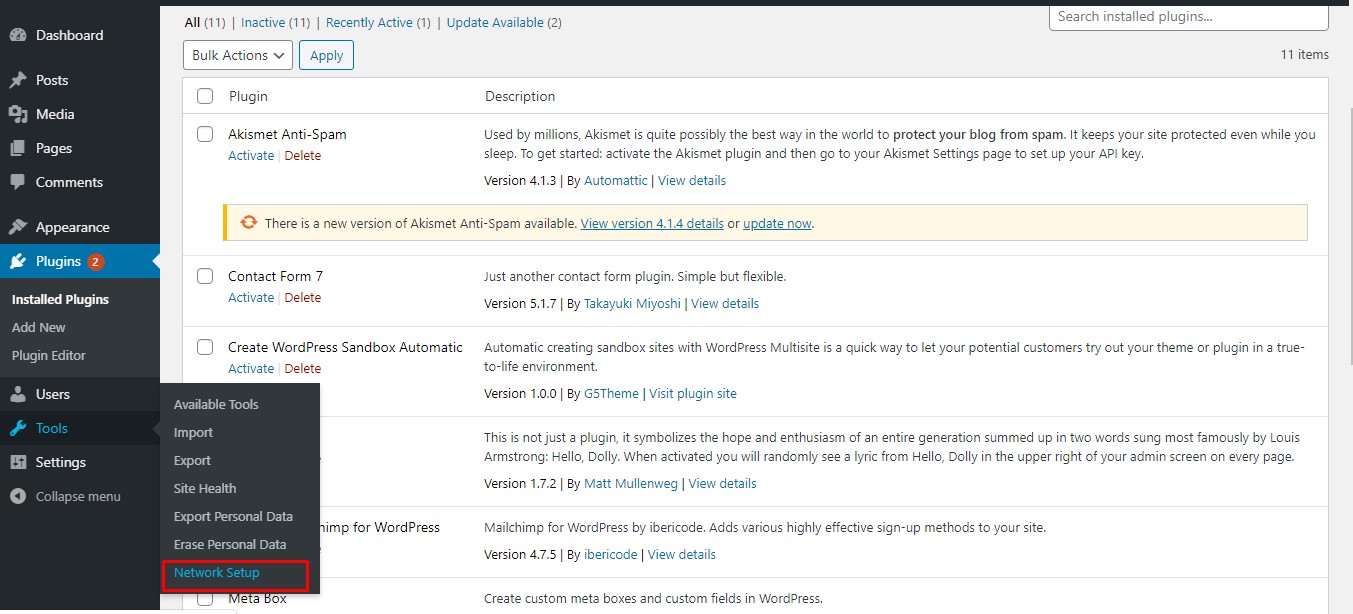
Navigate Tool >> Network Setup
You need to deactive your alll plugins before enabling the Network features.

Deactivate plugins and back to Network Setup sub-menu.
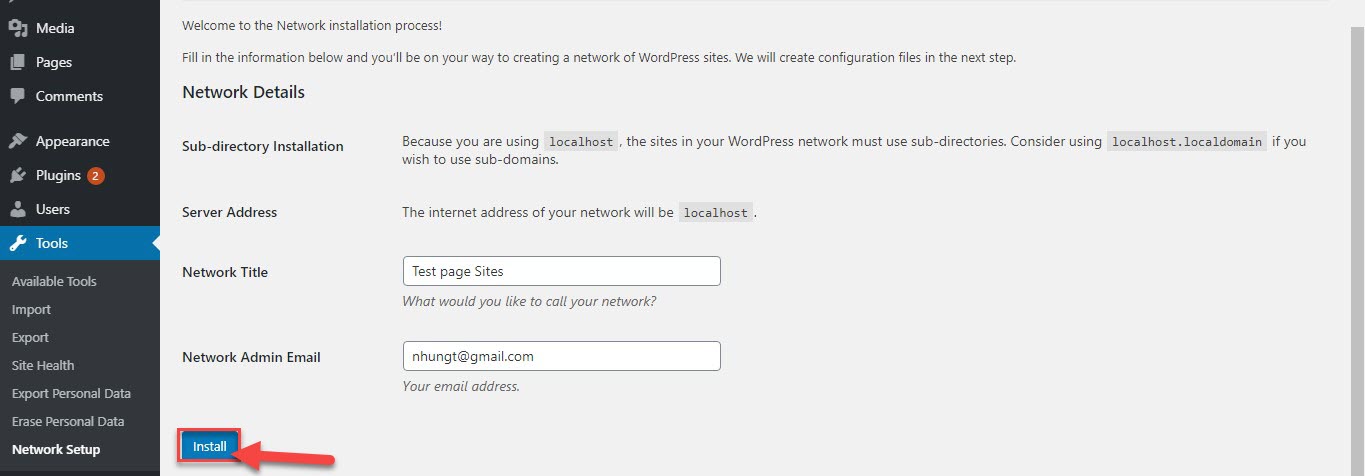
You can enter your Network Title and Network Admin, or you can ignore them, press the "Install" button.
Now, you are ready to enable a network How to enable a network
Enable A Network
Follow the guide appeared on the Create a Network of WordPress Sites screen.
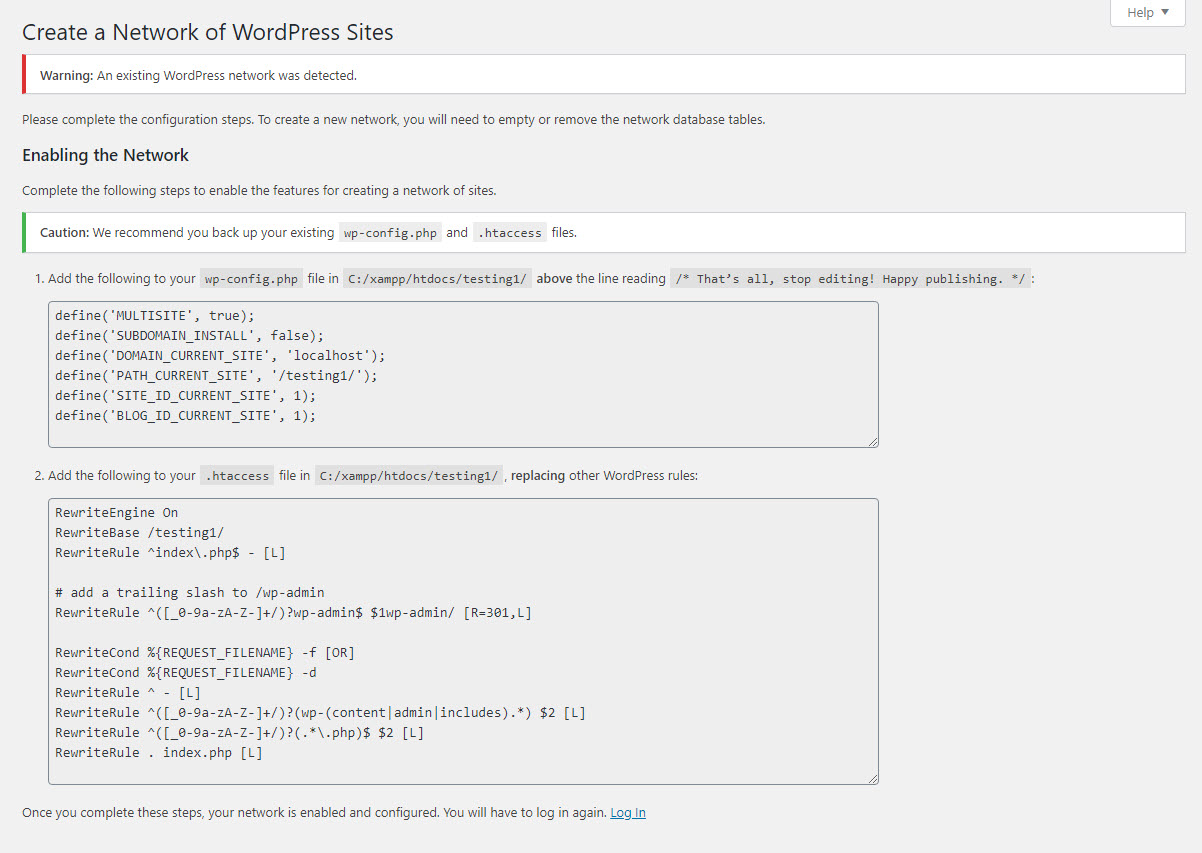
1. Back to wp-config.php to add the specified lines as the above sreen.
2. Add the specified lines to the .htacess file.
In case, you don't have a .htacess file, you can create the file in the same directory with your wp-config.php file.
If you already have a .htacess file, you remove the old code and replace any existing WP lines with these new ones.
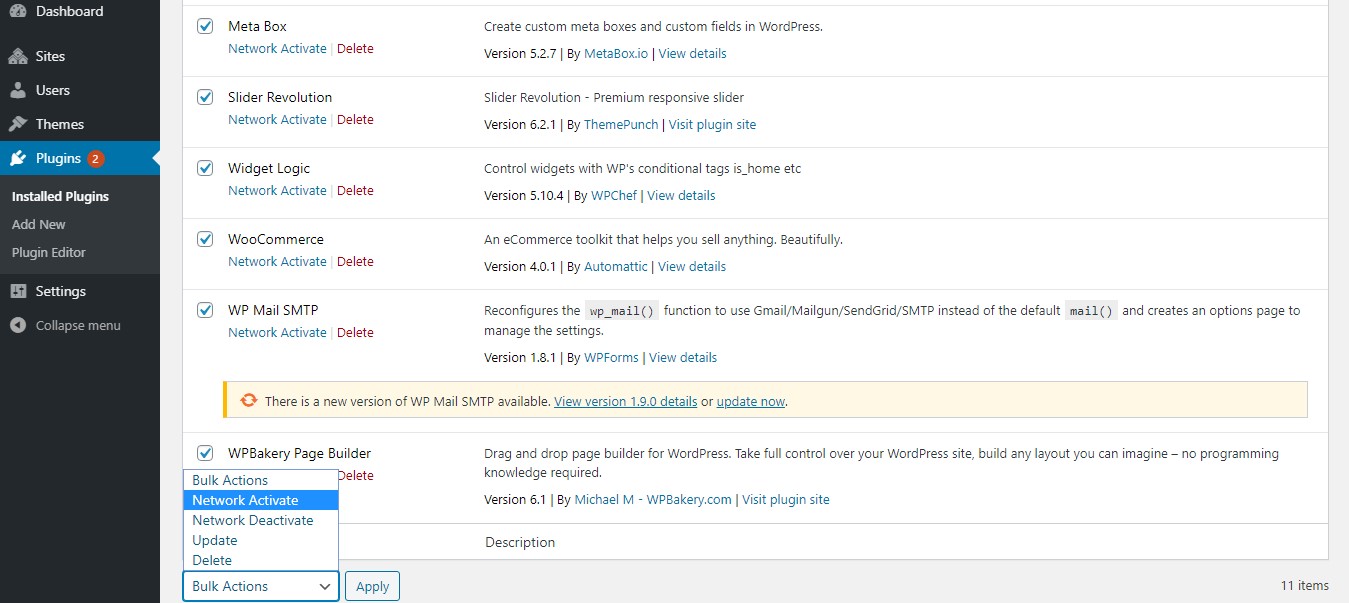
3. You completing those steps, you contiue to back your WordPress dashboard.
4. You can select all plugins and active all
Configure the plugin settings
General Tab
You can watch this video to take a closer look at the the general configuration for the Create WordPress Sandbox Automatic Plugin
Go to Create WordPress Sandbox Automatic >> General
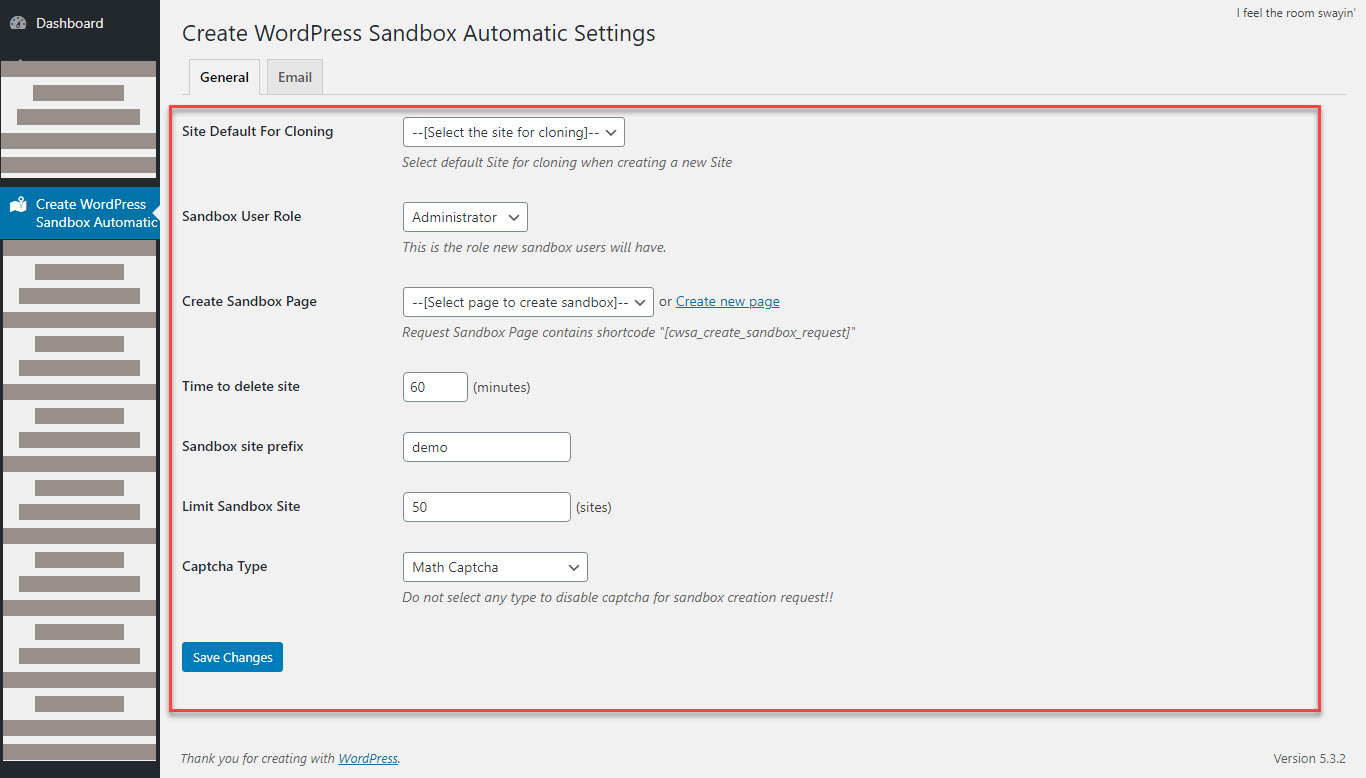
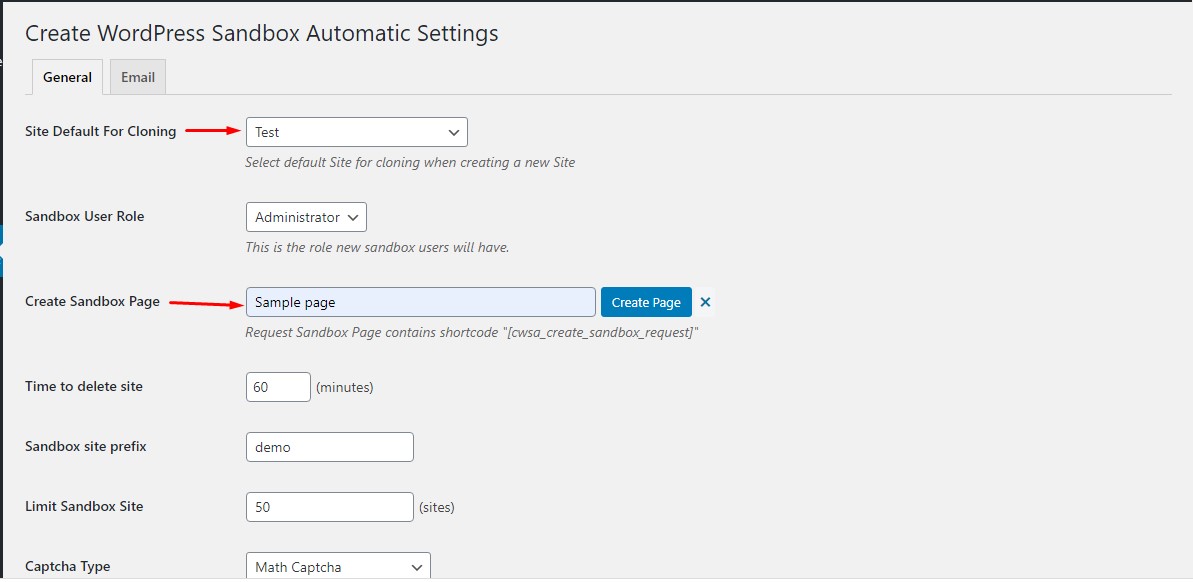
In the General tab you are able to set the following configuration:
- Site Default For Cloning: Select the site for cloning when you create a new site.
- Sandbox User Role: the role for demo users (sandboxes).
- Create Sandbox Page: You can select the existing page in the drop-down menu or create the page you want.
- Time to delete site: You can set the time amount of time the sandbox is live from the time of creation.
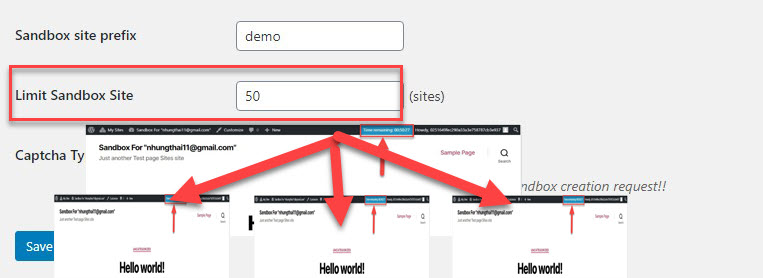
- Sandbox site prefix: Change the prefix URL directly in the sandbox page
- Limit Sandbox Site: Amount sandbox sites are created at the same time.
- Captcha Type: You can select Math captcha: type of operations format or you don't select to disable captcha
Email Tab
In the Notification tab you can set up notifications the demo user (Demo User Notification) and administrator (Admin Notification) will receive.
You can watch this video to take a closer look at the the Email configuration for the Create WordPress Sandbox Automatic Plugin
You can change the email name email address, the Footer in email text.
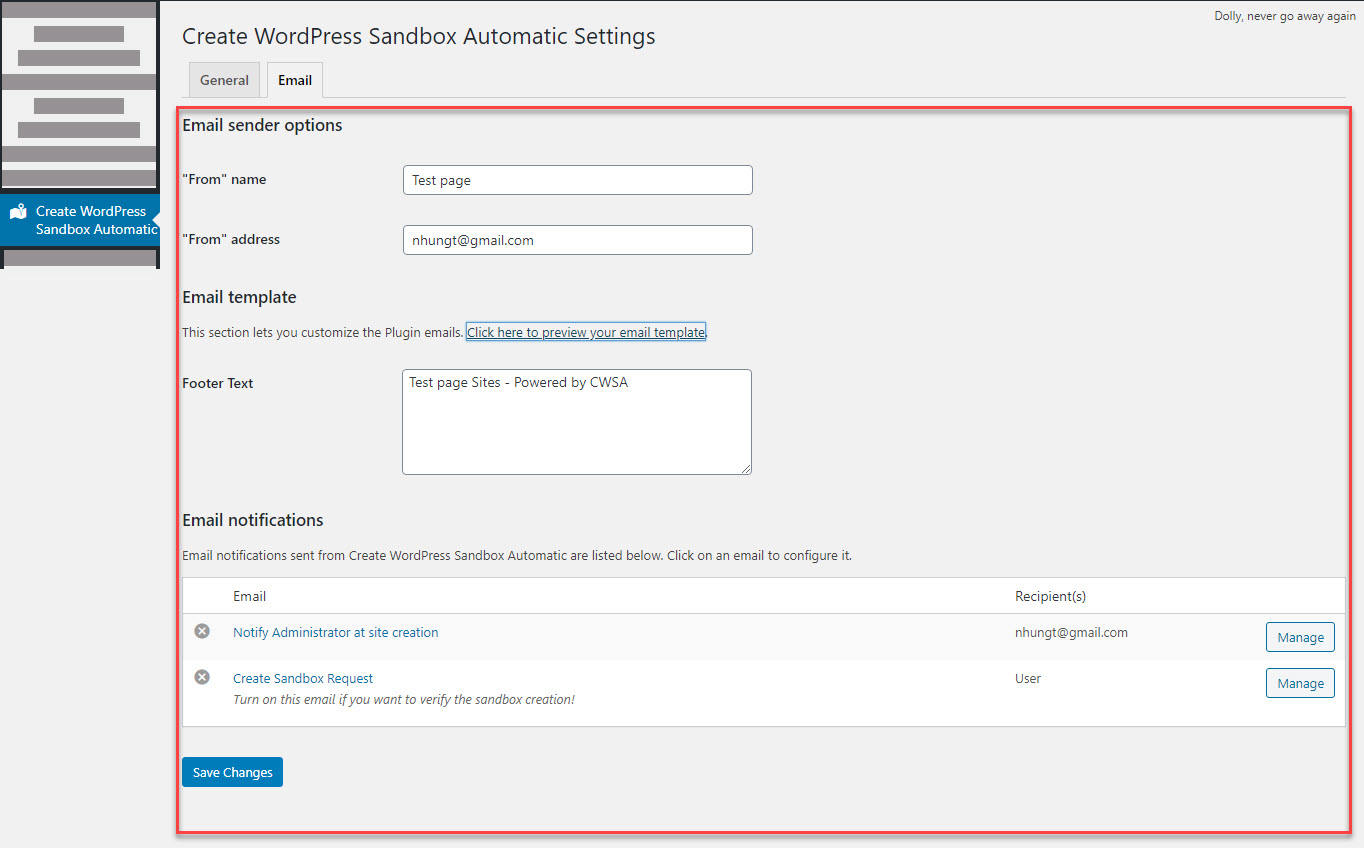
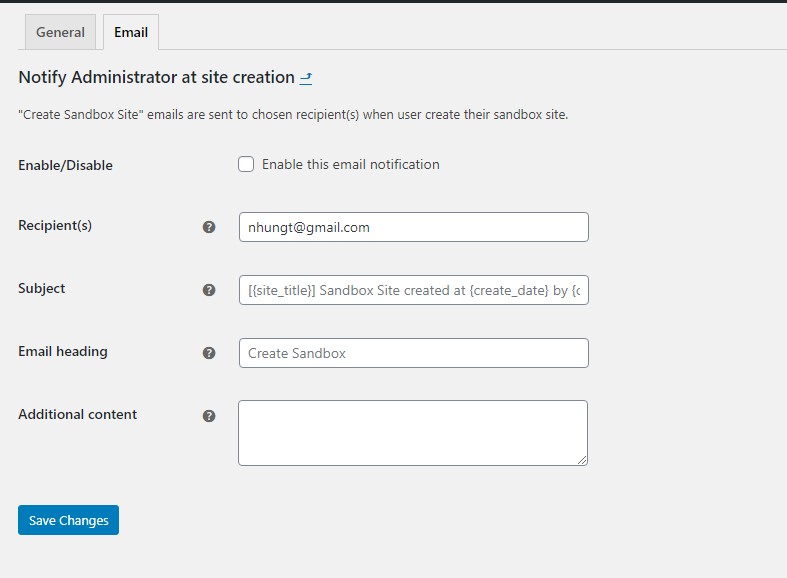
In Email notifications , you also can manage, update emails which are sent to chosen recipient(s) when users create their sandbox site and turn Notify Administrator at site creation off . Please press the Manage button to manage

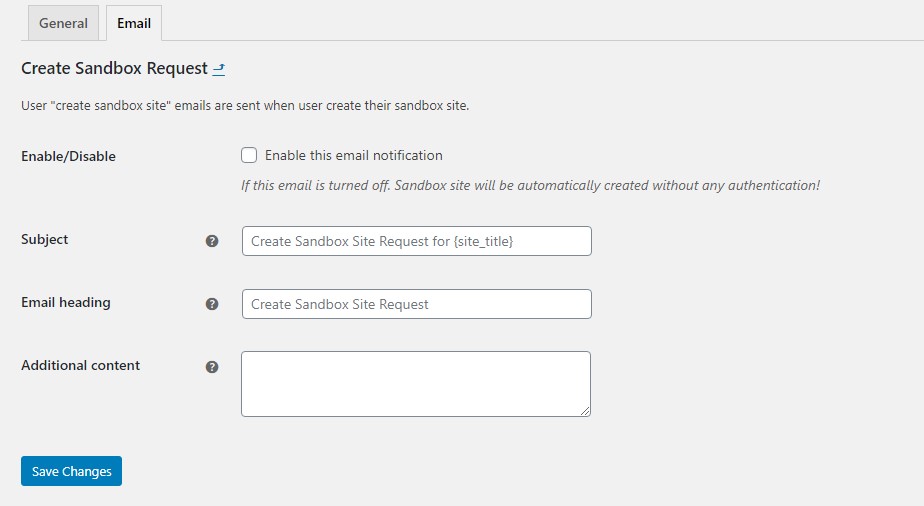
You also can manage, update emails which emails are sent when users create their sandbox site and turn Notify at site creation to User email off when you press the Manage button

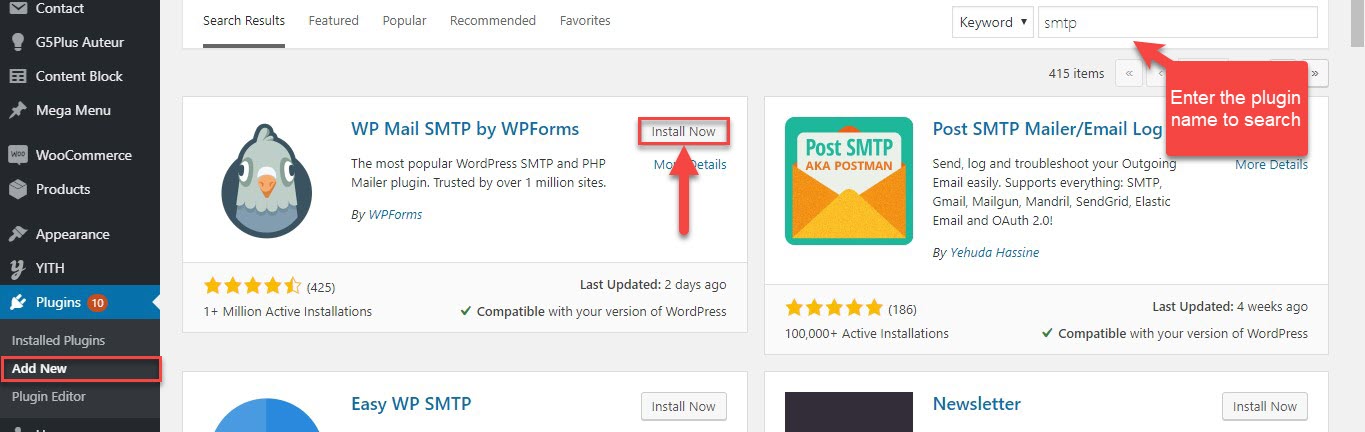
Before you can receive the notifications to mail, you need to follow this steps for SETTING MAIL.
HOW TO SETUP MAIL
WP MAIL SMTP INSTALLATION & SETTING
1. Install the WP Mail SMTP Plugin.
Wordpress will ask you to active the plugin after you install plugin successfully.
2. Setting the WP Mail SMTP Plugin
You can view this video for configuring SMTP
Or you can view this tutorial of WPForms: How to Set Up the Gmail Mailer in WP Mail SMTP
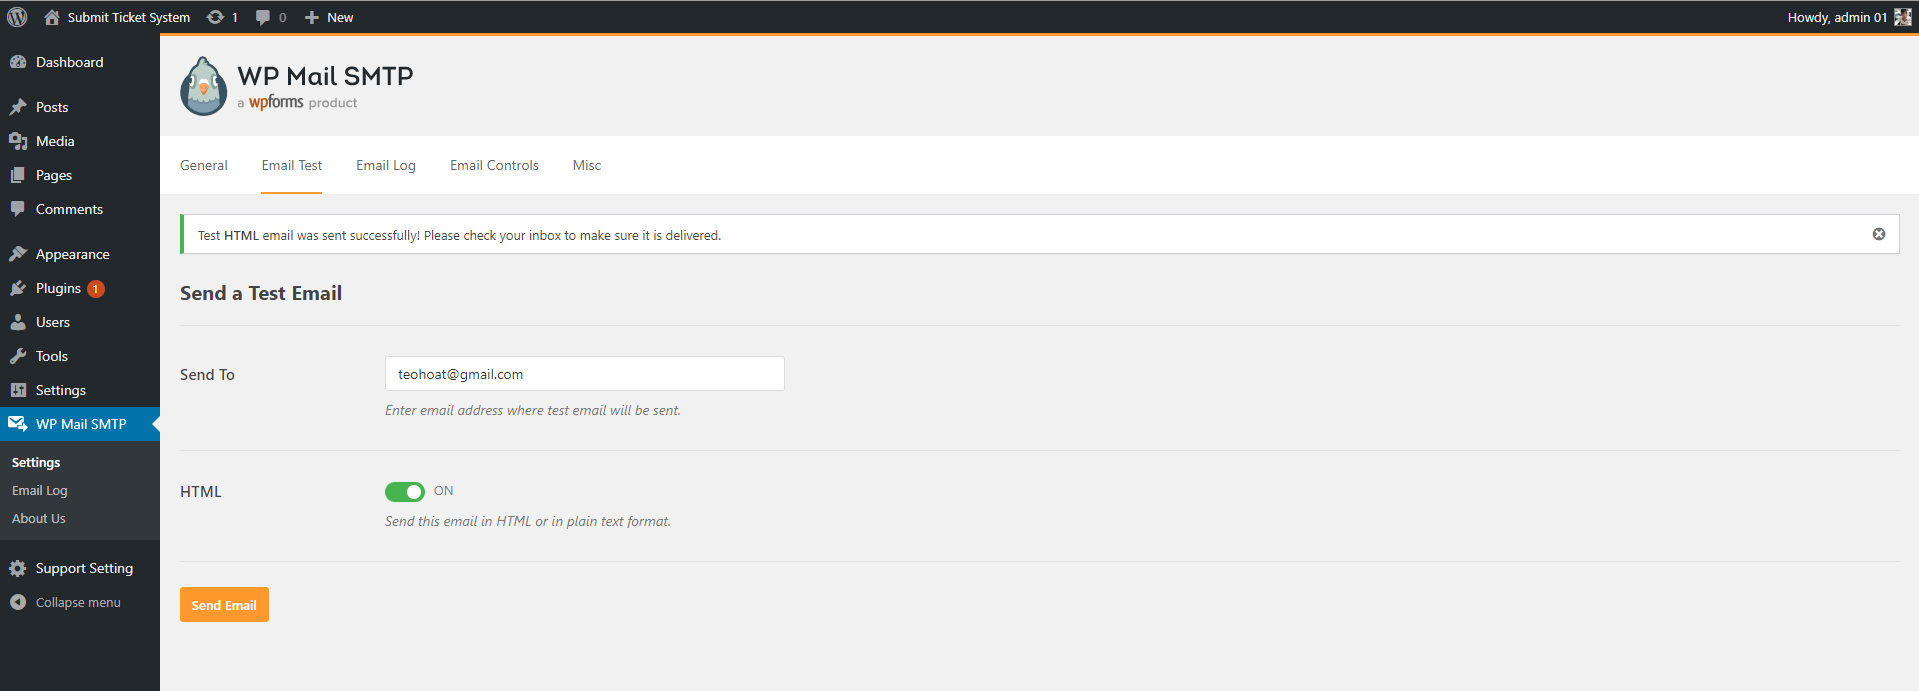
After you finish setting the mail, you can test in WP Mail SMTP » Settings, you click in Email Test tab to test
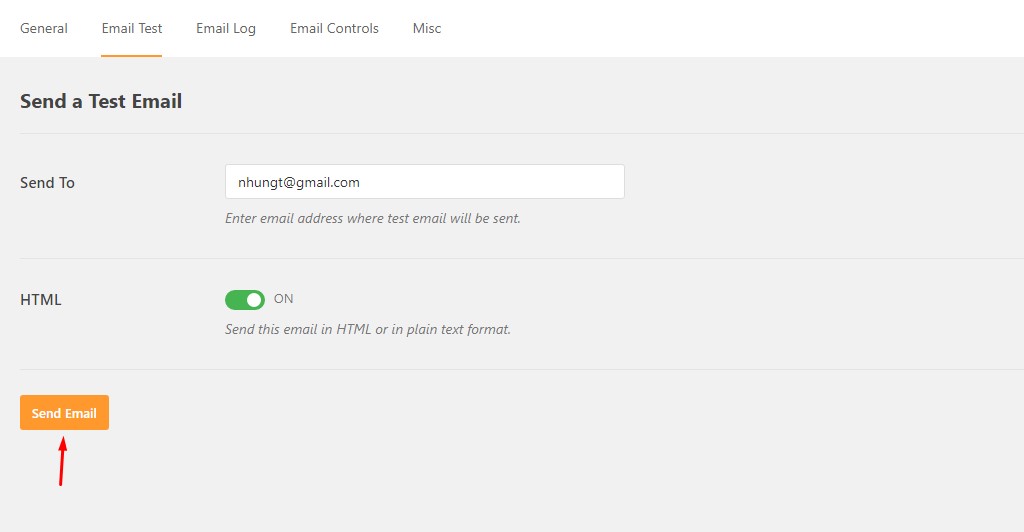
Once you enter a valid email adress in Send To field, you will know the mail delivery status. If the status is success, you can confirm the email is delivered
When the test message has been sent, you’ll see a success message at the top of this tab.
DONE. That’s it!.
How to use
You can watch the instructional video use Create Wordpress Sandbox Automatic plugin to clone website
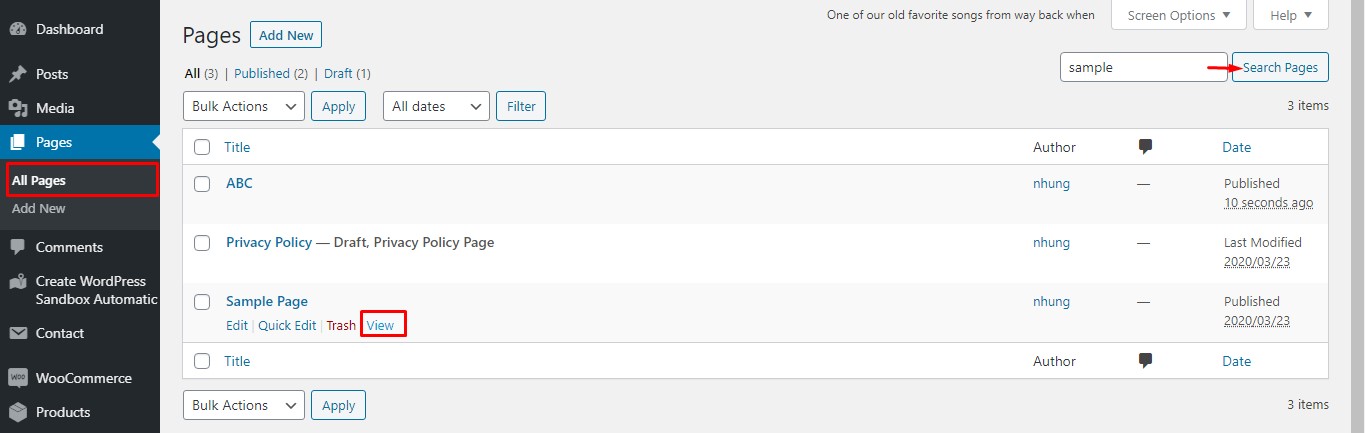
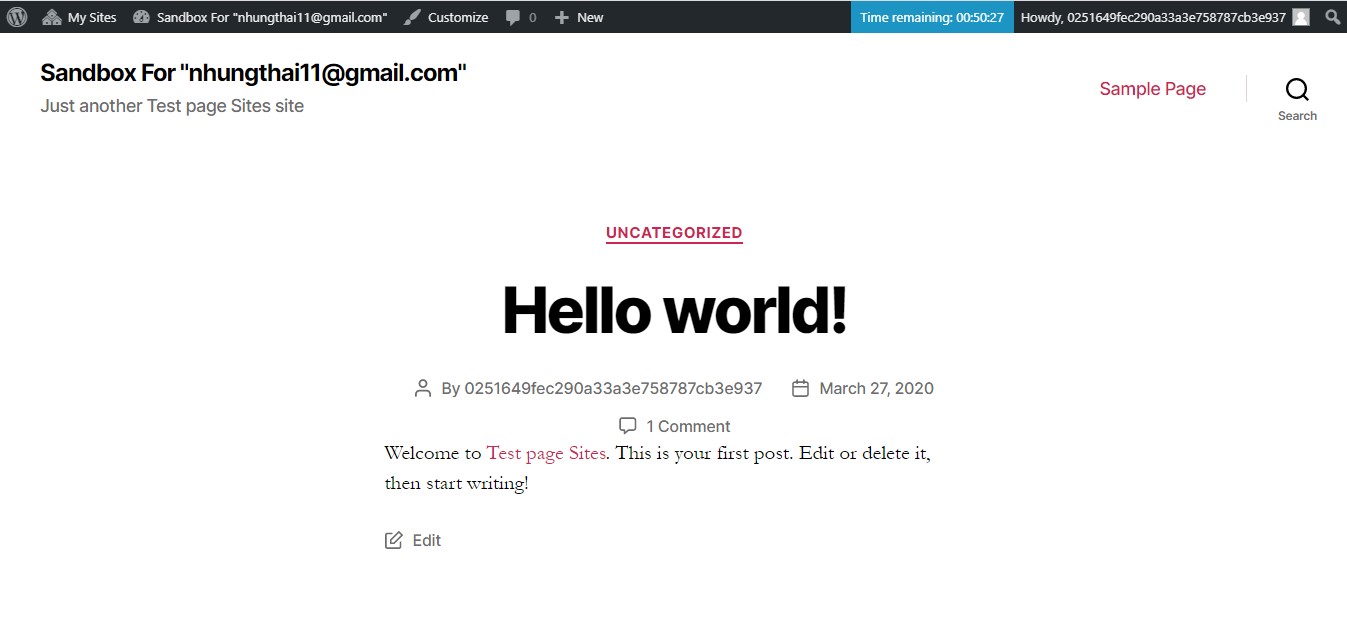
After you set the page for sandbox page, you can go to All pages and search the page name. (EX: Sample Page)
How demo users will create their sandboxes
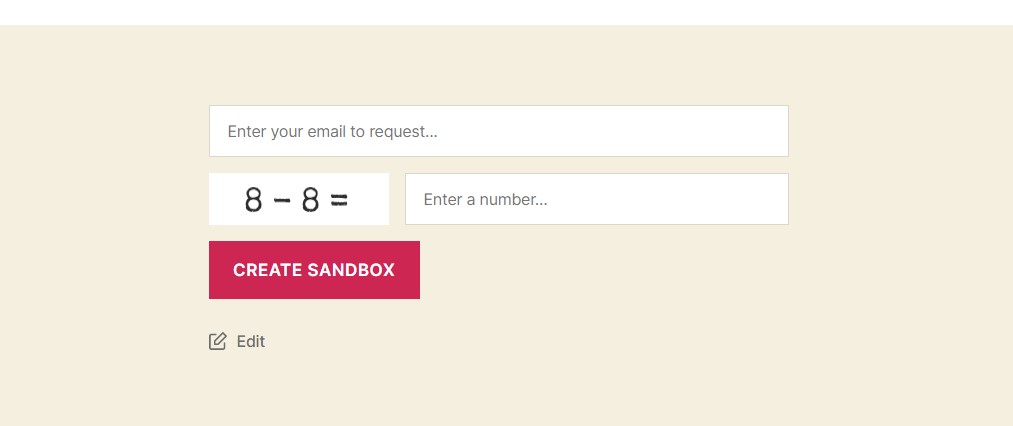
On the Sanbox page, users can enter your email address to create an automatic sandbox. If you want to display features as Captcha, you can view setting in Plugin Configuration
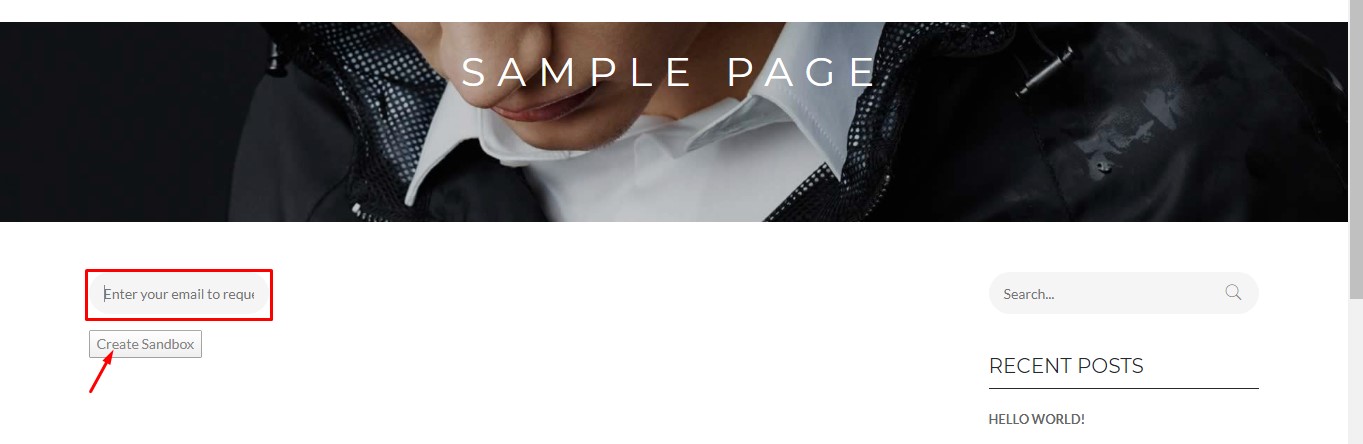
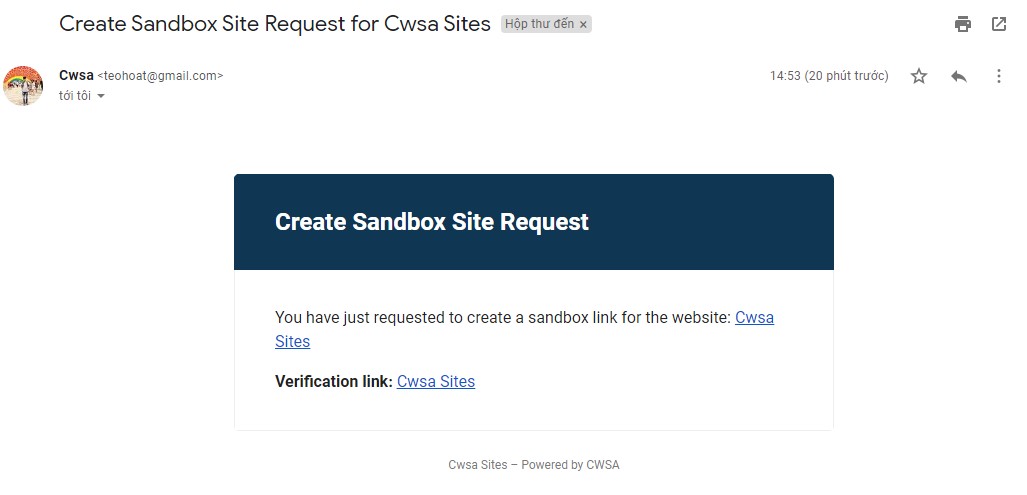
The activation link will be sent to the provided email address, you landed on your demo website.
Features of plugin
1. Create an automatic sandbox to test the WordPress plugins and/or themes.
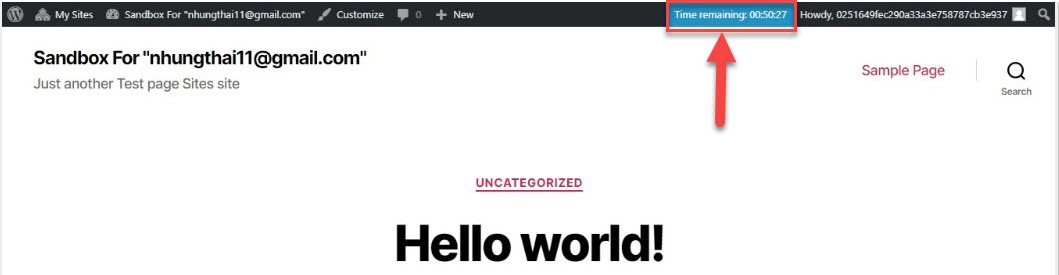
2. A countdown to inform the user about the sandbox expiration.
3. The maximum number of sandboxes are set that can be enabled at the same time.
4. The sandbox and all the related data are removed when the time runs out.
5. Users are required to confirm that they are not a robot before the form can be submitted with Captcha.
Troubleshooting
If you get any problem while downloading and installing, using Plugin. The Troubleshooting can help resolve the problem
We are updating soon!!!
Thank you for using our plugin
We have prepared detailed user manual in order to ensure smooth and easy work with the Create WordPress Sanbox Automatic plugin. However, If you have any questions that are beyond the scope of this documentation or have any troubles configuring your website applications with the above settings you can contact . G5Them Support Team will be glad to assist you.
Please feel free to contact us via Support Forum
Thanks so much!