Copyright G5Theme

Essential real estate - premium wordpress plugin

You are real estate agents, brokers, realtors or property firms. Are you looking for a suitable Real Estate plugin to install in your property website. ESSENTIAL REAL ESTATE is an ideal solution for you to set up a professional estate website where modern are combined with tasteful simplicity.

Easy to use, Friendly & Flexible with users, Powerful Features, Advanced Functions and so many shortcodes and templates helping you to build a real estate website fastly in some minutes.

Creating your own Real Estate Website by effortless way!!!

ESSENTIAL REAL ESTATE


This Plugin Review Article might provide an overview looking of all features in Essential Real Estate plugin

NOTE: In this documentation, we have used BEYOT theme that developed by our technicals so in some examples below you could see exclusive designs with logo and images of BEYOT.

Thank you for choosing our plugin. If you have any questions that are beyond the scope of this documentation, please feel free to contact us via Support Forum on wordpress.org. Thanks so much!

Server Requirements

The first step in setting up your Real Estate website is to install WordPress and the ESSENTIAL REAL ESTATE plugin itself. It's highly encouraged for you to always have the latest version of WordPress installed, this will also keep your site being more secure. But before doing so, you should check that your hosting environment meets our minimum requirements.

  • PHP 5.6 or greater
  • MySQL 5.6 or greater
  • ESSENTIAL REAL ESTATE requires WordPress 4.5+
  • WP Memory limit of 64 MB or greater (128 MB or higher is preferred)

Important quote from WordPress site:

Hosting is more secure when PHP applications, like WordPress, are run using your account’s username instead of the server’s default shared username. The most common way nowadays for hosting companies to do this is using suPHP. Just ask your potential host if they run suPHP or something similar.

We have tested it with Mac, Windows and Linux. You should also check WordPress minimum requirements and ensure your host can comply with

Install & Active Plugins

WordPress Plugin Search

The easiest way of installing a WordPress plugin is to use the plugin search.

Please consult our video guide on How to install ESSENTIAL REAL ESTATE plugin.

Video guide on How to install ESSENTIAL REAL ESTATE plugin via WordPress

First thing you need to do is go to your WordPress admin area and click on Plugins » Add New.

You will see a screen like the one in the screenshot above. Click Install Now then activate to integrate ESSENTIAL REAL ESTATE to your website.

That’s all, you have successfully installed ESSENTIAL REAL ESTATE plugin.

You can consult our video guide on How Install Essential Real Estate plugin

WordPress Plugin Uploader

You can download plugins directly to your website by using the using the Administration Panels.

  • Download the essential-real-estate directory plugin files from your wordpress.org account.
  • Log in to the WordPress Dashboard.
  • Navigate to Plugins » Add New.
  • Select Upload Plugin at the top.
  • Click Choose File and select the essential-real-estate.zip file that you have previously downloaded to your machine.
  • Click Install Now to upload the Plugin to your website.
  • Activate the plugin.

Using FTP

  • Unzip the essential-real-estate.zip file to a folder on your hard drive.
  • Upload the grid-plus folder to the WordPress' plugins folder (example: http://yourserver/wordpress/wp-content/plugins/) on your server using FTP.

Plugin overview

Essential Real Estate plugin provides a full-featured system to turn your real estate website into any sort of Real Estate website. Once you've installed and activated Essential Real Estate plugin, several items are added to your site for it to function properly:

  • New menu items in your WP main menu, custom post types, and taxonomies for property, invoice, package and more.
  • New widgets and shortcodes.
  • User roles in the backend and frontend management.

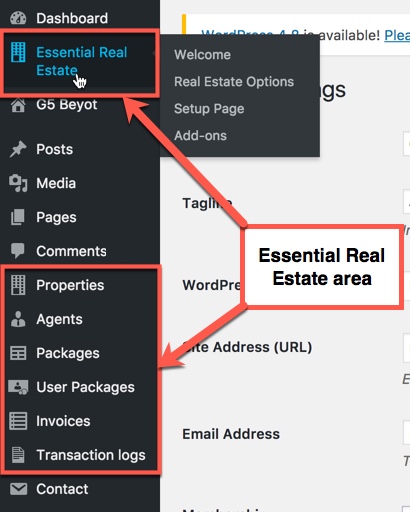
Essential Real Estate area on the admin dashboard

Essential Real Estate: includes Real Estate Options, Setup Page and Add-ons.

Essential Real Estate Setup: help you get started by creating the pages for property submission, property management, profile management, listing property, listing agent, packages, payment, login, register... If you want to skip the wizard and setup the pages and shortcodes yourself manually, the process is still relatively simple.

Essential Real Estate Setup


Real Estate Options: provides a full-featured system to turn your website into professional real estate website.
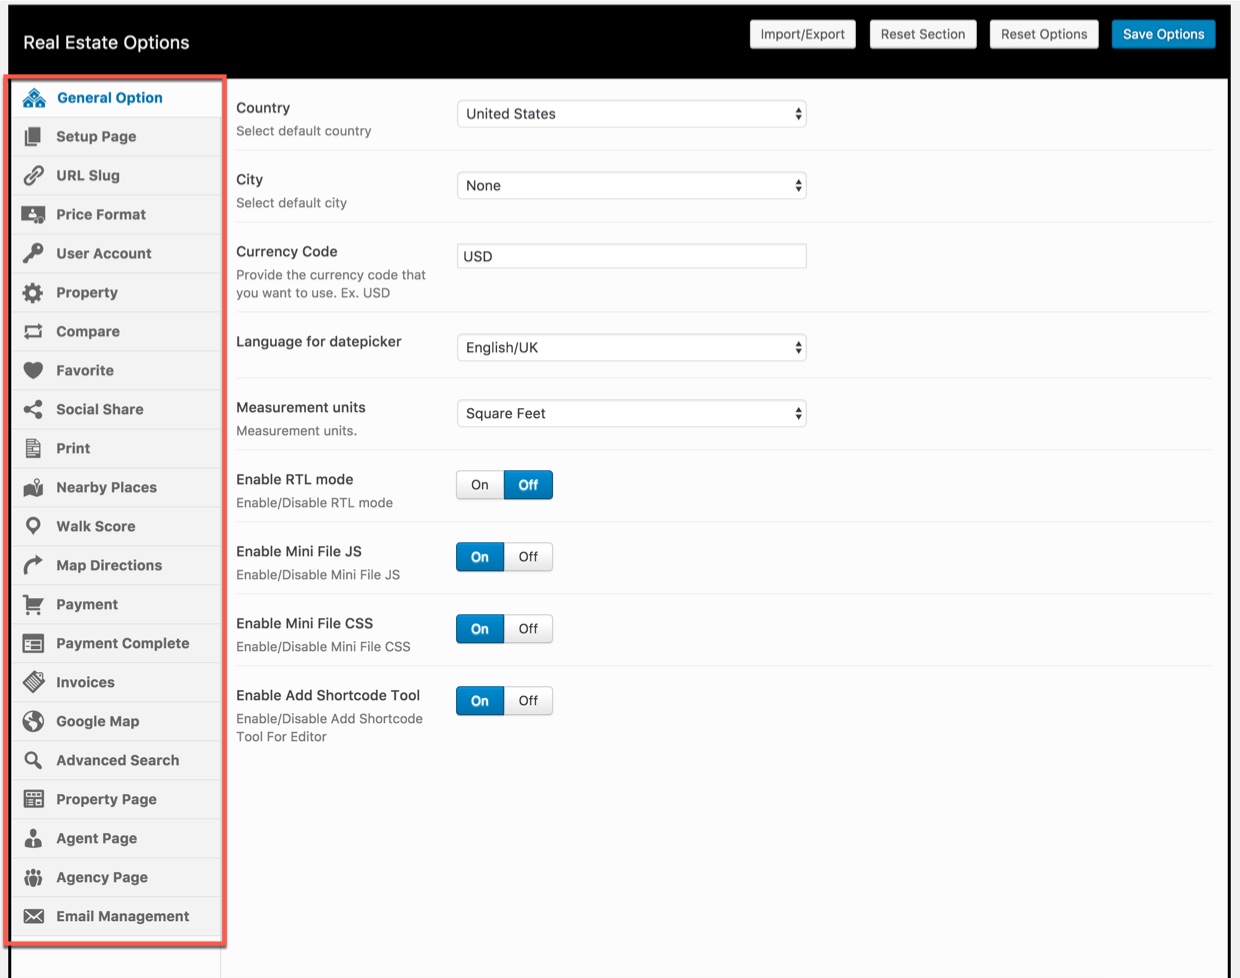
Real Estate Options


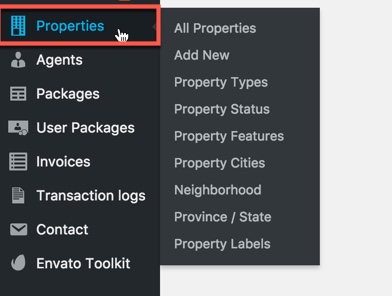
Properties: Manages all properties and attributes such as Property Types, Property Status, Property Features, Property Cities, Neighborhood, Province/State, Property Labels.


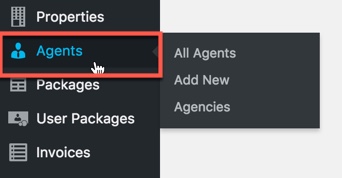
Agents: Manages all agents and agencies.


Packages: Manages all packages and package informations.


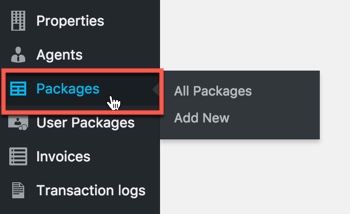
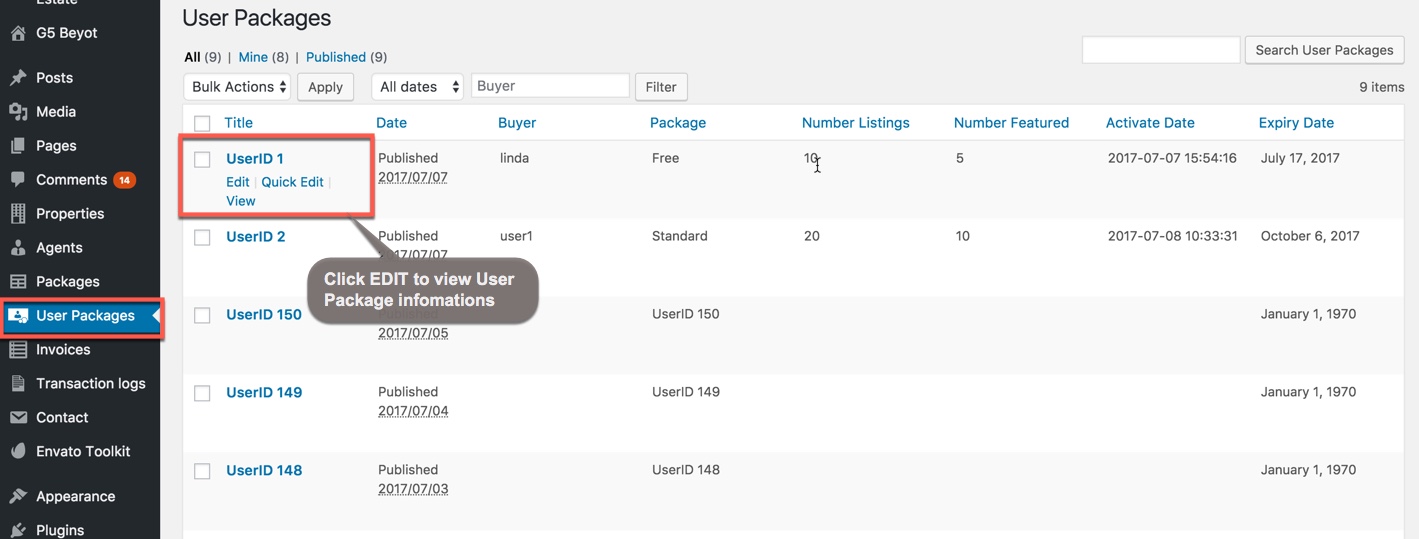
User Packages: Manages informations of user packages (admin don't has permission to change these informations)


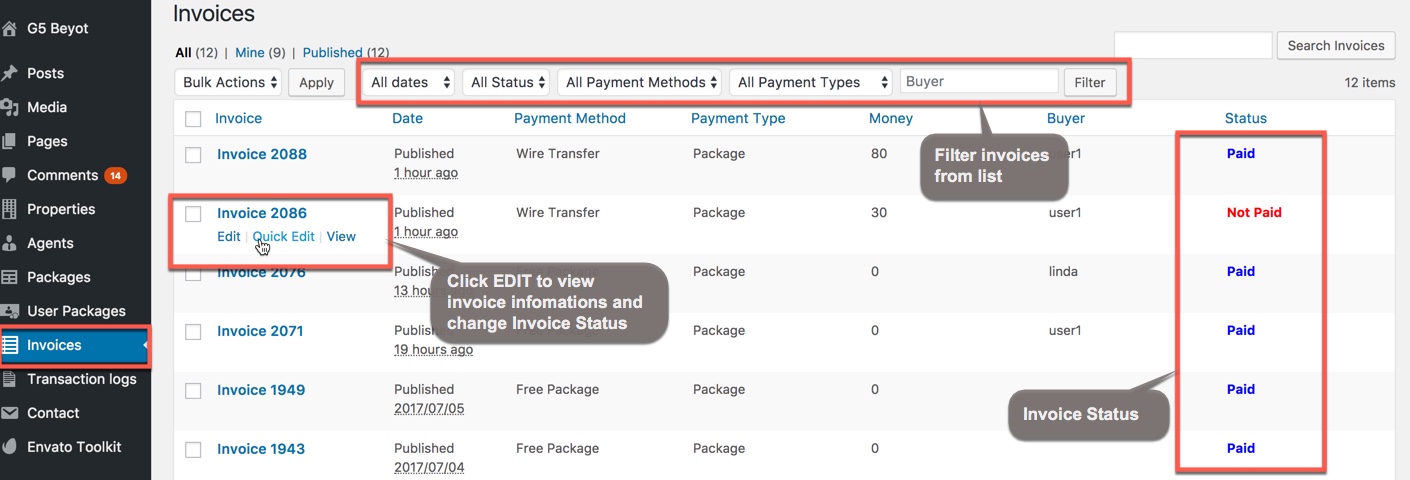
Invoices: Manages all invoices (admin can change Invoice Status from Not Paid to Paid and don't has permission to change other informations. Only buyers can see their invoices on the frontend.)


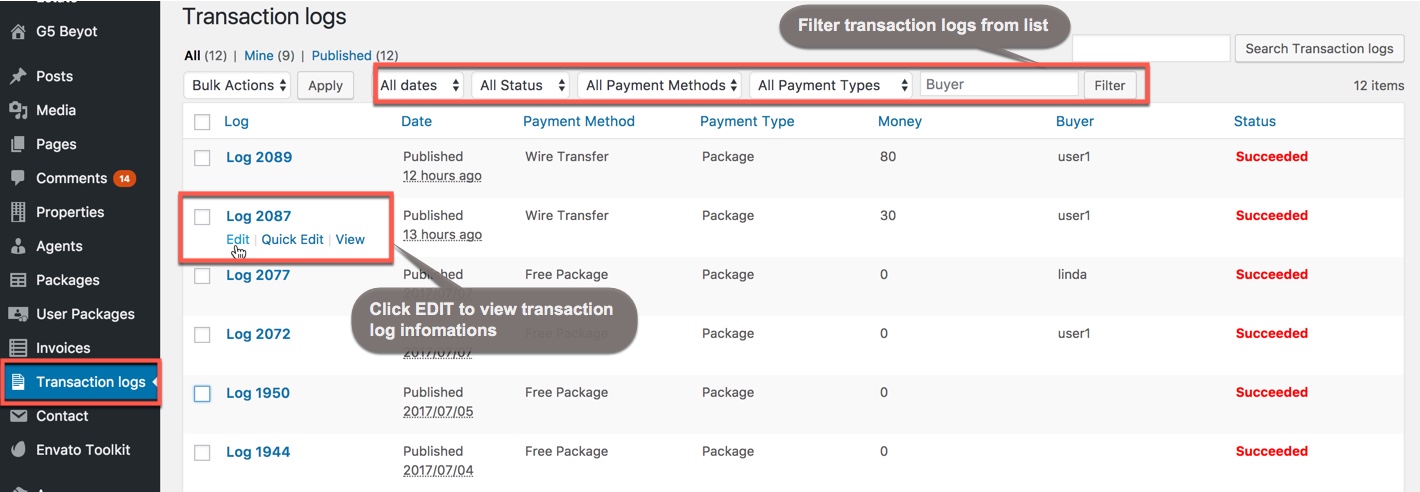
Transaction Logs: Manages all transaction log (admin don't has permission to change any informations of transaction log)


ERE Widgets: Widgets in ERS plugin will be displayed in available widgets.To activate a widget, you can drag or drop element to widget area as your liking.

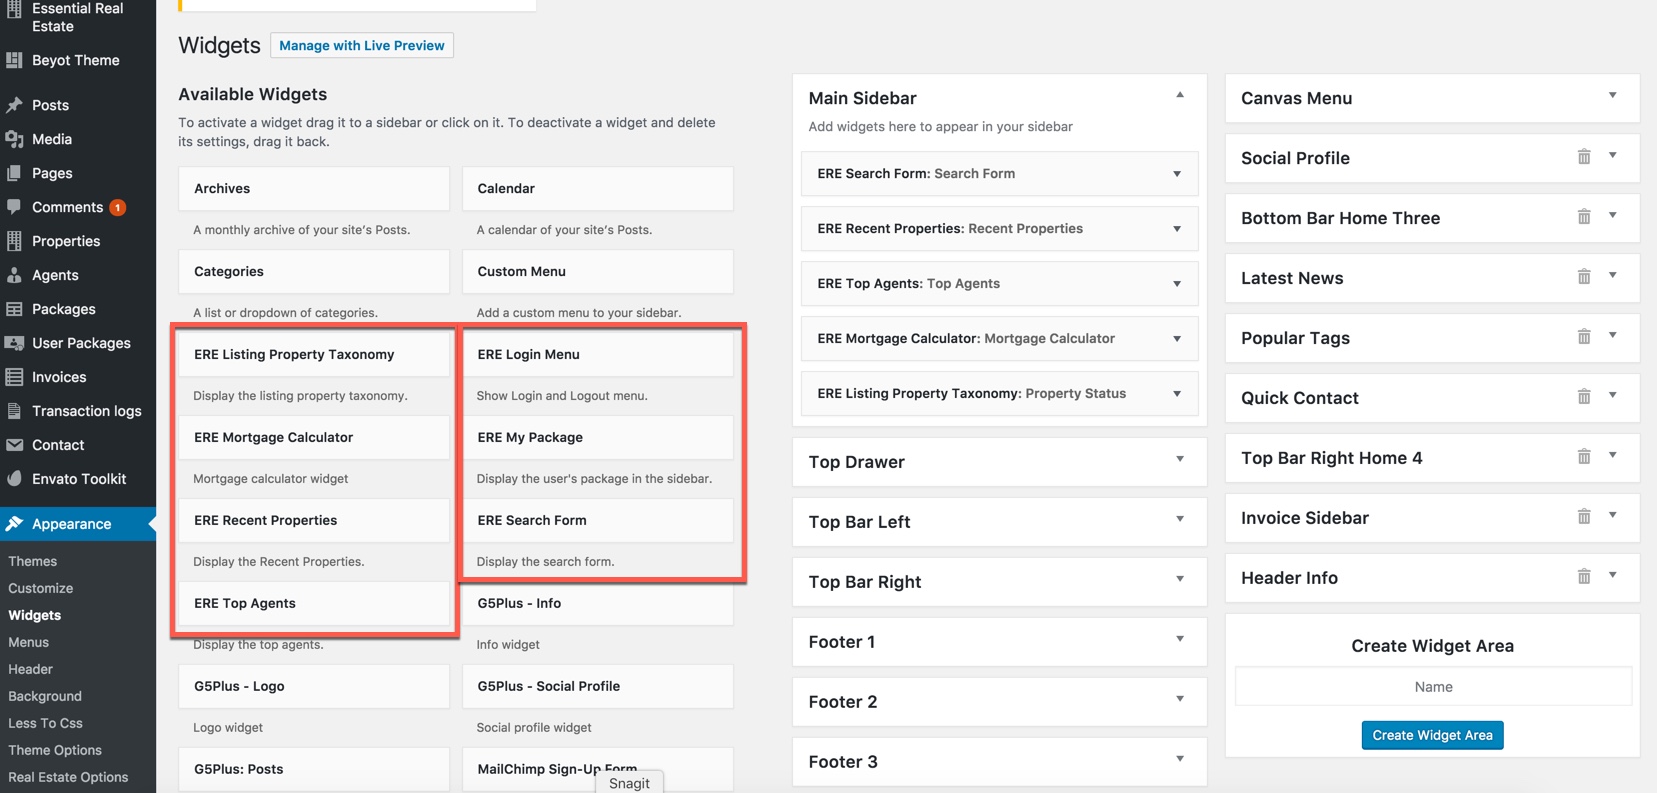
Widget area in WP dashboard

ERE Shortcode: A shortcode is a method for including special content in a Post or Page. For example, the ESSENTIAL REAL ESTATE plugin gives users a shortcode to add MY PROPERTY page to their site. Here’s what that shortcode looks like:

[ere_profile]

You can consult ERE Shortcode section for more details about how to using shortcode with Visual Composer and without Visual Composer.

We have put a lot of effort into improving this documentation to help you the best in finding solutions for your real estate website with ERE plugin. We highly encourage you to explore our plugin with all its powerful features and experimentwith what all the available options can do.

Import Sample Data

We used paid theme for demo display: BEYOT theme. After process of installation and activate ESSENTIAL REAL ESTATE plugin, you can create same design as like demo site by Import XML Demo Data (include Properties, Pages, Listings..) by following these step as below:

Download the sample data: HERE

Step 2: Import test data into your WordPress install by going to Tools => Import => WordPress

  • If you haven't installed the WordPress import plugin, a popup window will appears and ask you to install it. Just click Install Now. When the installation progress is completed, click Run Importer. If you have installed this plugin, skip to next step.


Step 3: Click Browse and select demo-data.xml file from the download file

Step 4: Click on Upload file and import.

Under Import Attachments check the Download and import file attachments box and click submit.

Using Real Estate plugin purpose

We have been spent more time to survey how customers demand in a Real Estate plugin so we can confidently affirm that Essential Real Estate (ERE) is a Powerful plugin to match with all your design with 100% Responsive and Mobile Ready, easily integrated to any WordPress website, compatible with all kinds of Themes and Frameworks, quickly set up, publish and update.

ERE provides a full-featured system to turn your real estate website into a Real Estate website for community (marketplace), or Real Estate website for Agency.

In this documentation we will give you 2 options to use ERE plugin with detailed instructions to modify the default behaviour of the plugin that match to using purpose in your website

REAL ESTATE COMMUNITY

When you use your website for Real Estate brokers, it means that you will empower for clients to create an account and proceed to exchange real estate deals on your website, from here agreement entered into by two parties for their mutual benefit.

Clients can register and log into the website by their accounts or via social accounts. There are many different packages with specific features suitable for users to choose the best one for their business goal. Users do not only manage their profiles, properties listings but also can quickly search properties or agents based on filter location, type, packing,bathroom, bedroom (Advanced Search feature)...

REAL ESTATE AGENCY

The Real Estate Agency website is a network offering exclusive real estate services to buyer, it focuses on showing information and helping clients buy real estate that best suits their needs.

Real Estate Community

When you use your website for Real Estate brokers, it means that you will empower for clients to create an account and proceed to exchange real estate deals on your website, from here agreement entered into by two parties for their mutual benefit.

Clients can register and log into the website by their accounts or via social accounts. There are many different packages with specific features suitable for users to choose the best one for their business goal. Users do not only manage their profiles, properties listings but also can quickly search properties or agents based on filter location, type, packing,bathroom, bedroom...

These sections below will display exactly features that have been integrated in Essential Real Estate plugin for Real Estate Community website.

LOGIN & REGISTER

Clients can create their own account by using the signup form.

Please consult our video guide on How to configure Register Form using Essential Real Estate plugin.

Register Form For Client on the frontend

If you have not had an account yet, you need to register. The administrator can enable account activation by settings in User Account in Real Estate Options. If User Account panel is Users can type the password on registration form then new accounts will be enabled immediately after the user has completed the form.

If this option is No, it means that the user user will get the auto generated password via email then must activate the account via a link in the confirmation email before it will be activated. This makes sure the specified email is valid. The confirmation link will automatically be generated.

==>

The login page allows the user to login and either redirect the user to the protected page or an accces denied page (if the password is wrong).

To make it easier and faster the recording process we included the option to login using Facebook, Google and accounts.Twitter

Logout: The Logout object gives the user the ability to log out.

User Profile Management

Please consult our video guide on User Profile Management.

Video guide on How User manage Profile

Users manage their Account Profile by clicking on account name at the top of the page then click on the My Profile tab.

With User Profile Dashboard, users can register and apply to become an agent, manage their properties from the frontend, communicate with buyers, control their public profile, and more.

This page contains four areas as outlined below:

The information used in these Profile areas isn't only how system identify you, but also is publish informations to other users. Site admins have complete control over the agents and properties approval process. You can Register to become an Agent in (2) area, or buy a Package to submit properties in (3) area, or also update your Password in (4) area.

After adjusting any of the fields on this page you'll need to click Update Profile at the bottom of the page.

User Register to become an Agent

A real estate agent (real estate broker) is a person who acts as an intermediary between sellers and buyers of real estate/real property. Agents perform different duties, depending on whether they work for the buyer or the seller. They attempt to find sellers who wish to sell and buyers who wish to buy and work completely on commission.

Note:

  • By setting User Account panel in Real Estate Options, Admin can enable/disable "User can register as agent" option.
  • If User Account panel is setup that Automatically approved after user register as agent then the account will be enabled as an agent immediately after the user has completed the form. If this option is No then new accounts will not be accepted as an agent until the administrator enables them.

    User click to Become an Agent button

    If Users want to become an Agent they need to register based on agreement Terms and Conditions.

    User need to be waited before become an Agent

    User profile when waitting for approvement to become an Agent

    User profile after become an Agent

    If the user became to be an agent, their profile would be like this:

    User Profile after becoming an agent looks like:


    You can consult our video guide on How Admin use "User Account" option and manage agents list in the backend

    Video guide on How Admin use User Account option and manage agents list

  • User Property Management

    Please consult our video guide on Submit a New Property via frontend and User Property Management.

    Submit a New Property via frontend and User Property Management

    Add New a Property

    There are two ways for user to add new a property.


    Here is Add New Property on website display for User. All you need is filling informations of you new property then click on Submit Property

    After create a new property successfully, You will be received the notification as below:

    or like this (It's depend on How administrator configurage Property panel in Real Estate Optionsthat the submitted property will need to be approved before publish by administrator or No).

    Property Management

    Paid Submission Type

    Please consult our video guide on How to setup up Paid Submission Types.

    Video guide on How to setup up Paid Submission Types

    Depending on configurations of administrator in the Paid Submission Type (Payment option in Real Estate Option), clients after login to website can submit a new property and might be paid amount money to perform.

    Administrator will select one in 3 options are: Free Submit or Pay Per Package or Pay Per Listing. This section gives you explanation the different between Paid Submission Types

    Free Submit

    With this selection, the administrator empower users to submit all properties for free.

    Pay Per Package

    From Profile Management, the users will be suggested to buy packages.

    or change package if the users have had one already.

    Or after clicking on New Property, the users could get the notification that suggest to buy a package conform your needs:

    Click to button Get Package to buy a package. It depends on configurations of Administrator, users could be requested to buy a package, per package contains expired date, property number, featured listings... relatively with amounts of money they paid. The packages list is showed up as below:

    • Expiration Date: The date on which package can no longer be used. After exprire date, the users cannot submit any property and edit their properties that were published as well.
    • Property Listing: A number of properties are submited.
    • Featured Listings: A number of feature properties are submited.

    Click to button Choose to get a package that best suits your needs. It will go to page check out with Payment Methods

    Pay Per Listing

    With this situation, the users can click on New Property, then fill all extra informations and click on button Submit Property. The users could get the notification that suggest pay money for submission.

    After choosing an option that best suits (Submission standard or Submission with featured), the users need to check out with Payment Methods

    Payment Methods

    Please consult our video guide on How User Perform Payment Methods.

    Video guide on How User Perform Payment Methods

    Right after you selected a package/option, you will be suggested to continue with the payment methods for the package/option you chose.

    Payment Methods displays when Paid Submission Types has been set Pay Per Package


    Payment Methods displays when Paid Submission Types has been set Pay Per Listing


    Method 1

    If you choose Pay with Paypal method, you will link to paypal checkout page as below to confirm your payment.


    Method 2

    If you choose Pay with Credit Card method, you will get the registration form as below to confirm your payment.


    Method 3

    If you choose Wire Transfer method, you have to transfer the money, right after the administrator confirmed that you paid through Order Number, they will approve your account with package you paid and send verification email to your email.

    Invoice Management for User

    Please consult our video guide on How User manage invoices.

    Video guide on ow User manage invoices

    Invoice List

    Users can view their invoices list and invoice in account profile:

    Invoice Status diplays payment confirmation of each invoice.

    Invoice Details

    The Invoice Details is showed up as below:

    My Favorite

    Add a property to "My Favorite" list

    You can add any property to your Favorite list, and get it out by clicking on the Star button.

    Manage "My Favorite" list

    You can manage your My Favorite list by adding more properties or get them out.

    Note: If any property belong to your Favorite list, the star in button will have different color to other area. On the contrary, the star will have the same color to other area.

    Share & Compare Properties

    Please consult our video guide on SHARE - COMPARE - FAVORITE PROPERTIES feature for Users.

    Video guide on SHARE - COMPARE - FAVORITE PROPERTIES feature for Users

    Share Property

    This feature allows user to share any property on their Social channels.

    Compare Properties

    User can use this feature to compare between two or more properties based on their basic criterions.

    Step 1: Click on Compare button of each property you want to compare, it will appears immediatetly in the Compared list on the right of the screen.


    Step 2: Click on Go button in Compared list.

    Dashboard For Administrator

    These screenshots below will display exactly features that have been integrated in G5 Real Estate plugin for Administrator in Real Estate Brokers website

    Agent Management

    Please consult our video guide on How Admin manage agents list in the backend

    Video guide on How Admin manage agents list

    In Real Estate website for commnunity, administrator can Create New Agent and have permission to approve/edit/view/delete any agent from All Agents list.

    Administrator navigate to Properties → All Agents in WordPress admin dashboard.

    By setting User Account in Real Estate Options that Automatically approved after user register as agent? or not, Admin has permission to approve the users register as agent.

    When user register as agent, it will display with Pending status. If you want to publish it, click on Approve button.

    Administrator can click on Edit button to edit informations of an agent:


    You also can view the agent on the frontend by clicking on View as screenshot below:

    Property Management

    Please consult our video guide on Publish Property Option - Admin Property Management .

    Video guide on How to Use Publish Property Option - Properties Management via backend

    In Real Estate website for commnunity, administrator can Create a New Property and manage all properties list as below:

    Administrator navigate to Properties → All Properties in WordPress admin dashboard.


    By setting Property in Real Estate Options that automatically publish the submitted property or not, Admin has permission to approve property before it is submitted.

    • Properties are PENDING means that the property need to be approved to publish. If you want to publish it, click on Approve button.
    • If you want to mark property as expried date, click on Expire button.
    • You can Edit property informations, Delete or Preview property on the frontend.

    Edit property in the admin dashboard

    On the frontend, when users submited property and waiting for approvement from admin, the screen will display like this:

    Invoice Management

    Please consult our video guide on Invoices Management via backend.

    Video guide on Invoices Management via backend

    Administrator has permission to set invoice status from Not Paid to Paid after confirmed payment from user, administrator can also edit or view invoice from list as below.


    Set invoice status from Not Paid to Paid after confirmed payment from user.


    Package Management

    Please consult our video guide on Packages Management via backend.

    Create a new Package

    You can consult our video guide on How admin manage Packages.

    Packages Management

    Administrator can create a new package and edit, view or delete any package from list as below.

    All Packages list in admin dashboard


    Edit Packages in admin dashboard


    Transaction Logs

    Typical web transactions are when a customer login as member website then fills in and submits a web form, makes a purchase on site (ex: buy a package). All of them will be saved into Transaction Logs.

    Administrator can view and edit only Excerpt in Transaction Log.

    All Transaction Logs in admin dashboard


    Edit Transaction Log to view transaction log details

    Real Estate Agency

    The Real Estate Agency website is a network offering exclusive real estate services to buyer, it focuses on showing information and helping clients buy real estate that best suits their needs.

    These screenshots below will display exactly features that have been integrated in Essential Real Estate plugin for Administrator in Real Estate Agency website.

    All Properties Management

    Please consult our video guide on How admin change published property option and manage properties.

    Video guide on How to Use Publish Property Option - Properties Management via backend

    As mentioned, the Real Estate Agency website goal is a network offering exclusive real estate services to buyer and focuses on showing informations, so the administrator can setting Property option in Real Estate Options is Automatically publish the submitted property - Yes - in order to publish the properties without approvement from admin.

    Administrator can add a new Property and also edit/view or delete any property from list as below:


    Click on Edit button you will access to Edit Property page:


    You can view the property on the fronend as screenshot below:

    property on the frontend

    Create a new property

    Please consult our video guide on How to submit new property via backend.

    Video guide on How to submit new property via backend

    Administrator has permission to create any number of properties with content. Go to Properties in Dashboard and click Add New option.

    This screenshot below is full detailed Add new property page.

    • 1. Title: insert a new title for your property in the title field.
    • 2. Description: insert the property description in the editor field.
    • 3. Discussion: check the box options to seclect discussion type for the property.
    • 4. Settings: fill in all options to give the best visual overview for readers.
    • 5. Property Types: select a property type from the most used property types, for example you can assign the type Appartment or Bar to a property.
    • 6. Property Status : select a property status the most used property Status, for example you can assign the status For Rent or For Sale to a property.
    • 7. Property Features: select property features from the most used property features, for example you can assign the features Fire Alarm, Gym and Home Theater to a property.
    • 8. Property Cities: select exactly city where property located from the most used property cities.
    • 9. Neighborhood: select neighborhoods from the most used neighborhood.
    • 10. Province/State: select province/state where property located from the most used province/state.
    • 11. Property Labels: select a property label from the most used property labels, for example you can assign the label Hot Offer or Sale to a property.
    • 12. Featured Image: upload the image using the Featured Image panel.
    • 13. Publish

    Published Property on the frontend will look like this:

    Property Types

    Please consult our video guide on Add New Property Attributes (Property Types, Property Labels, Neighborhood...).

    Video guide on How admin Add New Property Attributes (Property Types, Property Labels, Neighborhood...)

    When you create a new property, you have to insert detail informations to locate your new property. These informations are property attributes that you can manage in the Properties panel.

    To manage Property Types, navigate your admin panel to Properties → Property Type


    • 1. Name: insert the name for your property type.
    • 2. Slug: insert the slug for your property type (optional)
    • 3. Parent: select parent property type if needed. Usually you don't need to do it.
    • 4. Description: insert the description for your property type.
    • 5. Icon Image: Upload an image that can describe your property type
    • 6. When category is ready, please click on button Add New Property Type

    Property Types on the frontend will look like this:

    Property Status

    When you create a new property, you have to insert detail informations to locate your new property. These informations are property attributes that you can manage in the Properties panel.

    To manage Property Status, navigate your admin panel to Properties → Property Status


    • 1. Name: insert the name for your property status.
    • 2. Slug: insert the slug for your property status (optional)
    • 3. Parent: select parent property status if needed. Usually you don't need to do it.
    • 4. Description: insert the description for your property status.
    • 5. Background Color: select background color for label of your property status
    • 6. When category is ready, please click on button Add New Property Status

    Property Status on the frontend will look like this:

    Property Features

    When you create a new property, you have to insert detail informations to locate your new property. These informations are property attributes that you can manage in the Properties panel.

    To manage Property Features, navigate your admin panel to Properties → Property Features

    Manage all property features


    You can add a new property feature and manage all property features in list

    • 1. Name: insert the name for your property feature.
    • 2. Slug: insert the slug for your property feature (optional)
    • 3. Description: insert the description for your property feature.
    • 4. When the category is ready, please click on button Add New Property Feature

    Setup parent category of the property feature

    Property Features on the frontend will look like this:

    Property Features on the frontend

    Property Cities

    When you create a new property, you have to insert detail informations to locate your new property. These informations are property attributes that you can manage in the Properties panel.

    To manage Property Cities, navigate your admin panel to Properties → Property Cities


    • 1. Name: insert the name for your property city.
    • 2. Slug: insert the slug for your property city (optional)
    • 3. Description: insert the description for your property city.
    • 4. Taxonomy Setting: select the Province/State that the property city belong to.
    • 5. When category is ready, please click on button Add New Property City

    Property Cities on the frontend will look like this:

    Neighborhood

    When you create a new property, you have to insert detail informations to locate your new property. These informations are property attributes that you can manage in the Properties panel.

    To manage Neighborhood, navigate your admin panel to Properties → Neighborhood


    • 1. Name: insert the name for your neighborhood.
    • 2. Slug: insert the slug for your neighborhood (optional)
    • 3. Description: insert the description for your neighborhood.
    • 4. Taxonomy Setting: select the city that the neighborhood belong to.
    • 5. When category is ready, please click on button Add New Neighborhood

    Neighborhood on the frontend will look like this:

    Province/State

    When you create a new property, you have to insert detail informations to locate your new property. These informations are property attributes that you can manage in the Properties panel.

    To manage Province/State navigate your admin panel to Properties → Province/State


    • 1. Name: insert the name for County/State.
    • 2. Slug: insert the slug for County/State (optional)
    • 3. Description: insert the description for County/State.
    • 4. Taxonomy Setting: select the country of this Province/State.
    • 5. When category is ready, please click on button Add New Province/State

    Province/State on the frontend will look like this:

    Property Labels

    When you create a new property, you have to insert detail informations to locate your new property. These informations are property attributes that you can manage in the Properties panel.

    To manage Property Labels, navigate your admin panel to Properties → Property Labels


    • 1. Name: insert the name for Property Labels.
    • 2. Slug: insert the slug for Property Labels (optional)
    • 3. Description: insert the description for Property Labels.
    • 4. Background Color: Set background color for label.
    • 5. When category is ready, please click on button Add New Property Labels

    All Agents Management

    The Real Estate Agency website focuses on showing information and helping clients buy real estate that best suits their needs. Agents/Agencies are often adds by the administrator (administrator does not need to approve an user to become an agent anymore) so All Agents page could be like the below screenshot.


    By setting User Account in Real Estate Options that Automatically approved after user register as agent? or not, Admin has permission to approve the users register as agent. It is specially spent for Manage Agents in Real Estate Community website.

    In Real Estate website for Agency, administrator can manage all agents by clicking on Delete/Edit/View from the Admin Dashboard.

    Click on Edit button you will access to Edit Agent page:


    You can view the agent on the fronend as screenshot below:


    Please consult our video guide on How to manage all agents.

    Create an Agent

    Essential Real Estate plugin allows administrator to create new an agent and manage all agents on the Dashboard. In this section I will show you how to create an agent from Admin Dashboard

    Please consult our video guide on How to create new agent.

    Video guide on How to create new agent

    Step 1 - Click the Agents → Add New tab

    Create new agent screenshot

    Step 2 - Start filling in the blanks: enter your agent title in the upper field, and enter your agent description in the Agent Settings box below it.

    Step 3 - Insert all data of agent informations to Agent Settings.

    Step 4 - Choose agency of the agent from the most used agencies.

    Step 5 - As needed, select featured image of agent.

    Step 6 - When New Agent is ready, click on button Publish

    After published agent, you can view you New Agent on the frontend like this:

    The new agent on the frontend

    Agencies

    Agency represent for agents in an legal organization. Administrator can view, edit or delete any agency from Agencies List. In this section I will show you how to create an agency from Admin Dashboard

    Please consult our video guide on How to create new agency and manage all agencies.

    Video guide on How to create new agency and manage all agencies

    Create New Agency

    Step 1: Click the Agents → Agencies tab

    Create an new agency and manage agencies list


    Step 2: Start filling in the blanks:

    • 1. Name: insert the name for Agency.
    • 2. Slug: insert the slug for Agency (optional)
    • 3. Parent: select parent Agency if needed. Usually you don't need to do it.
    • 4. Description: insert the description for the Agency.
    • 5. Content: insert content to introduce the Agency.
    • 6. Logo: Upload the logo of the Agency.
    • 7. Licenses: Optionally insert licenses of the Agency.
    • 8. Address: insert address of the Agency.
    • 9. Google Map Address: insert address to locate the Agency on Google Map.
    • 10. Content: insert information to contact to the Agency.

    Step 3: When category is ready, please click on button Add New Property Labels

    After published agency, you can view you New Agency on the frontend like this:

    The new Agency on the frontend


    Manage Agencies list

    From Agencies List, you can edit/view/delete any agency from agencies list. For example, you can edit an Agency by clicking on Edit:

    Edit an agency's informations

    General Options

    General Settings tab has general options for setting on frontend (pls read infomation below each option for more details)


    Attribute Description
    Enable RTL mode Enable/Disable RTL Mode. RTL means Right-to-left and in the web context, it support of languages that are written from right to left.
    Country Select default country for all options on website
    Currency Code Insert the currency code that you want to use. Ex: USD
    Language for datepicker

    Setting language for datepicker area that you could see in My Invoices page on the frontend like this:

    Measurement units Select measurement unit for real estate. Ex: meter, feet..
    Print Logo Set Logo for print pages. Ex: print invoice page.
    Print Logo Size Insert print logo size ("thumbnail" or "full"). Alternatively enter size in pixels. Ex: 100x100, 200x100, 200x200 (without unit, space).
    Enable Mini File JS Enable/Disable Mini File JS.
    Enable Mini File CSS Enable/Disable Mini File CSS.

    Setup Page

    In Setup Page panel you can specify the page that the user is directed to upon access (default pages). You can choose from prepared pages in our demo data or create a new page.


    URL Slug

    URL Slug has a lot of options where you will be able to insert your default slugs.


    Price Format

    Price Format panel has all options where can customize everything is related to your property price & currency. You will be able to insert your default value such as currency sign, thousand/decimal separator... for property price & currency.


    Attribute Description
    Enable Price Unit Enable/Disable the price unit: "Thousand, Million, Billion" on Property Submission form
    Currency Sign Insert the Currency Sign on website
    Currency Sign Position Select the position of currency sign that you want to use. Ex: $500 or 500$
    Thousand Separator

    Insert the thousand separator

    Decimal Separator Insert the decimal separator
    Price on Call Text Insert the text for 'Price on Call' button.

    User & Agent

    User & Agent tab helps Administrator manage User Accounts by empower Users to manage their online presence both personally and corporately. You choose whether they can submit property, register as agent, automatically approved after user register as agent or not.... All of this provides powerful self-service to streamline your business.

    Attribute Description
    Allow to submit property via frontend Select Yes if you want the users are empowered to submit a property via frontend.
    All User can submit property Select Yes if you want the users are empowered to submit a property.
    User can register as agent Select Yes if you want user can register as agent on their own.
    Automatically approved after user register as agent? Select Yes if you want the users can register and become agent immediately without approval from administrator.
    Users can type the password on registration form Select Yes if you want the users type their password on registration form and can use it immediately without verification email. If no, users will get the auto generated password via email

    Register Terms & Conditions

    Select terms & conditions page from pages list.

    Become an agent Terms & Conditions

    Select page of terms & conditions for agents from pages list.

    Enable Social Login

    Enable/Disable Social Login (Please activate WordPress Social Login plugin)

    Enable Register tab on Login & Register popup

    Enable/Disable the Register tab on Login & Register popup

    Default User Avatar

    Upload or choose the default user avatar, when users do not upload any avatar for their profile, it will display this default avatar.

    Hide User Information Fields

    Choose which fields you want to hide on My Profile page

    Property

    Properties are a crucial part in Real Estate website. Property panel has all options where you can setup property extra informations and settings.


    Attribute Description
    Automatically publish the submitted property?

    Users can type the password on registration form.

    Select Yes if you want to publish the submitted property without approval from administratorl. If No, the submitted property will need to be approved before publish.

    Automatically publish the edited property?

    Select Yes if you want to publish the edited property automatically.

    Automatically approve Reactivating property request?

    Select Yes if you want to approve reactivating property automatically. If No, the reactivating property will need to be approved before publish.

    Submission Form Layout Manager Check the checkbox to choose the Form Layout items that you want to use in your property submission form layout. You can also drag and drop items to quickly organize the form layout.
    Show dropdowns for Property Location ? Select Yes if you want to show dropdowns for Property Location (City, Neighborhood, County/state, Country)
    Maximum Images Insert number of maximum images that are allowed to display on single property.
    Maximum File Size Insert number of maximum file size. For example 10kb, 500kb, 1mb, 10m, 100mb..
    Hide Submit Form Fields Choose which fields you want to hide on add property page.
    Required Fields Choose property fields that you want to be required fields.

    Additional Fields

    Property Details is a crucial part in Real Estate website which help customer know more about land area/garage size, year built, amount of rooms/bedrooms/bathrooms.... Additional Fields panel has custom options where you can setup property extra informations for custom field.

    Additional Fields option

    Additional Fields on the frontend


    Attribute Description
    Label

    Users can type the password on registration form.

    Insert name of the Property Field

    Field Type Select format for Field from types list to organize the field layout: Text/Text Multiple Line/Select/Checkbox List/Radio

    Payment & Submission Type

    Payment panel has all options where you will be able to setup Payment Methods.


    Attribute Description
    Paid Submission Type

    Select Paid Submission Type for your real estate website. You can choose one of 3 options below:

  • Free Sumit option
  • Pay Per Package option - means that if the users want to submit properties, they need to buy packages (you can refer Package Management section for more details on how to manage packages)
  • Pay Per Listing option - means that the users need to pay amount of money for each submitted property.
  • Terms & Conditions Select terms & conditions page from pages list.
    Paypal Setting
    Enable Paypal Enable/Disable Paypal. If you choose "Disable" then all options for Paypal Settings below will be disappeared immediately
    Paypal API Update PayPal settings according to API type selection (there are two prepared options: Sandbox = test API. Live = real payments API)
    Paypal Client ID Insert your Paypal Client Secret Key
    Paypal Client Secret Key Insert your Paypal Client Secret Key.
    Stripe Setting
    Enable Stripe Enable/Disable Stripe. If you choose "Disable" then all options for Stripe Settings below will be disappeared immediately.
    Stripe Secret Key Insert your stripe secret key. Info is taken from your account at https://dashboard.stripe.com/login.
    Stripe Publishable Key Insert your stripe secret key. Info is taken from your account at https://dashboard.stripe.com/login.
    Wire Transfer Setting
    Enable Wire Transfer/td> Enable/Disable wire transfer.

    Payment Complete

    Payment Complete panel has all options where you will be able to setup Payment Methods.


    Attribute Description
    Title Insert title of "Thank you" to users after payment with Paypal/ Stripe/Wire Transfer
    Thank you Content Insert Content of "Thank you" to users after payment with Paypal/ Stripe/Wire Transfer

    Invoices

    In the WP dashboard, Administrator has permission to manage all invoices (you can refer Invoices Management section for more details on how to manage all invoices).

    Invoice on the frontend

    Invoices panel has all options where you will be able to insert invoice extra information.


    Attribute Description
    Company Name Insert Company Name
    Company Address Insert Company Address
    Company Phone Insert Company Phone

    Compare Option

    On the fronend, users can use Compare Properties feature to compare between two or more properties based on their basic criterions.

    Step 1: Click on Compare button of each property you want to compare, it will appears immediatetly in the Compared list on the right of the screen.


    Step 2: Click on Go button in Compared list.

    Admin can enable/disable Compare Properties and choose which fields to hide when compare property. From WP dashboard, go to Essential Real Estate --> Real Estate Options --> Compare.

    Compare panel has options as screnshot below:


    Attribute Description
    Enable Compare Properties Enable/Disable Compare Properties.
    Hide Compare Fields Choose on which field you want to hide when compare properties.

    Favorite

    Favorite is a feature developed to help users can add one or more properties to favorite list. On the frontend, users can add any property to Favorite list, and get it out by clicking on the Star button. Users can also their Favorite list in: My Account –> My Favorite


    Admin can Enable/Disable Favorite option by going to Essential Real Estate –> Real Estate Options –> Favorite. In Real Estate Options, Favorite panel has options as screnshot below:


    Attribute Description
    Enable Favorite Property Enable/Disable Favorite Property on the frontend.

    Social Share

    Social Share is a feature developed to help users can share properties to social channel. On the frontend, Social Share allows user to share any property on their Social channels.

    Admin can Enable/Disable Social Share and select social channels to display in single property by going to Essential Real Estate –> Real Estate Options –> Social Share. In Real Estate Options, Social Share panel has options as screnshot below:


    Attribute Description
    Enable Social Share Enable/Disable Social Share on the frontend.
    Social Share Select channel to show the social sharing in single property

    Print

    Print panel is developed to help users can manage print options.


    Attribute Description
    Enable Print Property Enable/Disable Print Property on the frontend.
    Enable Print Invoice Enable/Disable Print Invoice on the frontend.
    Print Logo Upload logo for Print pages.
    Print Logo Size Enter print logo size ("thumbnail" or "full"). Alternatively enter size in pixels (Example: 100x100, 200x100, 200x200 (Not Include Unit, Space)).

    Nearby Places

    Please consult our video guide on How to Setup Nearby Places in Essential Real Estate plugin

    Video guie on Setup Nearby Places Option


    Nearby Places on the frontend

    Nearby Places panel has different tabs where you will be able to setup Nearby Places option and delete or add new Nearby Place Fields as well.


    Attribute Description
    Enable Nearby Places Enable/Disable Nearby Places on single property page. If you choose No all options for Nearby Places below will be disappeared immediately.
    Rank by Select option to rank Nearby Places Field.
    Radius Insert radius of Nearby Places Field
    Near by places distance in Select distance unit of Nearby Places Field
    Nearby Places Field You can delete Nearby Places Field or Add a new Nearby Place.

    Walk Score

    Walk Score helps you find a walkable place to live. Walk Score calculates the walkability of an address by locating nearby stores, restaurants...

    Walk Score on the frontend

    In Real Estate Options, Walk Score panel has options as screnshot below:.


    Attribute Description
    Enable Walk Score Enable/Disable Walk Score on single property page
    Walk Score API Key Insert API Key of Walk Score

    Map Directions

    Map Directions helps you setup Google Map Directions. In Real Estate Options, Map Directions panel has options as screnshot below:.


    Attribute Description
    Enable Map Directions Enable/Disable Map Directions
    Distance Units Select Distance Units for Map Direction

    Comment & Reviews

    Other Features helps you setup enable/disable features such as Social Login (WordPress Social Login plugin), Agent Rating (WP-PostRatings plugin), Property Rating (WP-PostRatings plugin). In Real Estate Options, Other Features panel has options as screnshot below:.


    Attribute Description
    Enable Social Login Enable/Disable Social Login (make sure that you have activated WordPress Social Login plugin before enable Social Login feature).
    Enable Agent Rating Enable/Disable Agent Rating (make sure that you have activated WP-PostRatings plugin before enable Agent Rating feature).
    Enable Property Rating Enable/Disable Property Rating (make sure that you have activated WP-PostRatings plugin before enable Agent Rating feature).

    Google Map

    Google Map panel has all options where you will be able to setup google map extra information & settings.


    Attribute Description
    Google Maps SSL Optionally you can choose to use Google Maps with SSL
    Google Maps API KEY Insert your Google Maps API KEY. We strongly encourage you to get an APIs Console key and post the code in Theme Options. You can get it from here.
    Default Map Zoom Setup default proportion zoom in Map by enter a value (1-20) or drag scroll bar
    Pin Cluster Yes/No use pin cluster on google map.
    Style for Google Map Create styles Google Maps with you custom colors use https://snazzymaps.com/. You just need to copy and paste the code they provide into the code box.
    Marker Icon Upload Marker Icon for Google Map.

    Google Captcha

    Essential Real Estate includes the google reCAPTCHA that you can enable/disable in each submit form: Login, Register, Reset Password, Contact Agent, Contact Agency.

    Google Captcha panel has all options where you will be able to enable/disable Google Captcha and setup google captcha information for submit forms.

    Google reCaptcha in Contact Agent form


    Attribute Description
    Enable Google Captcha Enable/disable Google Captcha for submit forms
    Site Key Insert your site key. We strongly encourage you to get Google Captcha Key and post the code in Theme Options. You can get it from here.
    Secret Key Insert your Secret Key of Google Captcha

    Property Page

    Property Page panel has all options where you will be able to customize your Archive Property Page and Single Property Page exactly as you want on the frontend.


    Attribute Description
    Archive Property
    Enable Search Form Enable/Disable Search Form
    Search Form Options Enable/Disable Search Field (such as Title Field, City Field, Price Field..) from Search Form
    Layout Style Select layout for Archive Property page between Grid and List
    Items Amount Enter amount of property items are displayed on the frontend
    Columns Enter columms number of property items are display on the frontend
    Columns Gap Select columns gap between properties for Archive Property Page.
    Items Desktop Small/Tablet/Tablet Small/Mobile Enter number of property items displayed on Browser of different devices (different browsers width)
    Single Property
    Header Display Type Select Header type to display on Single Property page between Header Image and Header Map.
    Show Google Map Directions Yes/No show google map directions.

    Agent Pages

    Agent Pages panel has all options where you will be able to setup Archive Agent Page and Single Agent Page to display on the frontend as your liking.


    Attribute Description
    Archive Agent
    Agencies Enter agencies by names to narrow output
    Layout Style Select layout for Archive Agent page between Grid and List
    Agent Items Amount Enter number of agent items displayed on the frontend
    Image Size Insert image size ("thumbnail" or "full"). Alternatively enter size in pixels. Ex: 100x100, 200x100, 200x200 (without unit, space).
    Agent Columns (on Desktop Small/Tablet/Tablet Small/Mobile Enter number of property items displayed on Browser of different devices (different browsers width).
    Single Agent
    Image Size Insert image size ("thumbnail" or "full"). Alternatively enter size in pixels. Ex: 100x100, 200x100, 200x200 (without unit, space).
    Property of Agent Select and insert extra informations to display property of agent on Single Agent page. It is similar to Archive Agent page settings.
    Other Agent Select and insert extra informations to display other agents on Single Agent page. It is similar to Archive Agent page settings.

    Agency Pages

    Agency Pages panel has all options where you will be able to setup Single Agency Page. We are going to describe all the options you have to setup for Single Agency Page


    Attribute Description
    Property of Agency
    Show Property of Agency Yes/No Show Property of Agency. If you choose No, all options below in Property of Agency tab will be disappeared immediately.
    Property Layout Style Select layout for Property of Agency between Grid and List
    Property Image Size Insert property image size ("thumbnail" or "full"). Alternatively enter size in pixels. Ex: 100x100, 200x100, 200x200 (without unit, space).
    Columns Gap Select columns gap between properties for Single Agency page
    Agent Columns (on Desktop Small/Tablet/Tablet Small/Mobile Enter number of property items displayed on Browser of different devices (different browsers width).
    Agent of Agency
    Show Agent of Agency Yes/No Show Agent of Agency. If you choose No, all options below in Agent of Agency tab will be disappeared immediately.
    Layout Style Select layout for Agent of Agency section between Carousel and Grid or List.
    Image Size Insert image size ("thumbnail" or "full"). Alternatively enter size in pixels. Ex: 100x100, 200x100, 200x200 (without unit, space).
    Agent of Agency Columns (on Desktop Small/Tablet/Tablet Small/Mobile Enter number of agents displayed on Browser of different devices (different browsers width).

    Email Management

    Email Management panel has 13 subjects where you will be able to customize User Email and Admin Email for each subject such as New Registered User, Approved Agent.


    Attribute Description
    Subject Insert title for your email to User/Admin
    Content Insert content for your email to User/Admin

    Widgets in Essential Real Estate plugin

    Widgets in ERS plugin will be displayed in available widgets.To activate a widget, you can drag or drop element to widget area as your liking.


    Widgets on the frontend will be displayed like this:

    Shortcode in Essential Real Estate plugin

    A shortcode is a method for including special content in a Post or Page. For example, the ESSENTIAL REAL ESTATE plugin gives users a shortcode to add MY PROPERTY page to their site. Here’s what that shortcode looks like:

    [ere_profile]

    In this section, we will show you how to use ERE shortcode

    Please consult our video guide on How to use ERE Shortcode.

    1. With Visual Composer


    2. Without Visual Composer

    To use ERE shortcodes without Visual Composer, you have to disable the gutenburg editor - if you are using WordPress version 5.0 or higher (you can use Disable Gutenburg plugin)

    Thank you for choosing our plugin

    If you have any questions that are beyond the scope of this documentation or have any troubles configuring your website applications with the above settings you can contact us via Support System on WordPress.org

    G5Them Support Team will be glad to assist you. Thanks so much for choosing ESSENTIAL REAL ESTATE plugin!