System Ticket Support Plugin
System Ticket Support Plugin which one of best support ticket system plugins for website, is elegant support ticket system. It is great choice to connect you with customers. Beside, it may be most simple way to resolve the customers conflicts in a professional support system.
System Ticket Support Plugin includes many awesome features such as: Unlimited Users and Tickets, Advanced Fucntion, Clean User Interface etc. It makes sure the support system meets your many requirements.
Creating your own System Ticket Support by effortless way!!!
SYSTEM TICKET SUPPORT PLUGIN
Thank you for choosing our plugin. If you have any questions that are beyond the scope of this documentation, please feel free to contact us via Support Forum on wordpress.org. Thanks so much!
System Requires
The first step in setting up your System Ticket Support is to install WordPress and the SYSTEM TICKET SUPPORT plugin itself. It's highly encouraged for you to always have the latest version of WordPress installed, this will also keep your site being more secure. But before doing so, you should check that your hosting environment meets our minimum requirements.
- PHP 5.6 or greater
- MySQL 5.6 or greater
- WP Memory limit of 64 MB or greater (128 MB or higher is preferred)
You should also check WordPress minimum requirements and ensure your host can comply with.
INSTALL & ACTIVE PLUGINS
Method 1: WordPress Plugin Search
The easiest way of installing a WordPress plugin is to use the plugin search.
Please consult our video guide on How to install SYSTEM TICKET SUPPORT plugin .
Method 2: Via the built in WordPress Plugin uploader
- Download the support-ticket-system directory plugin files from your wordpress.org account.
- Login your Wordpress dashboard then you go to Plugin >> Add new to add new the plugin
- Click Upload plugin button
- Click Choose file to upload the support-ticket-system.zip and select the downloaded zip file in your computer.
- Click Install Nowto upload the zip file.
- Wordpress will ask you to active the plugin after you install plugin successfully.
- You click "Active" in the plugin to enable all features of the plugin
Method 3: Via FTP account
- Download the support-ticket-system directory plugin files from your wordpress.org account.
- Extract/Unzip this file
- Login your FTP account and go to this path: ...wp-content/plugins, copy
- You copy & paste the upzip file in the above path to upload the plugin in FTP
- Once the upload is complete, login your Wordpress dashboard and active the plugin in Plugin
Beside installing Support Ticket System, WP MAIL SMTP can be considered as the REQUIRED plugin included with the Support Ticket System
Before you can receive the notifications to mail, you need to follow this steps for SETTING MAIL.
Plugin Configuration
After the plugin is installed successfully, you can go to Wordpress dashboard and view this video to SETUP the System Ticket Support.
Video guide on How to set Support Ticket System plugin
Plugin Overview
System Ticket Support Plugin is boosted with unlimited tickets, unlimited agents, it provides many awesome features for your support system.
You can view this video to take a general look about the plugin:
Video guide on Overview Of Support Ticket System plugin
After you install and active System Ticket Support plugin, there are many features:
- Tickets menu.
- Management area for Admin/leader/supporter.
- Report area for admin
- Top bar area includes: welcome, sumbmit ticket button, notification area, user information area.
- Main content.
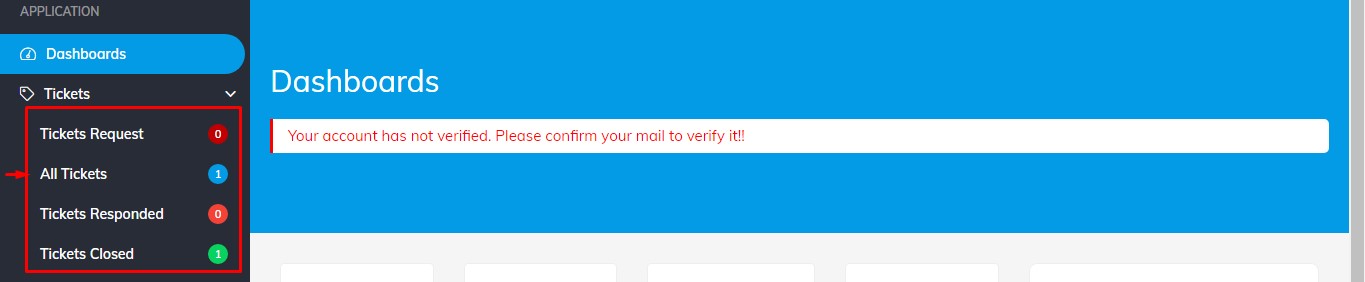
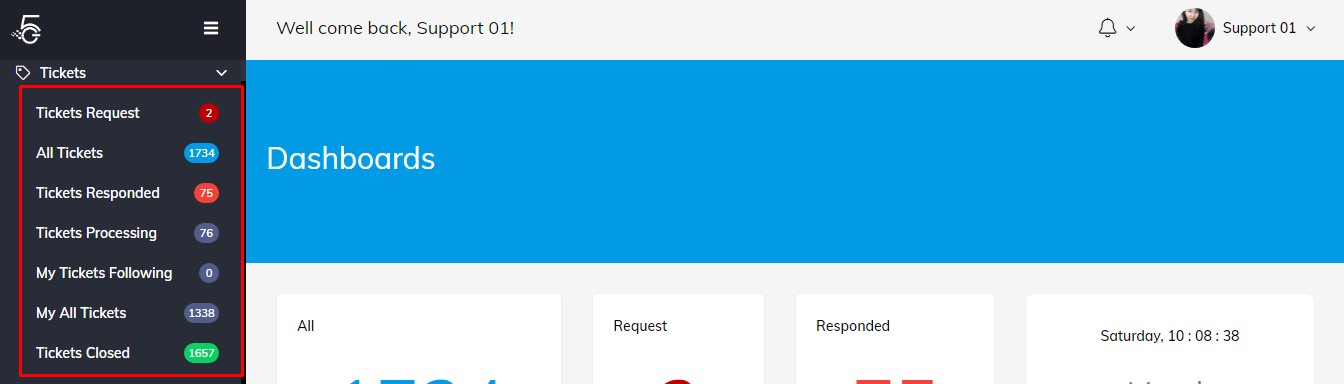
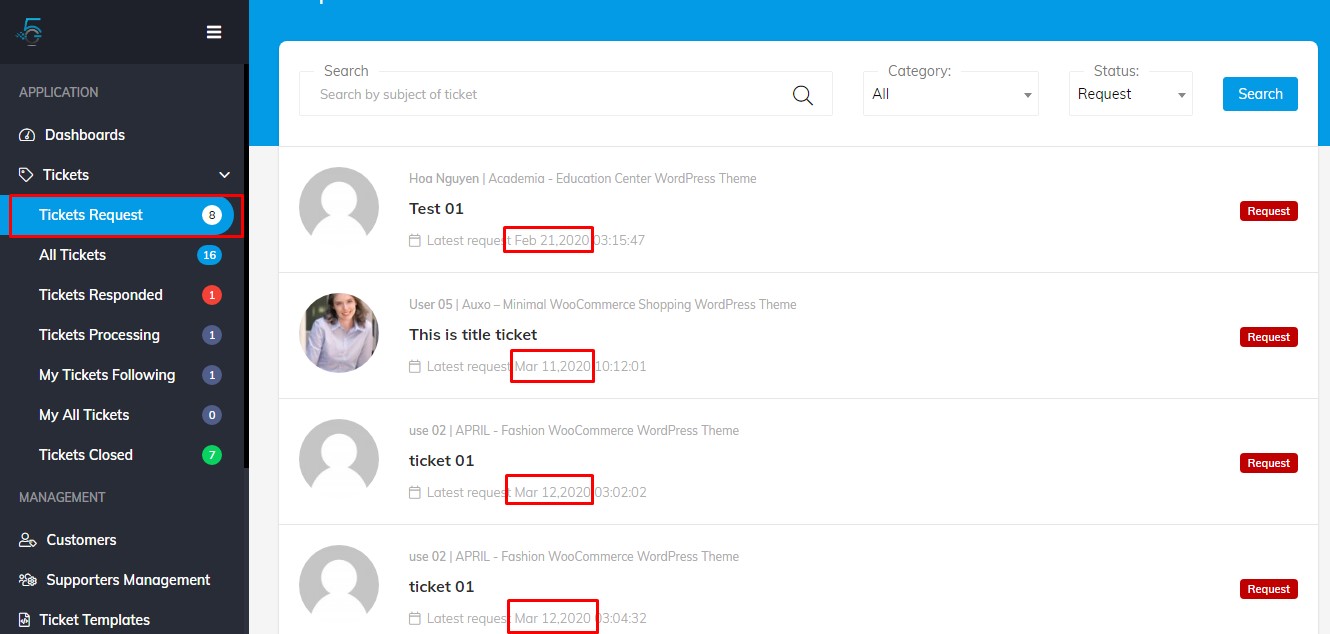
Tickets menu collects all tickets: tickets request, all tickets, tickets response, tickets processing, my tickets following, my all tickets, ticket closed.
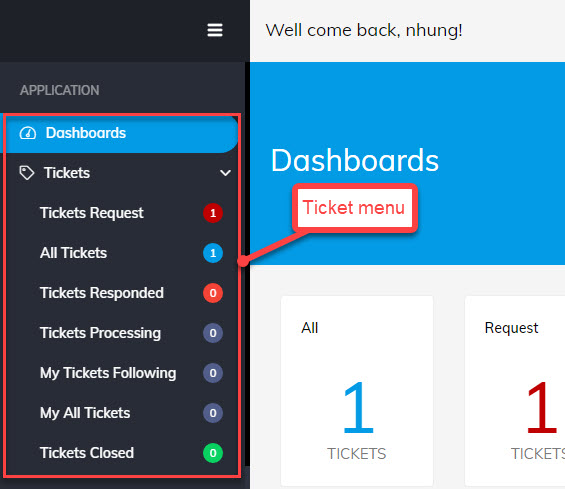
Tickets menu on support sysytem
Management area for supporter: Supporter can manage or search customer list, create & use the template.
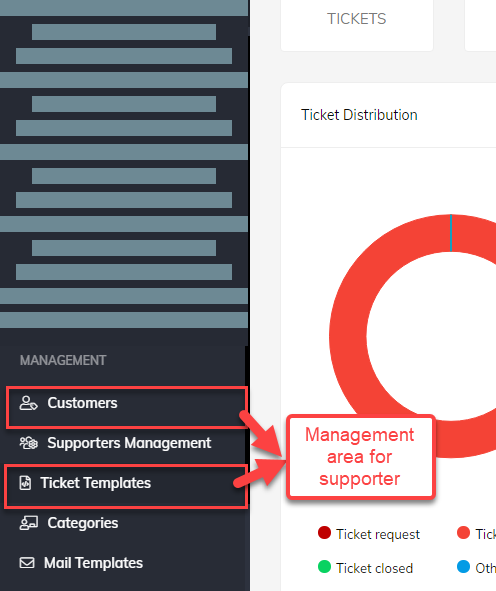
Management area for supporter on support sysytem
Management area for admin/leader : Admin/leader has full permission, manage all tickets, categories.
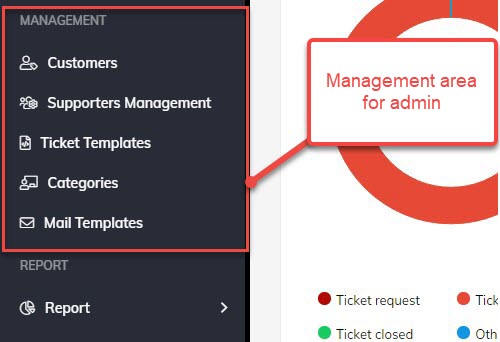
Management area for admin/leader
Report area for admin: Admin can manage rating report and supporter report.
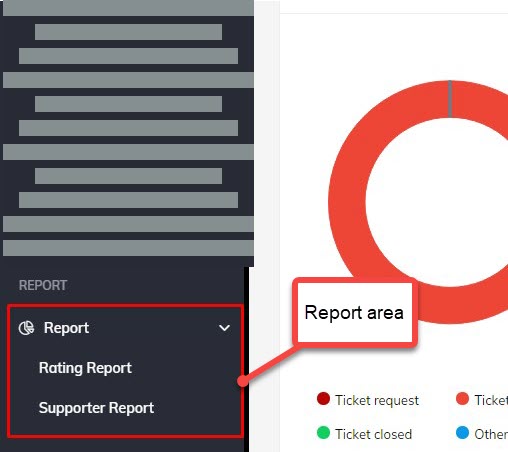
Report area for admin
Top bar area
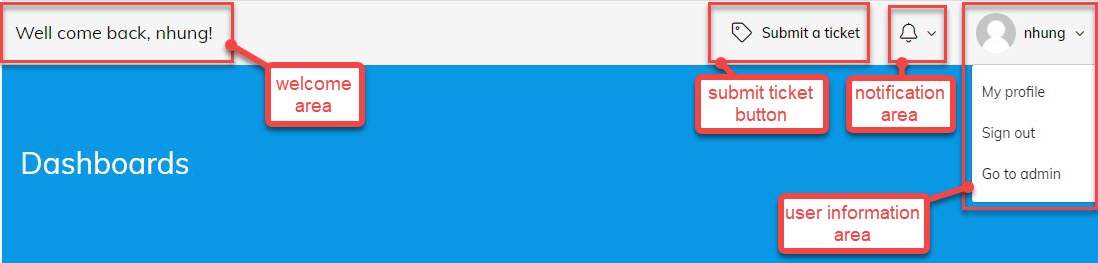
Top bar area
Main content area
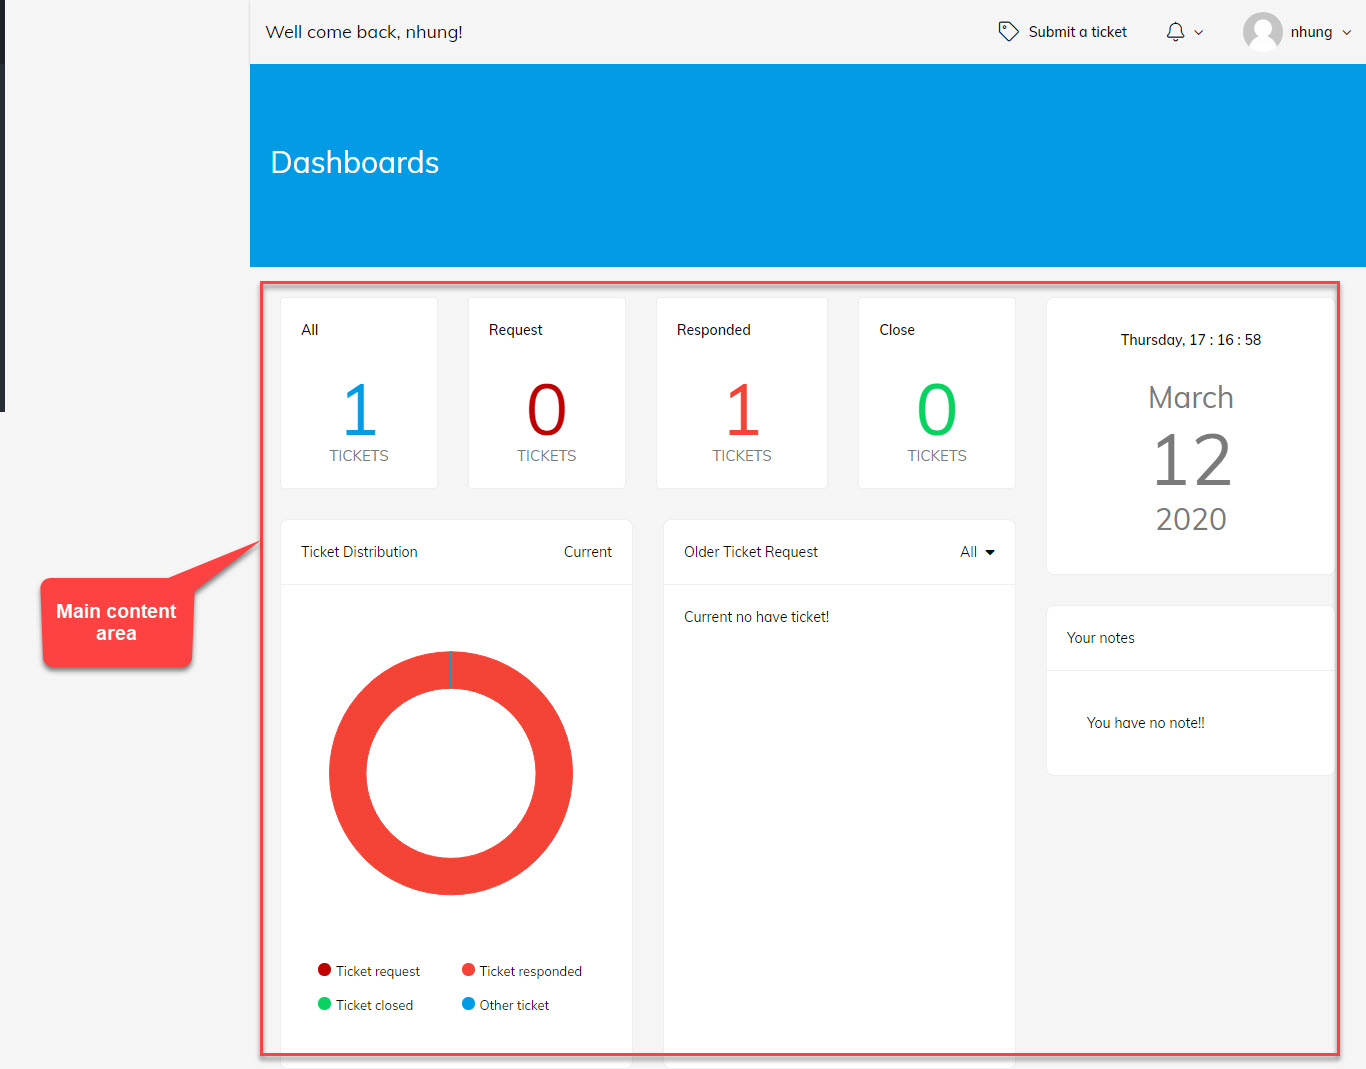
Main content area
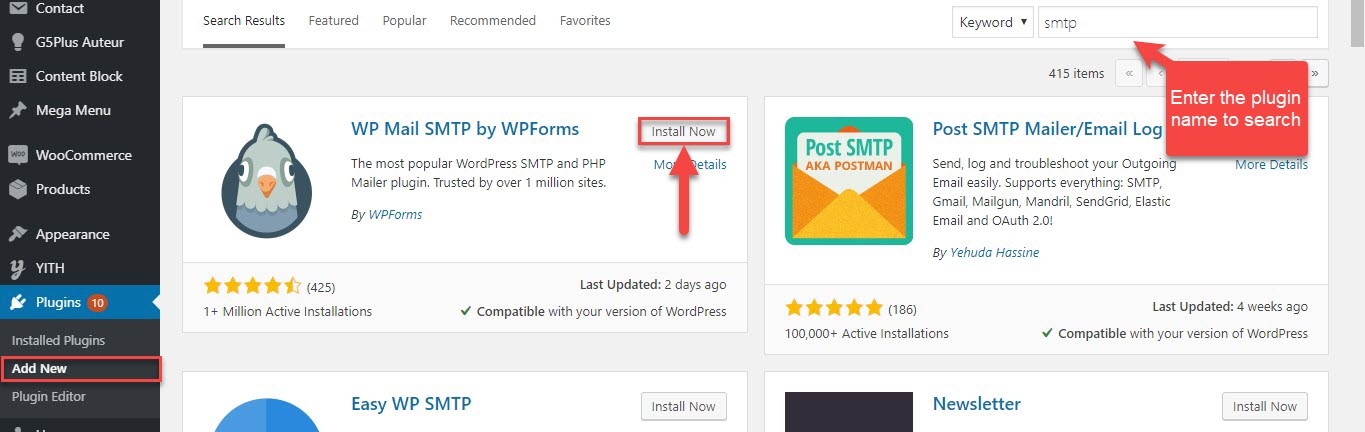
WP Mail SMTP Installation & Configuration
1. Install the WP Mail SMTP Plugin.
Wordpress will ask you to active the plugin after you install plugin successfully.
2. Setting the WP Mail SMTP Plugin
You can view this video for configuring SMTP
How to Set Up WP Mail SMTP Plugin Wordpress
Or you can view this tutorial of WPForms: How to Set Up the Gmail Mailer in WP Mail SMTP
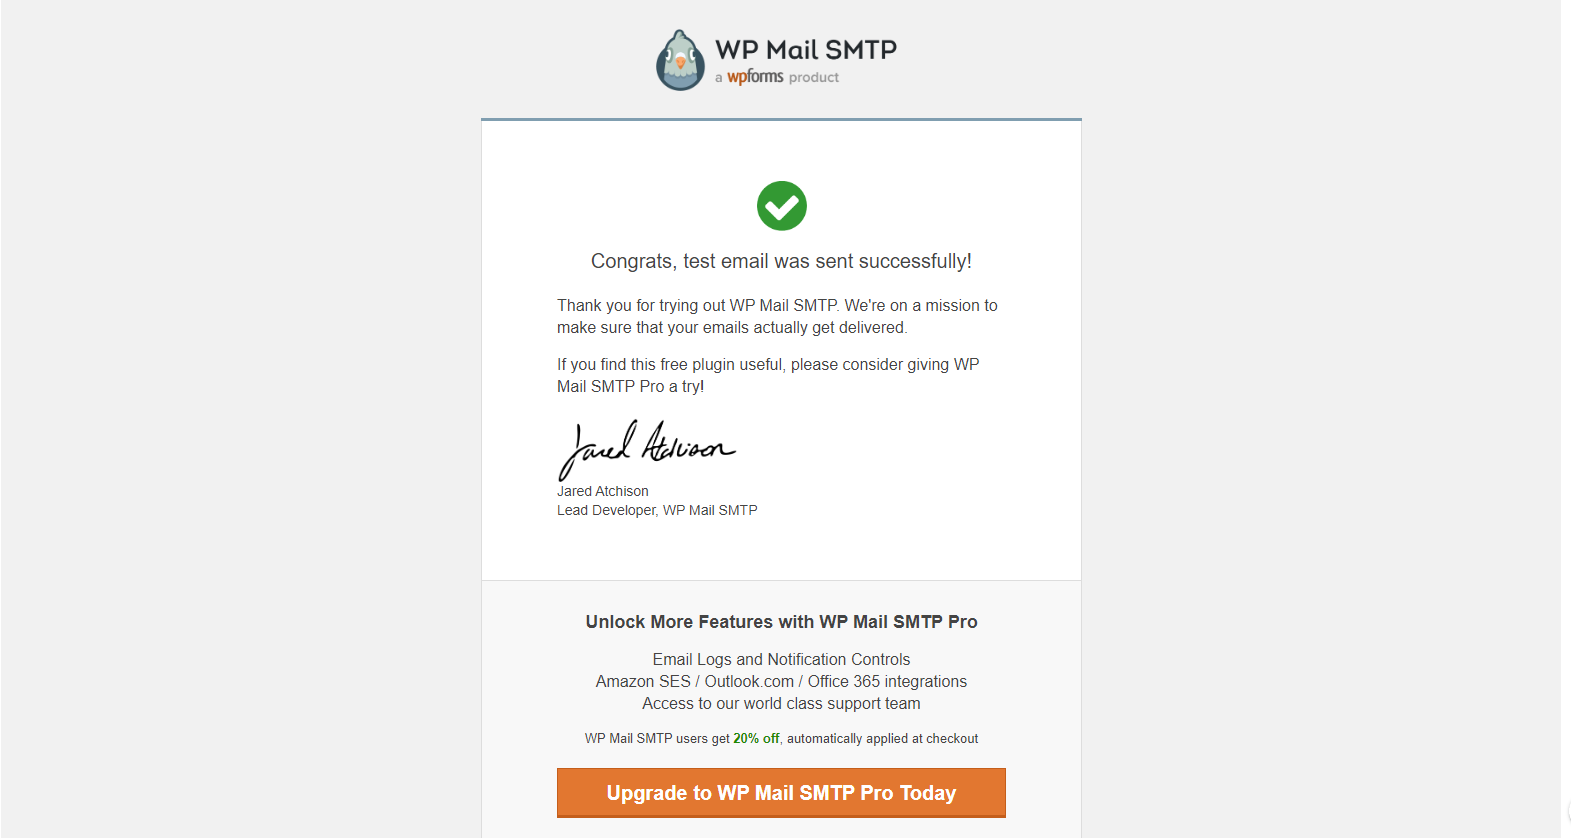
After you finish setting the mail, you can test in WP Mail SMTP » Settings, you click in Email Test tab to test
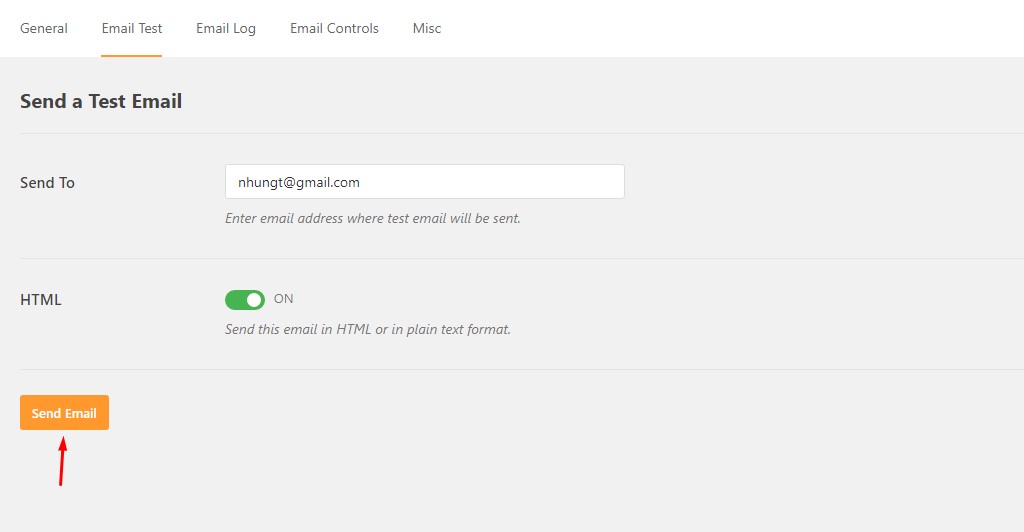
Once you enter a valid email adress in Send To field, you will know the mail delivery status. If the status is success, you can confirm the email is delivered
When the test message has been sent, you’ll see a success message at the top of this tab.

DONE. That’s it!.
Now, you are ready to receive any mail from the support ticket system related to your tickets.
LOGIN & REGISTER
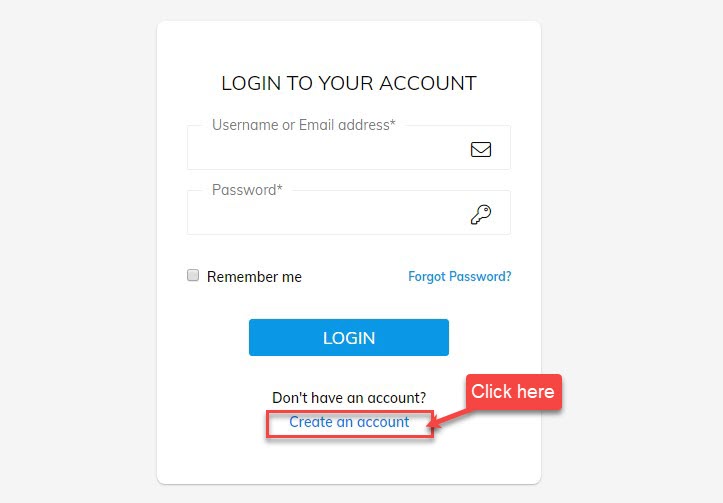
Clients can create their account with two ways:
1. Clients can register first to have an account then you create the tickets
2. The fast way is Clients can register and create the ticket in a same time
You can view this video to take a closer look for creating an account for customer and change profile information.
Video guide on How to create an account for customer and change profile information
If you have not had the account in the support system yet, you need to register.
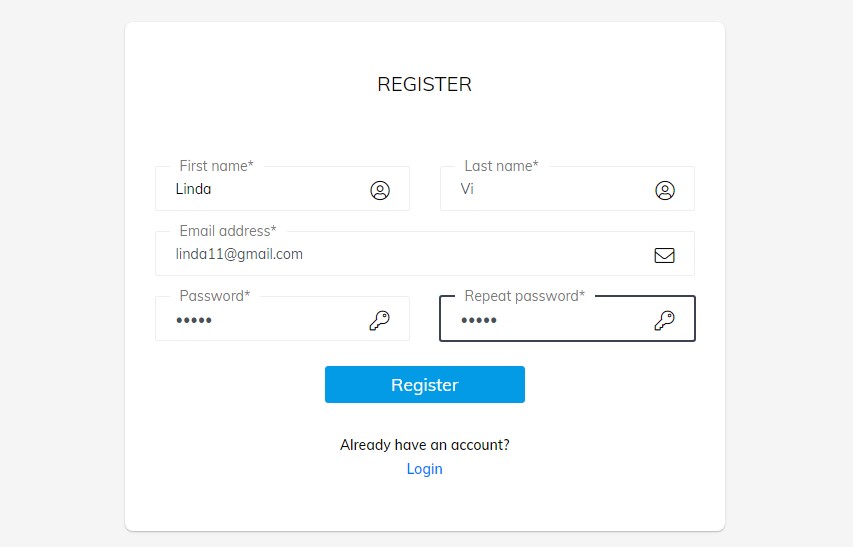
With case 1: You can enter full your information in the register form (you need to enter your exactly mail to get the notification from the support system via mail)
After you enter your name, your email address, password on the registration form, the account is created immediately.
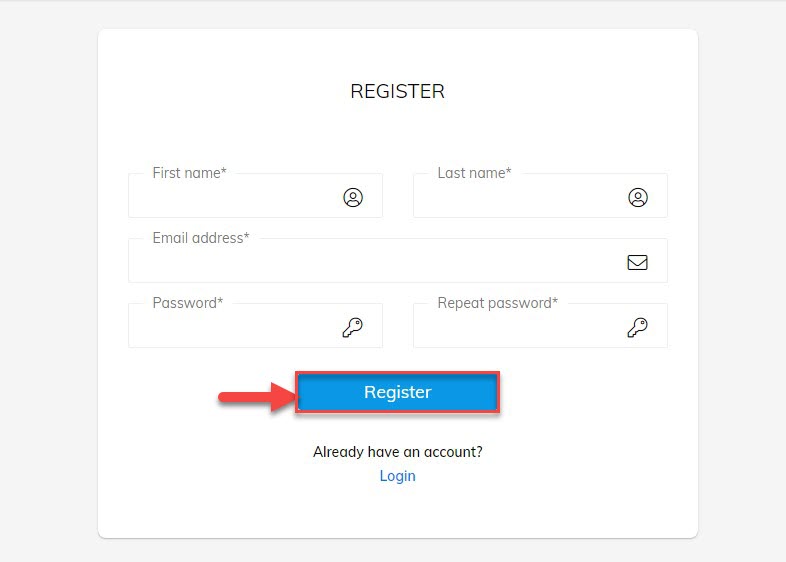
You can view an example here
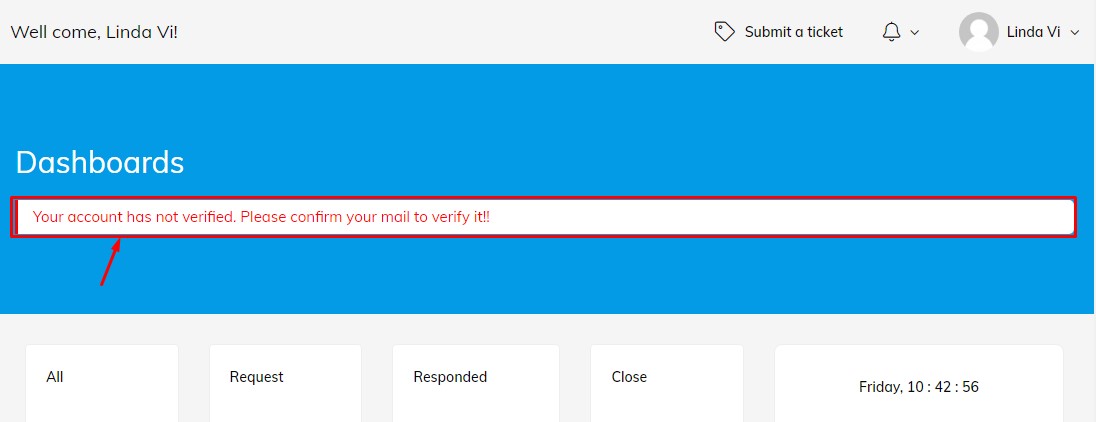
After you can register your account successfully, the support system will ask you confirm your email so you need to log in your mail and confim. If you register your own email, any action of supporters/leaders in your ticket is notificated via your email.
Case 2: You can save your time by registering and creating the ticket in a same time
You can click in Submit a ticket button in the top of page.

Then you need to select your category/theme that you want to be supportted.
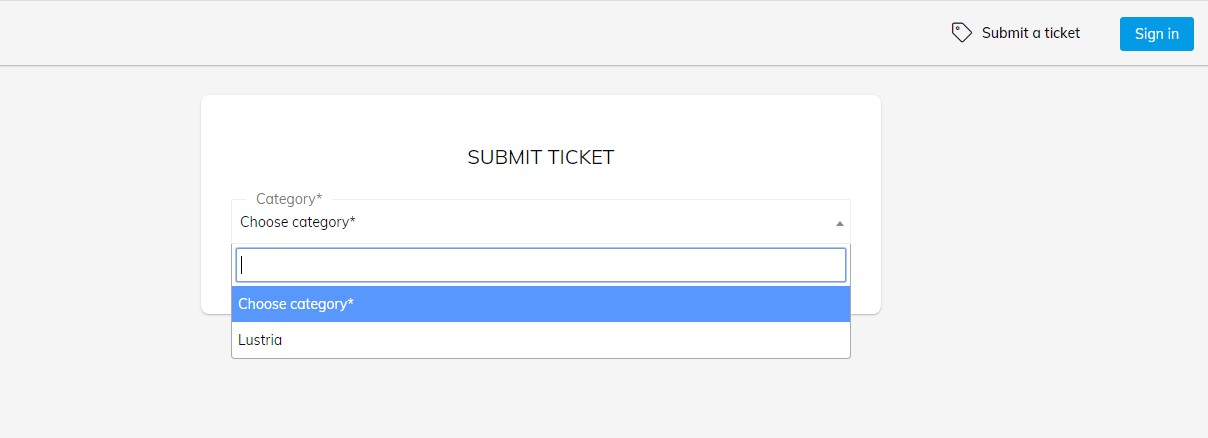
The submit ticket form displays immediately after you select the category in drop down menu. The form includes registration information and ticket information that you need to enter.
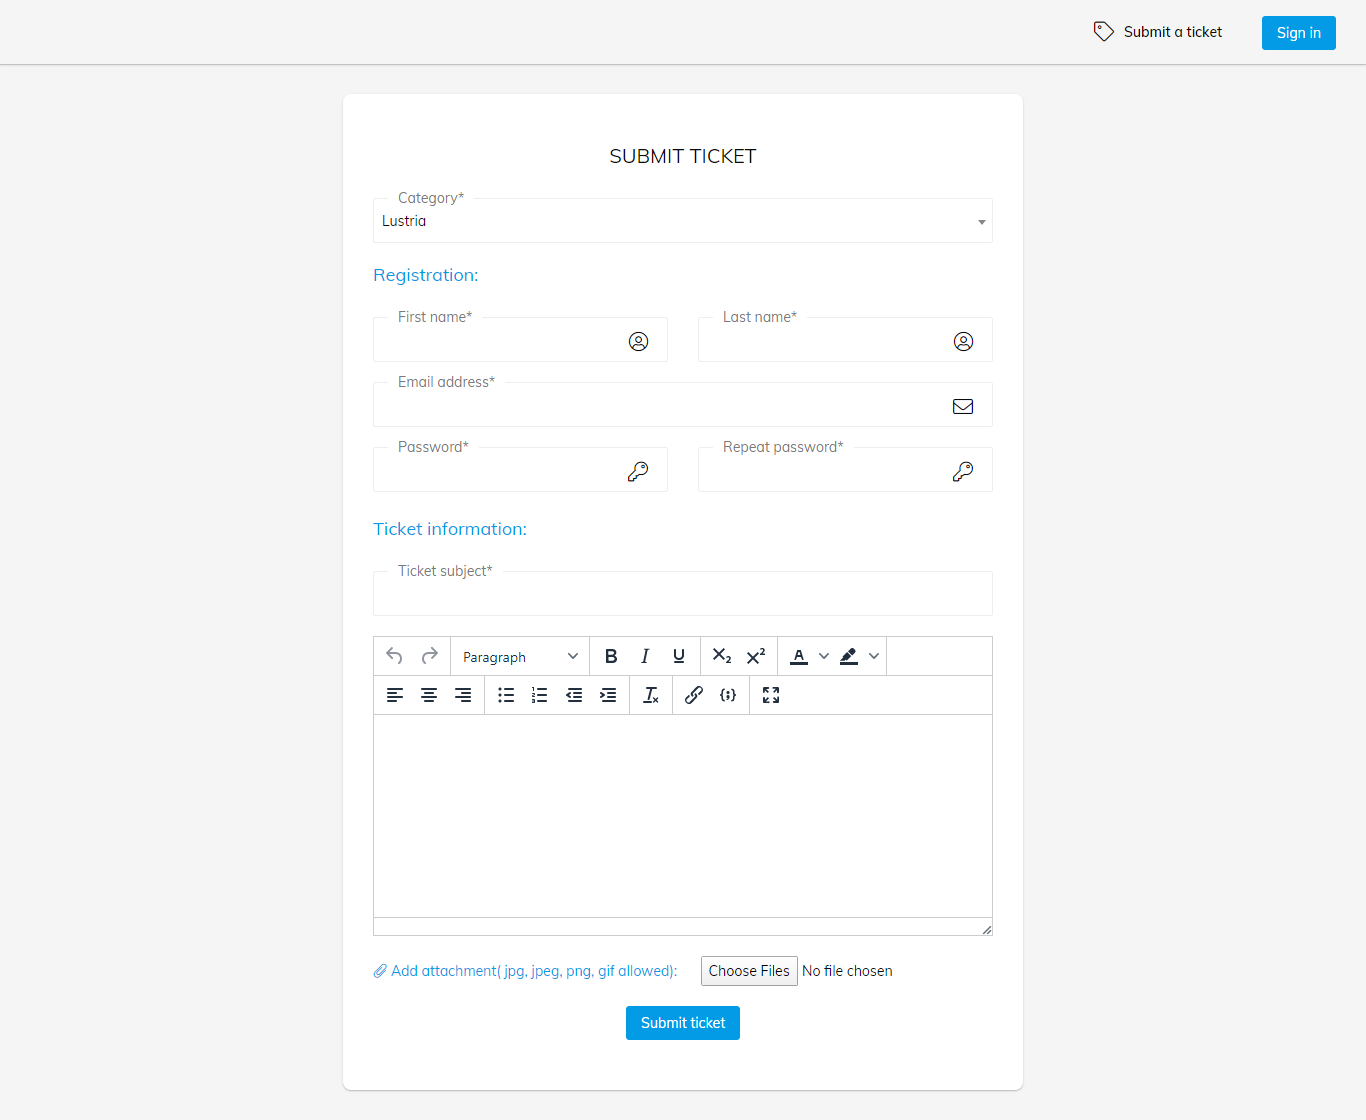
You can enter in the registration form same as the guide of Case 1
About the ticket information, you can view the guide in Submit a ticket
If you had your own account on the support system, you only need to enter the username & password that you register already. You can log into the system immediately.
Profile management
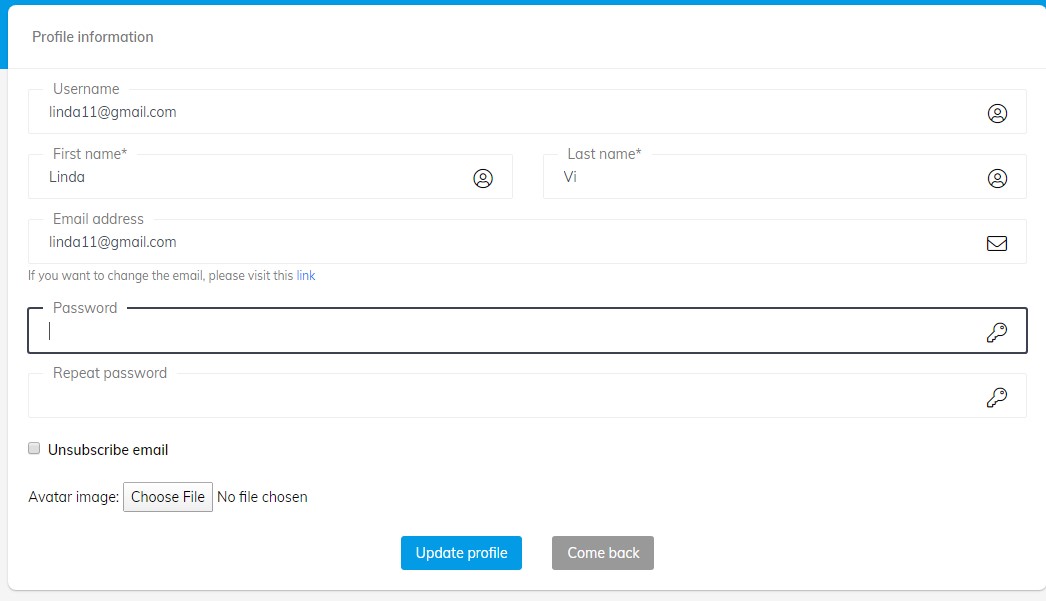
Users can manage their Profile in the top right of page by click on My profile tab

With User Profile dashboard, users can change the information which they registerd before, subcribe mail to receive the notification via email and upload your avatar image for their account.
After you change any information in your Profile, you click "Update profile" to save your profile in the support system.
HOW TO SUBMIT A TICKET
After you log into the support system successfully, you can create your own ticket.
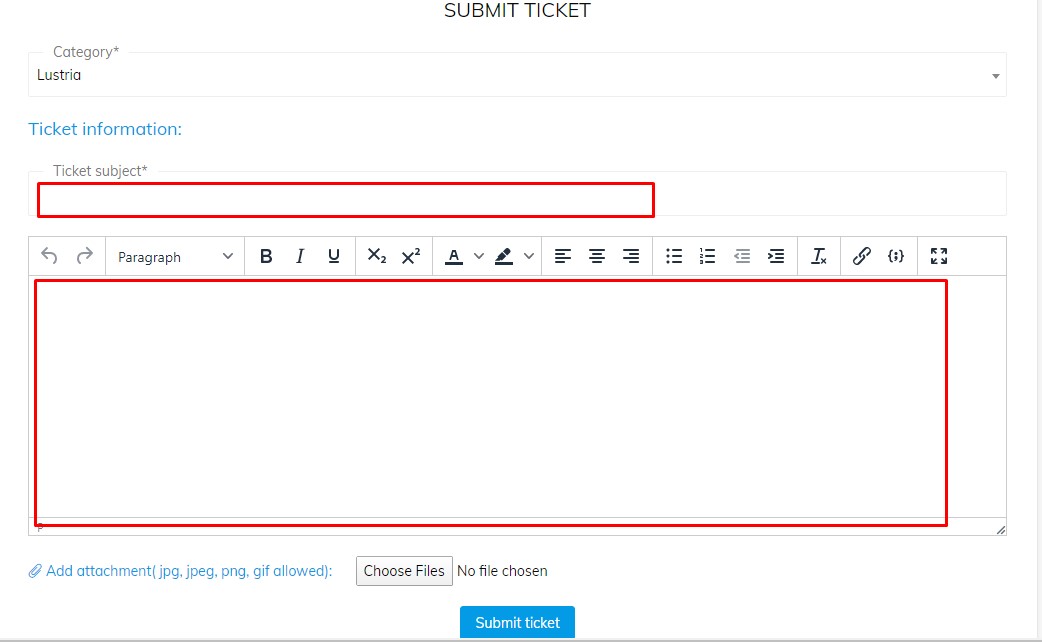
First, you choose the category/theme you want to be supported in a drop-down menu format.
First, you need to enter the ticket subject and the content ticket with full HTML editor make sure you can adjust the clear content. Beside, uploading the image attachments with jpg, jpeg, png, gif image format helps the problem clearer with more information. So supporter can take a closer look about the problems and resolve the ticket faster.
Finally, you click "submit ticket" to create ticket on the support system. After creating the ticket successfully, you will see your ticket in Tickets request and wait for the reply.
DASHBOARD FOR SUPPORTER
Responsibility of supporters is solving the problems of customers fast, handling and monitoring closely the tickets on the support sytem so supporters can view and manage customers list, create, use the ticket template in their reply.
These screenshots below will display exactly features that have been integrated in Support Ticket Support plugin for Supporter in the website.
Management area for supporter on support sysytem
Profile Management
Supporter can begin to register an account as a normal user.
Then admin will set the account role is supporter in the dashboard of WordPress. Navigate to Users >> All Users
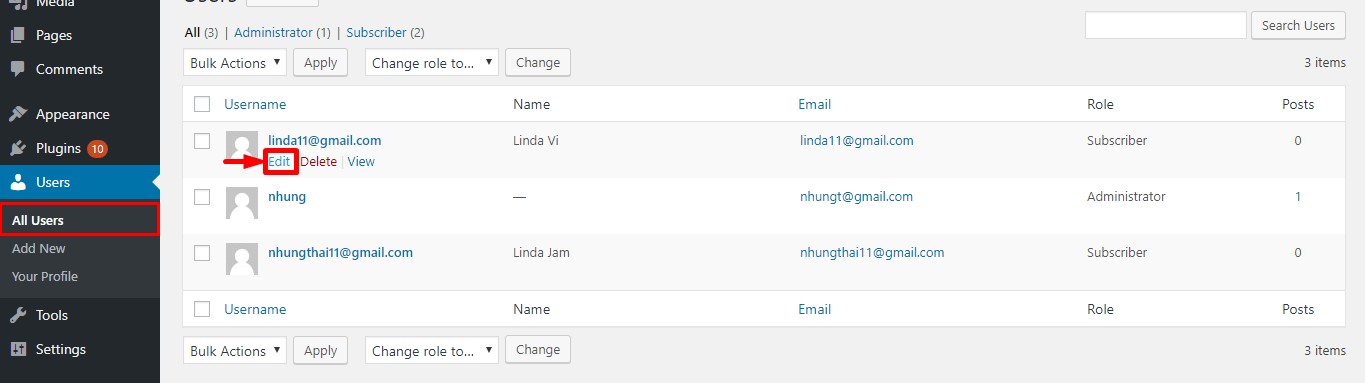
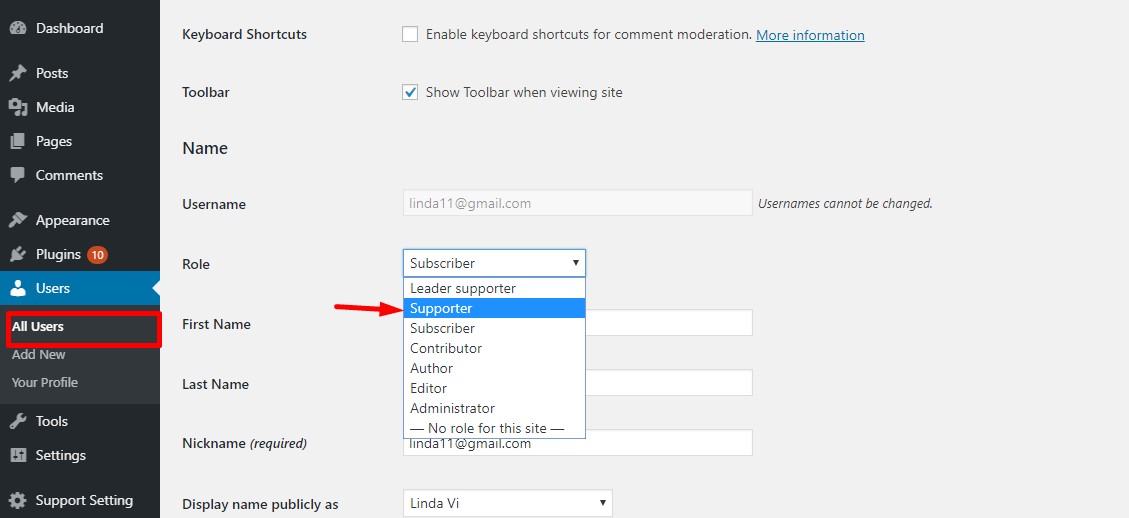
Set role for supporter
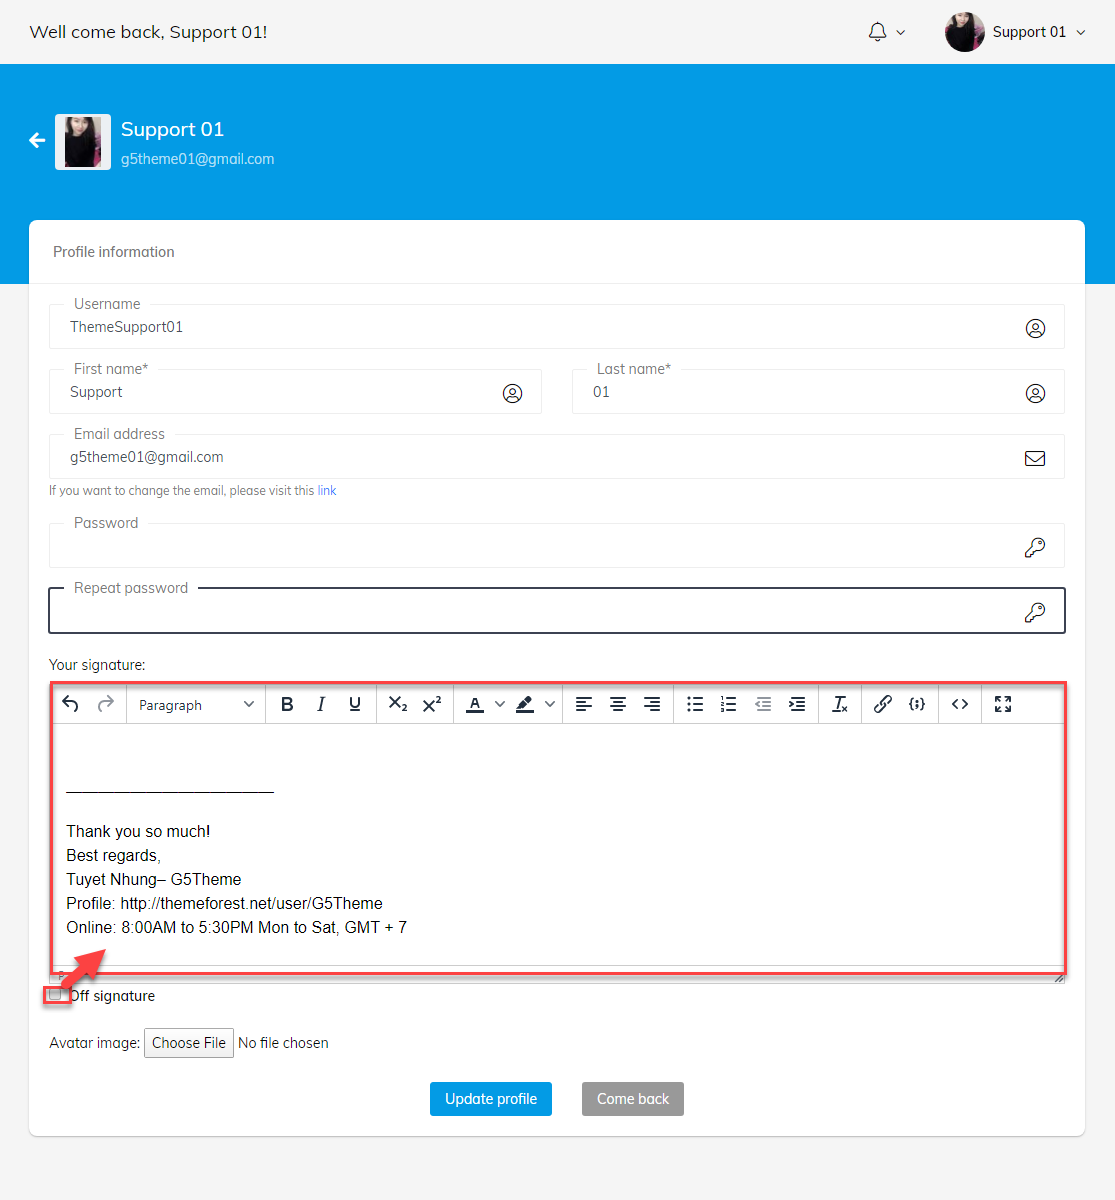
To manage the supporter profile, go to My profile tab in the top right of the website
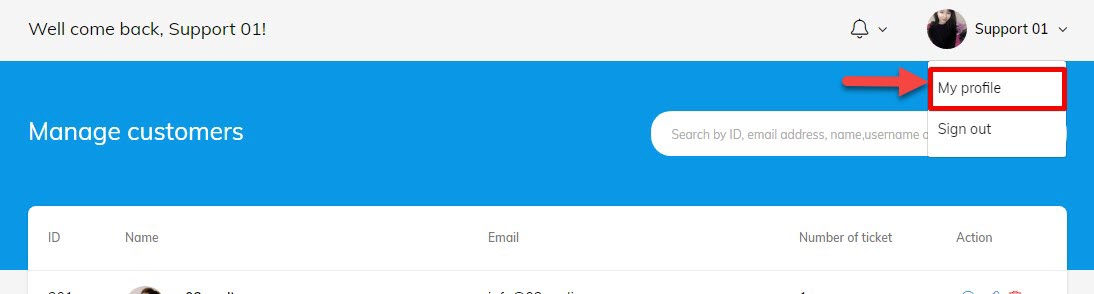
You can change any information that you registered already. The dashboard interface of supporter same with the dashboard interface of user except the signature.
Supporters can add signature and choose from any of them when replying to a ticket. They can make one of the signatures their default which will automatically populate the reply box every time they view a ticket.The signature can be turned on/off added, deleted and updated.
Beside, supporters can change the profile information with this video
Video guide on How to change the profile information of Supporters
Customer Management
First, supporters can search information of customer with filter ID, email, username & purchase code of customers.
Morever, tikects of customers are tracked by supporters conveniently, view the exactly authentication information of customer. If supporter found any problem for the accounts of customer, they can delete this accounts which they ever supported before.
You can view the bellow image to take a general look about Customer Management with a supporter role.

Customer management for supporter
Ticket Management
Ticket Management is ticket collection includes ID, Template name, Type of template, Created user, Action.
ID of tickets are sorted by creation time.
You can video to manage the template. Admin and supporter, leader supporter template management is the same.
Video guide on manage the template
Supporters can edit or delete their own template. After a selection has been made, the SUBJECT and DESCRIPTION should automatically be updated with the pre-configured values. Supporters, leader support can use each other's template.
First, go to "Add template" button in the top right of page.
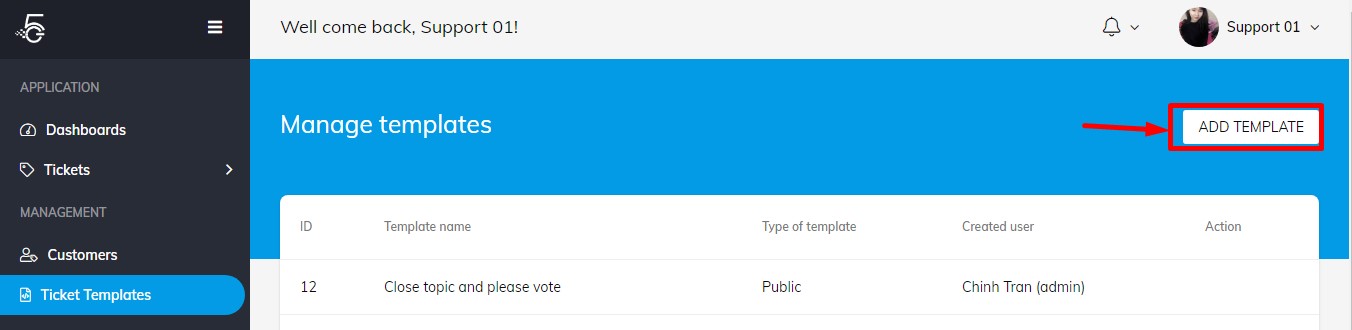
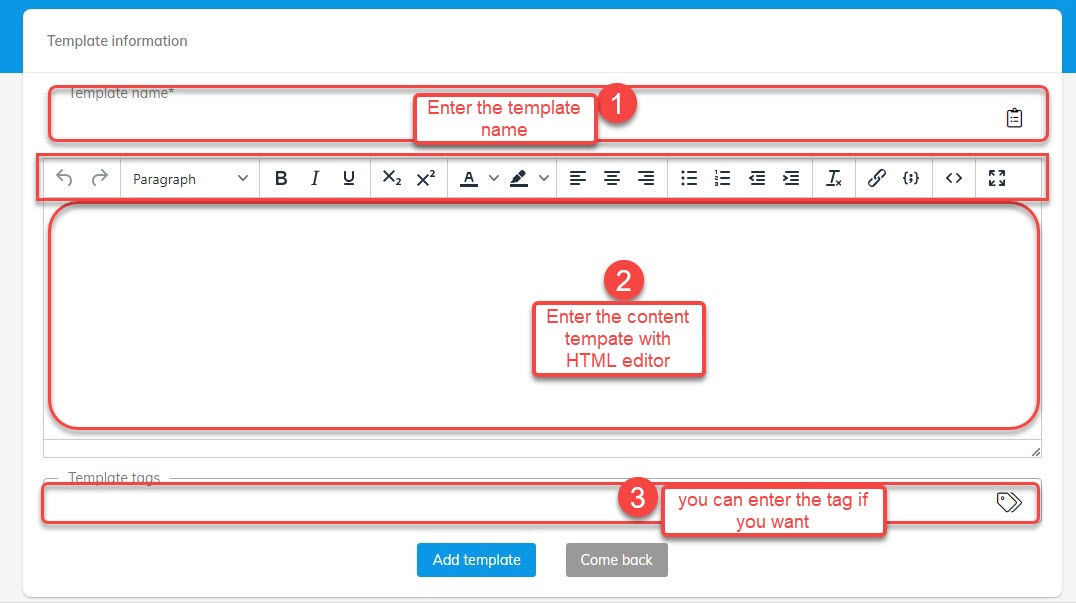
Add new a template
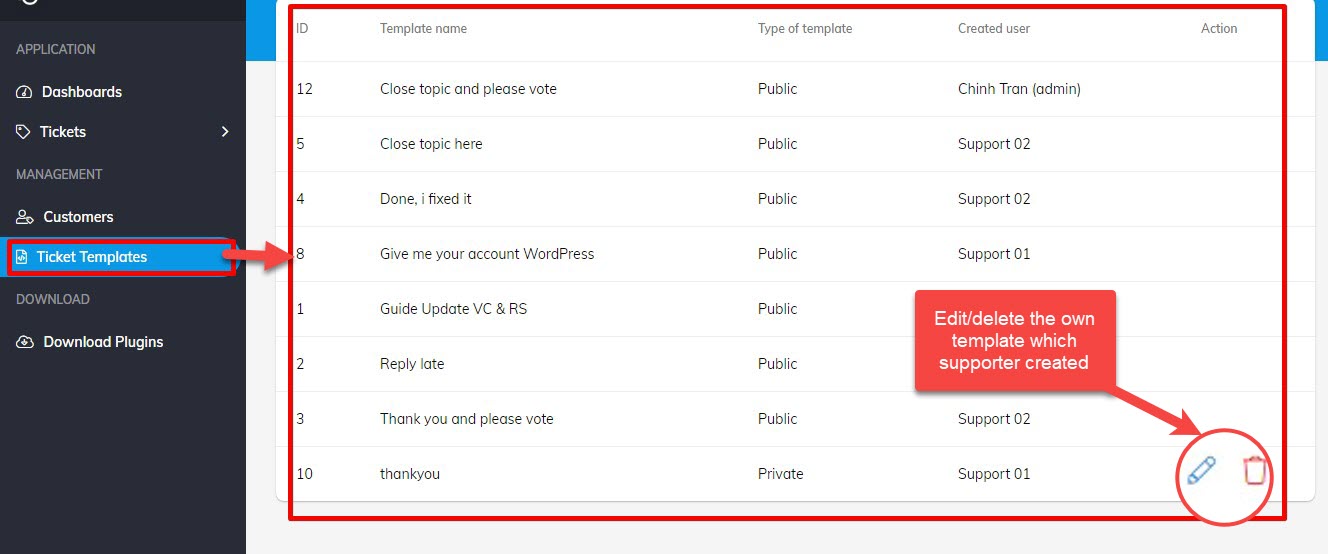
This is template collection
DASHBOARD FOR LEADER
The dashboard of leaders is same with the dashboard of supporters, you can view cleary in Dashboard for supporter
But the dashboard of leaders differs from one point to Dashboard for supporter that is assigning tickets to other departments if needed. Ticket reassignment feature can help the supporter to distribute the work-load according to their works.
Leaders supporter can assign in a drop-down menu in the right corner of the ticket details.
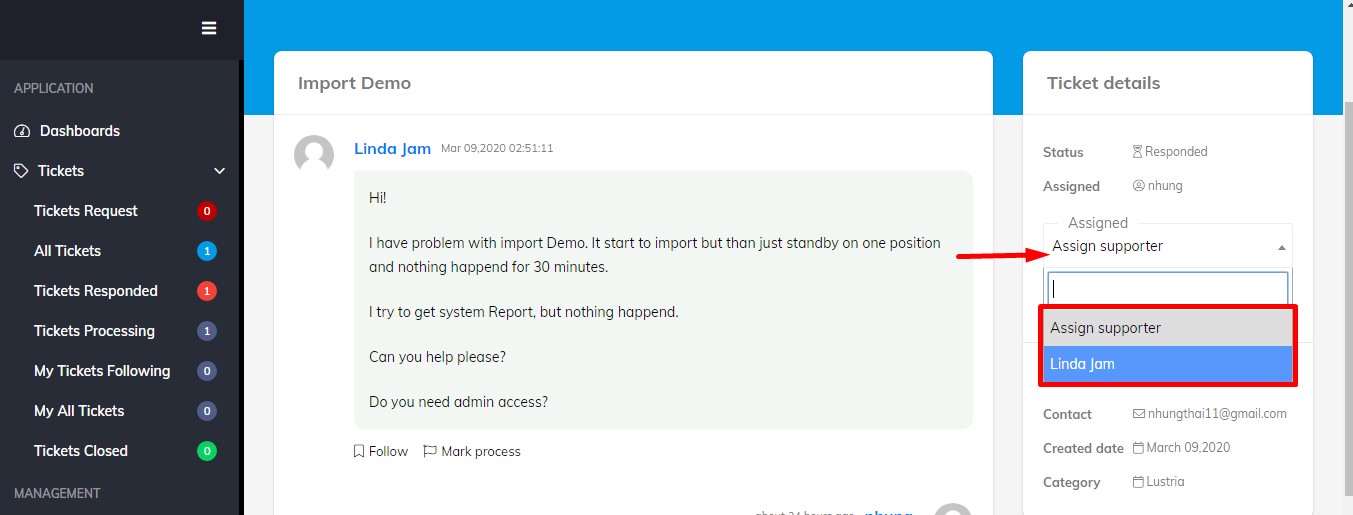
This is assignment of leader supporters.
DASHBOARD FOR ADMIN
Because admin is highest role so it has fully customize in the support system, you can view the tutorial about Dashboard for supporter
and Dashboard for leader
Beside, admin manage other parts in the support system such as: Categories, Mail Template, Rating report, Supporter report
Support Management
Video guide on How to manage customers and supporters+
Admin can manage, follow all supporters working on the support system by Support Management page. After admin click in Support Management tab, the listing about supporter names, email, close ticket, open ticket. Admin also view, delete or edit all profiles of supporters.
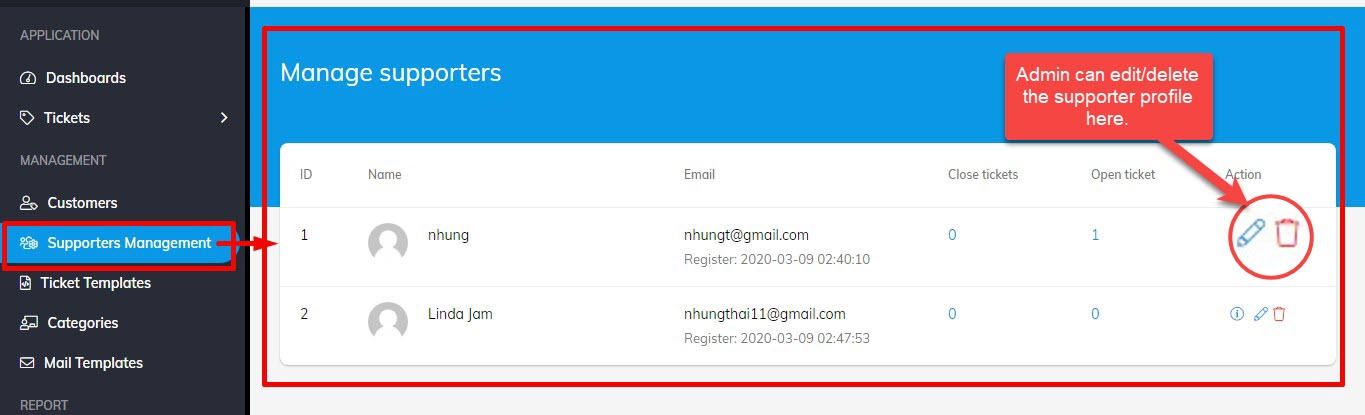
Support management from admin
Mail template
You can add branded colors and fonts with HTML editor. Also, you can upload your logo and bring the necessary changes to the content areas of your mail template.
Video guide on How to add or edit Mail template
Category Management
If admin create the new categories. Categories will display in the drop-down menu before customers want to create any ticket Submit a ticket
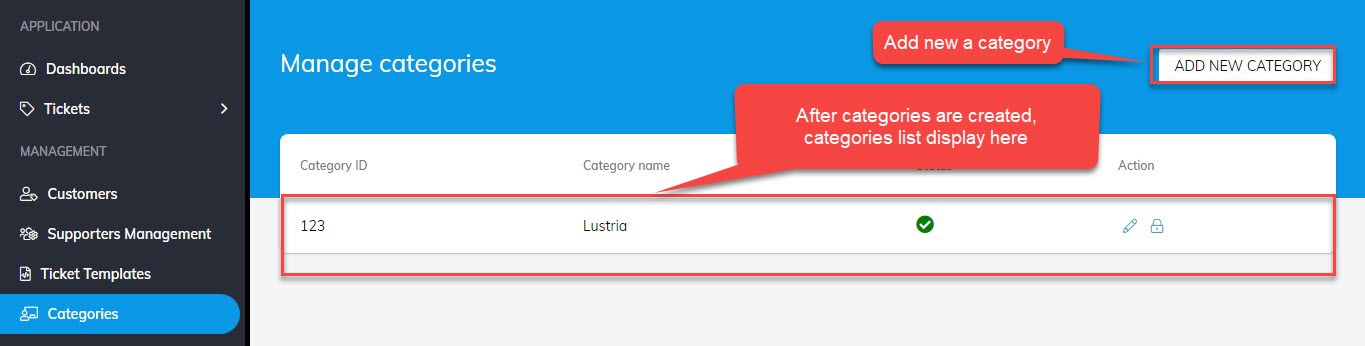 Categories management from admin
You can view this video to manage categories for admin.
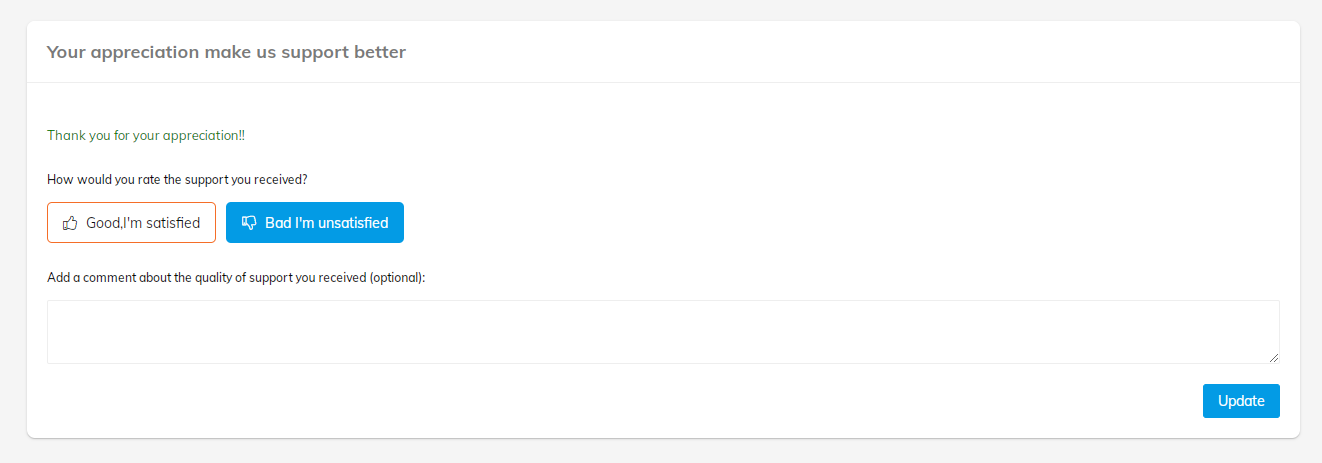
Rating Report
Customers can rate the satisfaction at the end of each employee's answer with just one click after their ticket is closer. So admin can evaluate the quality of supporting each supporter.
Admin can view detail content tickets includes: satified tickets, tickets unsatisfied, tickets has visited but not rating, other tickets in a time.
Hopefully this video can help you know How to view Rating and Supporter report for admin.
Video guide on How to view Rating and Supporter report for admin
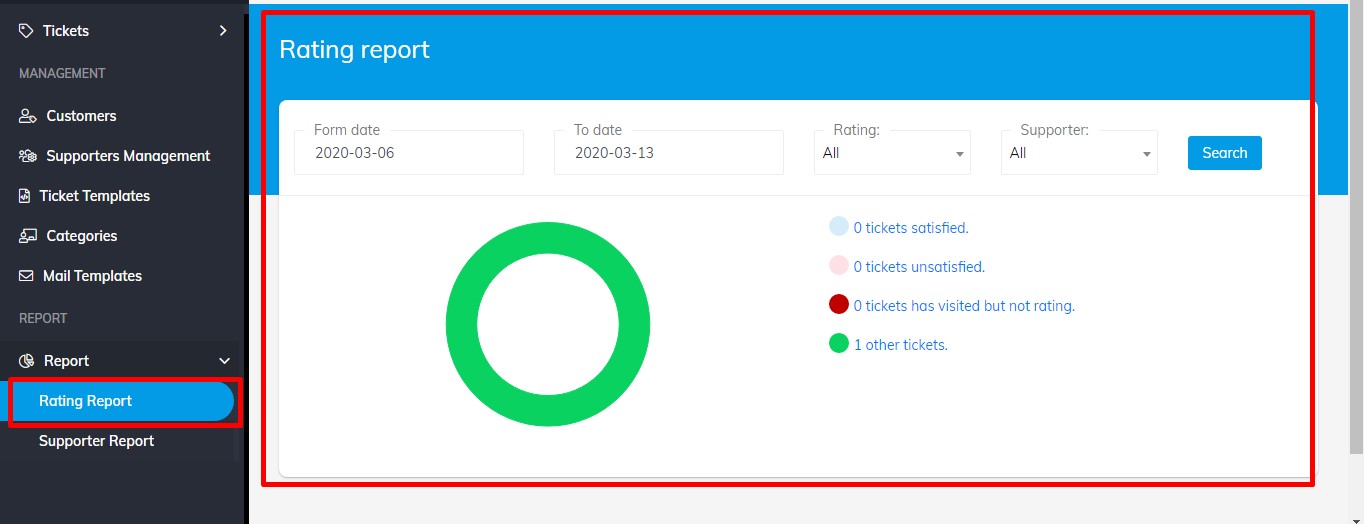
Rating report from admin
Supporter Report
Beside support quality, admin also manage the quantity of each supporter, leader supporters in the working time
Click in Supporter Report to view number tickets, number message of each supporter.
The system automatically statistics to evaluate the processing efficiency, the source of votes quickly and automatically.

Supporter report from admin
Ticket Options
Ticket system is the sysytem of receiving, distributing - processing - tracking - managing customer requests from multiple channels gathered into one relationship with outstanding efficiency.
The tickets have the following status:
- Ticket request: The ticket was opened but neither supporter responded.
- All tickets: All tickets are created
- Ticket responded: The relevant department has responded to the ticket of the Customer, need the Customer to check and respond.
- Ticket processing:The supporter has received the ticket and is processing it.
- My ticket following: Someone's ticket is being followed by supporter, leader supporter or admin. If any action is on the ticket, that follower can receive the notification on support site.
- My all tickets: all someone's tickets to the present.
- Ticket closed: The ticket has been processed or after 7 days (default) has not been returned, the ticket will be automatically closed. Then if Customer needs support, admin can open again the ticket. (You can set your closing time of tickets)
With customer role , the following status: Tickets request, All tickets, Tickets response, Tickets closed are displayed.
For more information about using the ticket customer, you can view this video:
Video guide on How to use ticket for Customer
With supporter, supporter leader, admin role , the all status are displayed:
For more information about using the ticket for Admin, Leader & Supporter, you can view this video:
Video guide on How to use ticket for Admin, Leader & Supporter
How does the ticket system work?
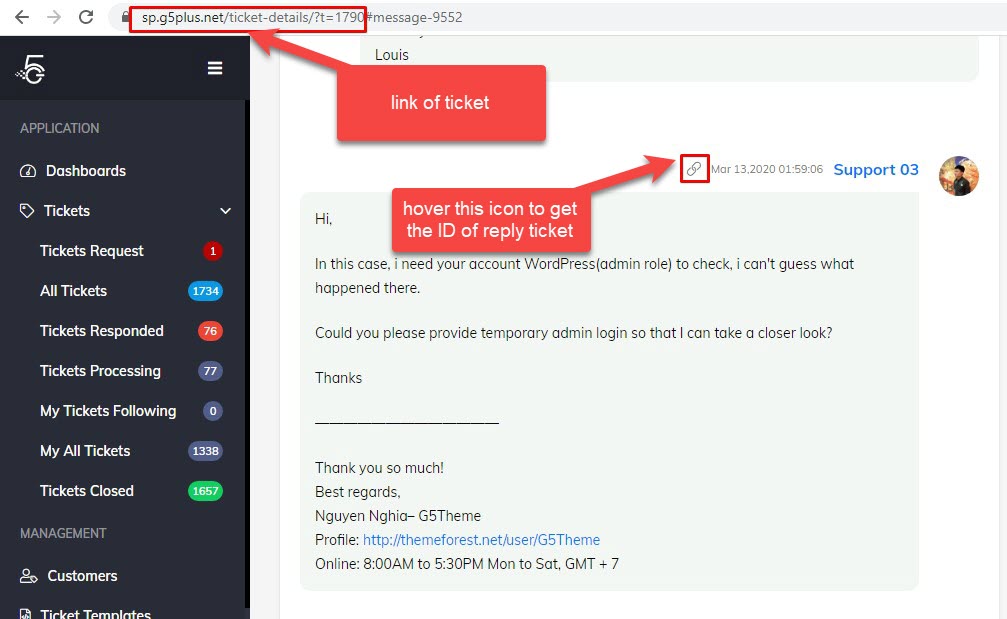
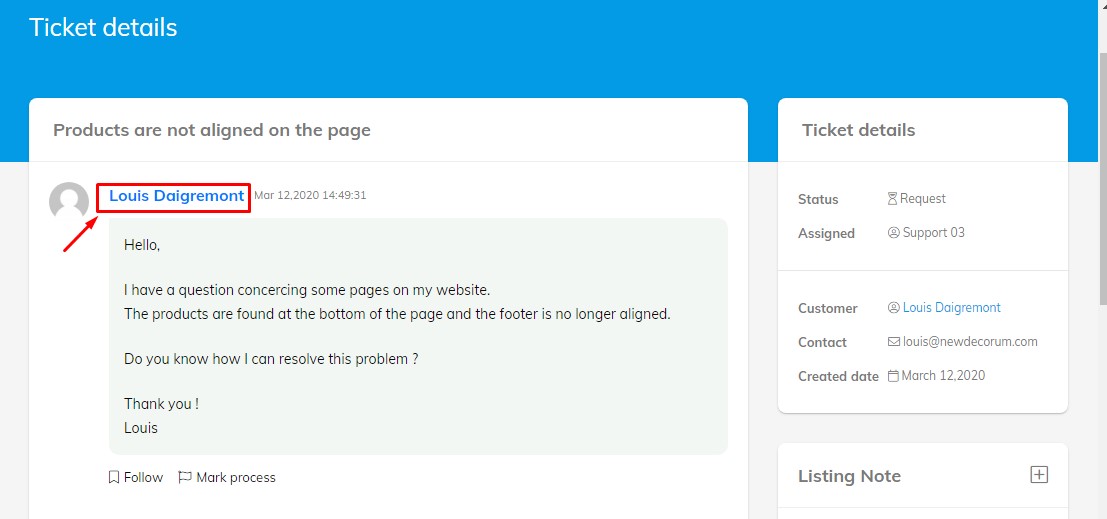
- The conversation between you and the customer on the same issue will be automatically arranged in a series of tickets together with a link with the ID ticket for easy tracking and management.
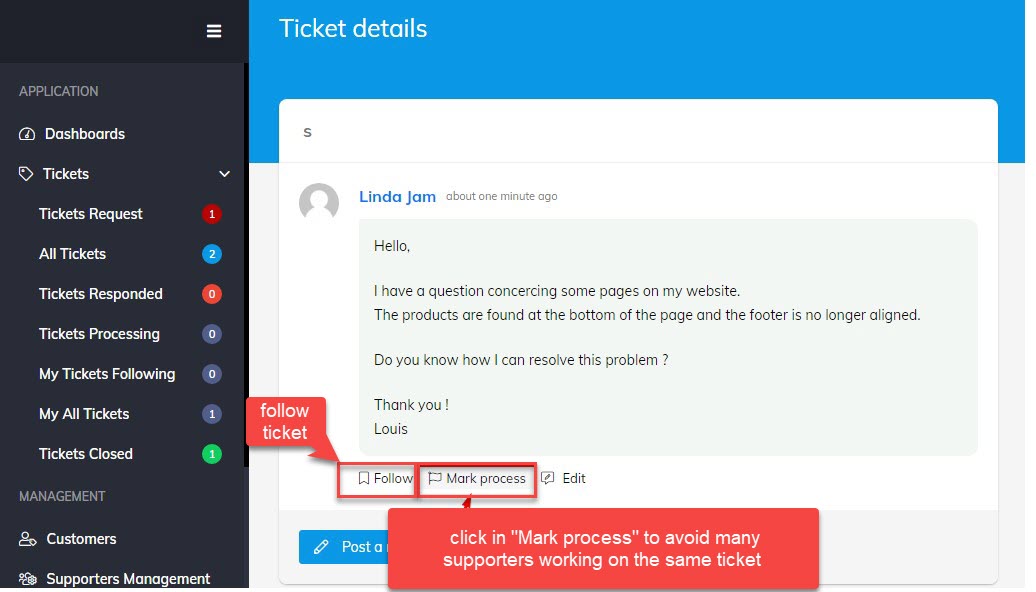
- Many related departments or staff can take turns to solve the same problem for guests easily without confusion (the system will help you track the process, assign specific responsibilities, monitor the finish by Mark process or Follow .
- Customers can rate the satisfaction at the end of each supporter's answer with just one click.
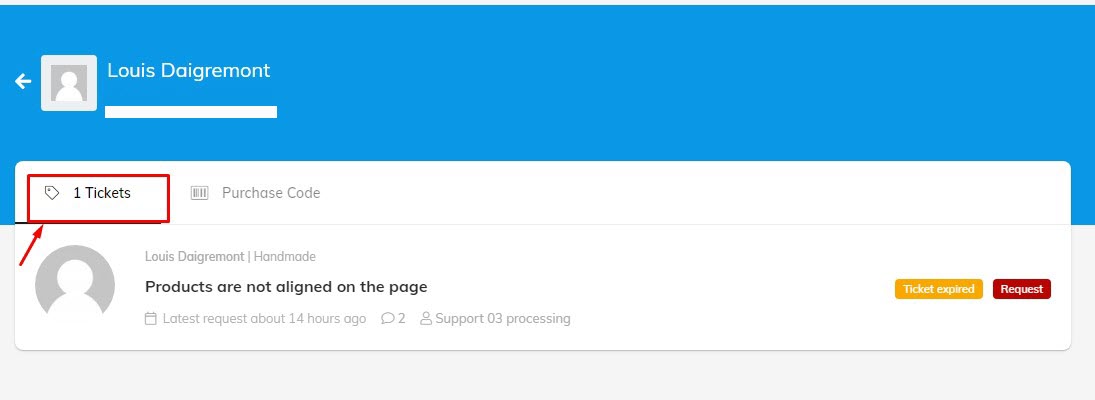
- When customers have new problems, they can create another Ticket, they can also track their own tikects conveniently by clicking in their username on the support system
- Those tickets that haven't responded for a long time will go to the top of the reply ticket list so that supporters can supporters can prioritize the necessary tickets
Thank you for using our plugin
We have prepared detailed user manual in order to ensure smooth and easy work with the System Ticket Support plugin. However, If you have any questions that are beyond the scope of this documentation or have any troubles configuring your website applications with the above settings you can contact . G5Them Support Team will be glad to assist you.
Please feel free to contact us via Support Forum on wordpress.org.
Thanks so much!
Troubleshooting
If you get any problem while downloading and installing, using Plugin. The Troubleshooting can help resolve the problem
We are updating soon!!!